
Version 1.3
February 2024
Version 1.3
February 2024
Revision History
|
Version |
Date |
Name |
Description |
|
0.1 |
|
|
First Draft |
|
0.2 |
04/17/2020 |
i3 Verticals, India Ops. |
Updated sections 1.4.2.2 through 1.4.2.11 and 1.4.3.4 |
|
0.3 |
08/14/2021 |
i3 Verticals, India Ops. |
Updated section 1.4.4.6 |
|
1.0 |
12/15/2023 |
i3 Verticals, India Ops. |
Updated
Section 1.4.7.2 |
|
1.1 |
01/16/2024 |
i3 Verticals, India Ops. |
Updated
Section 1.4.4.3 & 1.4.4.4 |
|
1.2 |
02/05/2024 |
i3 Verticals, India Ops. |
Added
section 1.4.5.8, 1.4.5.9 & updated section 1.4.7.2 |
|
1.3 |
05/29/2026 |
i3 Verticals, India Ops. |
updated
section 1.3.2.12.1.5, 1.3.2.15.1.2 & 1.3.2.15.2.5 |
Table of Contents
1.3.2.1.1 Annual Permit General Screen
1.3.2.1.2 Annual Permit Load & Dimensions Screen
1.3.2.1.3 Annual Permit Conditions Screen
1.3.2.1.4 Annual Permit Billing Screen
1.3.2.2 Annual - General Loads
1.3.2.2.1 Annual - General Loads General Screen - Internal
1.3.2.2.2 Annual - General Loads Load & Dimensions Screen - Internal
1.3.2.2.3 Annual - General Loads Conditions Screen - Internal
1.3.2.2.4 Annual - General Loads Verification Screen - Internal
1.3.2.2.5 Annual - General Loads Billing Screen - Internal
1.3.2.2.6 Annual - General Loads General Screen - External
1.3.2.2.7 Annual - General Loads Verification Screen - External
1.3.2.2.8 Annual - General Loads Billing Screen - External
1.3.2.3 Annual - Farm Equipment
1.3.2.3.1 Annual - Farm Equipment General Screen - Internal
1.3.2.3.2 Annual - Farm Equipment Load & Dimensions Screen - Internal
1.3.2.3.3 Annual - Farm Equipment Conditions Screen - Internal
1.3.2.3.4 Annual - Farm Equipment Verification Screen - Internal
1.3.2.3.5 Annual - Farm Equipment Billing Screen - Internal
1.3.2.3.6 Annual - Farm Equipment General Screen - External
1.3.2.3.7 Annual - Farm Equipment Verification Screen - External
1.3.2.3.8 Annual - Farm Equipment Billing Screen - External
1.3.2.4 Annual - Prefabricated Building
1.3.2.4.1 Annual - Prefabricated Building General Screen - Internal
1.3.2.4.2 Annual - Prefabricated Building Load & Dimensions Screen - Internal
1.3.2.4.3 Annual - Prefabricated Building Conditions Screen - Internal
1.3.2.4.4 Annual - Prefabricated Building Verification Screen - Internal
1.3.2.4.5 Annual - Prefabricated Building Billing Screen - Internal
1.3.2.4.6 Annual - Prefabricated Building General Screen - External
1.3.2.4.7 Annual - Prefabricated Building Verification Screen - External
1.3.2.4.8 Annual - Prefabricated Building Billing Screen - External
1.3.2.5 Annual - Self-Propelled Vehicles
1.3.2.5.1 Annual - Self-Propelled Vehicles General Screen - Internal
1.3.2.5.2 Annual - Self-Propelled Vehicles Load & Dimensions Screen - Internal
1.3.2.5.3 Annual - Self-Propelled Vehicles Conditions Screen - Internal
1.3.2.5.4 Annual - Self-Propelled Vehicles Verification Screen - Internal
1.3.2.5.5 Annual - Self-Propelled Vehicles Billing Screen - Internal
1.3.2.5.6 Annual - Self-Propelled Vehicles General Screen - External
1.3.2.5.7 Annual - Self-Propelled Vehicles Load and Dimension Screen - External
1.3.2.5.8 Annual - Self-Propelled Vehicles Verification Screen - External
1.3.2.5.9 Annual - Self-Propelled Vehicles Billing Screen - External
1.3.2.5.10 Annual - Self-Propelled Vehicles Web Processing Screen - External
1.3.2.6.1 Annual - Tow Trucks General Screen - Internal
1.3.2.6.2 Annual - Tow Trucks Load & Dimensions Screen - Internal
1.3.2.6.3 Annual - Tow Trucks Conditions Screen - Internal
1.3.2.6.4 Annual - Tow Trucks Verification Screen - Internal
1.3.2.6.5 Annual - Tow Trucks Billing Screen - Internal
1.3.2.6.6 Annual - Tow Trucks General Screen - External
1.3.2.6.7 Annual - Tow Trucks Verification Screen - External
1.3.2.6.8 Annual - Tow Trucks Billing Screen - External
1.3.2.7 Annual - Tree Length Logs
1.3.2.7.1 Annual - Tree Length Logs General Screen - Internal
1.3.2.7.2 Annual - Tree Length Logs Load & Dimensions Screen - Internal
1.3.2.7.3 Annual - Tree Length Logs Conditions Screen - Internal
1.3.2.7.4 Annual - Tree Length Logs Verification Screen - Internal
1.3.2.7.5 Annual - Tree Length Logs Billing Screen - Internal
1.3.2.7.6 Annual - Tree Length Logs General Screen - External
1.3.2.7.7 Annual - Tree Length Logs Verification Screen - External
1.3.2.7.8 Annual - Tree Length Logs Billing Screen - External
1.3.2.8 Annual - Utility Poles
1.3.2.8.1 Annual - Utility Poles General Screen - Internal
1.3.2.8.2 Annual - Utility Poles Load & Dimensions Screen - Internal
1.3.2.8.3 Annual - Utility Poles Conditions Screen - Internal
1.3.2.8.4 Annual - Utility Poles Verification Screen - Internal
1.3.2.8.5 Annual - Utility Poles Billing Screen - Internal
1.3.2.8.6 Annual - Utility Poles General Screen - External
1.3.2.8.7 Annual - Utility Poles Verification Screen - External
1.3.2.8.8 Annual - Utility Poles Billing Screen - External
1.3.2.9 Enhanced Annual - General Loads
1.3.2.9.1 Enhanced Annual - General Loads General Screen - Internal
1.3.2.9.2 Enhanced Annual - General Loads Load & Dimensions Screen - Internal
1.3.2.9.3 Enhanced Annual - General Loads Conditions Screen - Internal
1.3.2.9.4 Enhanced - General Loads Verification Screen - Internal
1.3.2.9.5 Enhanced Annual - General Loads Billing Screen - Internal
1.3.2.9.6 Enhanced Annual - General Loads General Screen - External
1.3.2.9.7 Enhanced Annual - General Loads Verification Screen - External
1.3.2.9.8 Enhanced Annual - General Loads Billing Screen - External
1.3.2.10 Enhanced Annual - Emergency Moves
1.3.2.10.1 Enhanced Annual - Emergency Moves General Screen - Internal
1.3.2.10.2 Enhanced Annual - Emergency Moves Load & Dimensions Screen - Internal
1.3.2.10.3 Enhanced Annual - Emergency Moves Conditions Screen - Internal
1.3.2.10.4 Enhanced Annual - Emergency Moves Verification Screen - Internal
1.3.2.10.5 Enhanced Annual - Emergency Moves Billing Screen - Internal
1.3.2.10.6 Enhanced Annual - Emergency Moves General Screen - External
1.3.2.10.7 Enhanced Annual - Emergency Moves Verification Screen - External
1.3.2.10.8 Enhanced Annual - Emergency Moves Billing Screen - External
1.3.2.10.9 Enhanced Annual - Emergency Moves Web Processing Screen - External
1.3.2.11 Enhanced Annual - Prefabricated Buildings
1.3.2.11.1 Enhanced Annual - Prefabricated Buildings General Screen - Internal
1.3.2.11.2 Enhanced Annual - Prefabricated Buildings Load & Dimensions Screen - Internal
1.3.2.11.3 Enhanced Annual - Prefabricated Buildings Condition Screen - Internal
1.3.2.11.4 Enhanced Annual - Prefabricated Buildings Verification Screen - Internal
1.3.2.11.5 Enhanced Annual - Prefabricated Buildings Billing Screen - Internal
1.3.2.11.6 Enhanced Annual - Prefabricated Buildings General Screen - External
1.3.2.11.7 Enhanced Annual - Prefabricated Buildings Verification Screen - External
1.3.2.11.8 Enhanced Annual - Prefabricated Buildings Billing Screen - External
1.3.2.12.1.1 Single Trip Permit General Screen
1.3.2.12.1.2 Single Trip Permit Load & Dimensions Screen
1.3.2.12.1.3 Single Trip Permit Routing Screen
1.3.2.12.1.4 Single Trip Permit Conditions Screen
1.3.2.12.1.5 Single Trip Permit Billing Screen
1.3.2.12.2 Single Trip Permit-General Loads-Annual Dimensions
1.3.2.12.2.3 Single Trip Permit - General Loads - Annual Dimensions - General Screen
1.3.2.12.2.4 Single Trip Permit - General Loads - Annual Dimensions - Load & Dimensions Screen
1.3.2.12.2.5 Single Trip Permit - General Loads - Annual Dimensions - Routing Screen
1.3.2.12.2.6 Single Trip Permit - General Loads - Annual Dimensions - Conditions Screen
1.3.2.12.2.7 Single Trip Permit - General Loads - Annual Dimensions - Verification Screen
1.3.2.12.2.8 Single Trip Permit - General Loads - Annual Dimensions - Billing Screen
1.3.2.12.3 Single Trip Permit - General Loads - Enhanced
1.3.2.12.3.1 Single Trip Permit - General Loads - Enhanced - Permit Search Screen - Internal
1.3.2.12.3.2 Single Trip Permit - General Loads - Enhanced - Permit Search Screen - External
1.3.2.12.3.3 Single Trip Permit - General Loads - Enhanced - General Screen
1.3.2.12.3.4 Single Trip Permit - General Loads - Enhanced - Load & Dimensions Screen
1.3.2.12.3.5 Single Trip Permit - General Loads - Enhanced - Routing Screen
1.3.2.12.3.6 Single Trip Permit - General Loads - Enhanced - Conditions Screen
1.3.2.12.3.7 Single Trip Permit - General Loads - Enhanced - Verification Screen
1.3.2.12.3.8 Single Trip Permit - General Loads - Enhanced - Billing Screen
1.3.2.13.1 Project Permit General Screen
1.3.2.13.2 Project Permit Load & Dimensions Screen
1.3.2.13.3 Project Permit Routing Screen
1.3.2.13.4 Project Permit Conditions Screen
1.3.2.13.5 Project Permit Billing Screen
1.3.2.14 Special Vehicle Configuration (SVC) Permit
1.3.2.14.1 Bus Mounted Bike Racks
1.3.2.14.1.1 Bus Mounted Bike Racks General Screen
1.3.2.14.1.2 Bus Mounted Bike Racks SVC Screen
1.3.2.14.1.3 Bus Mounted Bike Racks Conditions Screen
1.3.2.14.1.4 Bus Mounted Bike Racks Billing Screen
1.3.2.14.2.1 Car Carrier General Screen
1.3.2.14.2.2 Car Carrier SVC Screen
1.3.2.14.2.3 Car Carrier Conditions Screen
1.3.2.14.2.4 Car Carrier Billing Screen
1.3.2.14.3 Extended Permitting Dump Semi-Trailers
1.3.2.14.3.1 Extended Permitting Dump Semi-Trailers General Screen
1.3.2.14.3.2 Extended Permitting Dump Semi-Trailers SVC Screen
1.3.2.14.3.3 Extended Permitting Dump Semi-Trailers Conditions Screen
1.3.2.14.3.4 Extended Permitting Dump Semi-Trailers Billing Screen
1.3.2.14.4.1 Generic SVC General Screen
1.3.2.14.4.2 Generic SVC Screen
1.3.2.14.4.3 Generic SVC Conditions Screen
1.3.2.14.4.4 Generic SVC Billing Screen
1.3.2.14.5 Go Double Decker Bus
1.3.2.14.5.1 Go Double Decker Bus General Screen
1.3.2.14.5.2 Go Double Decker Bus SVC Screen
1.3.2.14.5.3 Go Double Decker Bus Conditions Screen
1.3.2.14.5.4 Go Double Decker Bus Billing Screen
1.3.2.14.6.1 Hamilton Steel General Screen
1.3.2.14.6.2 Hamilton Steel SVC Screen
1.3.2.14.6.3 Hamilton Steel Conditions Screen
1.3.2.14.6.4 Hamilton Steel Billing Screen
1.3.2.14.7 Long Combination Vehicle
1.3.2.14.7.1 Long Combination Vehicle General Screen
1.3.2.14.7.2 Long Combination Vehicle SVC Screen
1.3.2.14.7.3 Long Combination Vehicle Conditions Screen
1.3.2.14.7.4 Long Combination Vehicle Billing Screen
1.3.2.14.8.1 NOLTA General Screen
1.3.2.14.8.3 NOLTA Conditions Screen
1.3.2.14.8.4 NOLTA Billing Screen
1.3.2.14.9.1 Public Vehicle General Screen
1.3.2.14.9.2 Public Vehicle SVC Screen
1.3.2.14.9.3 Public Vehicle Conditions Screen
1.3.2.14.9.4 Public Vehicle Billing Screen
1.3.2.14.10 Tire Pressure Control System
1.3.2.14.10.1 Tire Pressure Control System General Screen
1.3.2.14.10.2 Tire Pressure Control System SVC Screen
1.3.2.14.10.3 Tire Pressure Control System Conditions Screen
1.3.2.14.10.4 Tire Pressure Control System Billing Screen
1.3.2.15.1 Disabled Vehicle Supplemental Towing
1.3.2.15.1.1 Disabled Vehicle Supplemental Towing General Screen
1.3.2.15.1.2 Disabled Vehicle Supplemental Towing Billing Screen
1.3.2.15.2.1 Single Trip Batch General Screen
1.3.2.15.2.2 Single Trip Batch Load & Dimensions Screen
1.3.2.15.2.3 Single Trip Batch Routing Screen
1.3.2.15.2.4 Single Trip Batch Conditions Screen
1.3.2.15.2.5 Single Trip Batch Billing Screen
1.3.3 Vehicle Configuration Evaluation (VCE) Request
1.3.3.1 Conventional Application
1.3.3.1.1 Conventional Application General Screen
1.3.3.1.2 Conventional Application Load & Dimensions Screen
1.3.3.1.3 Conventional Application Conditions Screen
1.3.3.1.4 Conventional Application Billing Screen
1.3.3.2 Mobile Crane Application
1.3.3.2.1 Mobile Crane Application General Screen
1.3.3.2.2 Mobile Crane Application Load & Dimensions Screen
1.3.3.2.3 Mobile Crane Application Conditions Screen
1.3.3.2.4 Mobile Crane Application Billing Screen
1.3.3.3 Road Building Machine Application
1.3.3.3.1 Road Building Machine Application General Screen
1.3.3.3.2 Road Building Machine Application Load & Dimensions Screen
1.3.3.3.3 Road Building Machine Application Conditions Screen
1.3.3.3.4 Road Building Machine Application Billing Screen
1.3.3.4.1 Self-Propelled VCE Application General Screen
1.3.3.4.2 Self-Propelled VCE Application Load & Dimensions Screen
1.3.3.4.3 Self-Propelled VCE Application Conditions Screen
1.3.3.4.4 Self-Propelled VCE Application Billing Screen
1.3.4.2.2 Validate Used Towing Certificates
1.3.4.2.3 Validate Used Single Trip Batch Certificates
1.3.4.3.1 O/O – ADMIN – Report
1.3.4.3.2 Escorted Loads by Type
1.3.4.3.3.1 Permit Issuance Summary Report
1.3.4.3.3.2 Permit Application Workflow Queue Details
1.3.4.3.4 Transactions Revenue
1.3.4.3.5 Permit Production and Revenue
1.3.4.3.5.1 Permit Production Details
1.3.4.3.5.2 Permit Production Summary
1.3.4.3.5.3 Permit Production Revenue Summary
1.3.4.5.3 Restriction Notification
1.3.4.5.5 Stale Dated Permit Applications
1.3.4.5.6 Upcoming Restriction Expiration Notification
1.3.4.8.1 Create MTO Common Corridor
1.3.4.8.2 Delete MTO Common Corridor
1.3.4.8.3 MTO Common Corridor Enquiry
1.3.4.9.1 Restriction Management
1.3.4.9.2 Temporary Restriction Report
1.3.5.1.1 Annual Permit Renewal
1.3.5.1.2 Project Permit Renewal
1.3.5.2.2 Single Trip Permit Amend
1.3.5.2.3 Project Permit Amend
1.3.5.4 Upload Used Towing Certificates
1.3.5.5 Upload Used Single Trip Batch Certificates
1.3.9.1 O/O – WEB PROC – Submit
O/O processing includes the following transactions:
|
Abbreviation |
Transaction Descriptions |
|
|
AAC |
New Account |
|
|
APR |
New Permit |
|
|
VCE |
New Request |
|
|
RWC |
Renewal |
|
|
CPT |
Amendment |
|
|
RPT |
Replacement |
|
|
HPT |
Hold |
|
|
CPT |
Cancellation |
|
·
A Common Client account on the Enterprise Level Mani Menu is required before an Oversized/Overweight (O/O) account (Section 1.2.1.1 New Client) can be created by an Authorized User. The Client Number and O/O Account Number are the same. Although information is shared with the International Registration Program (IRP) some of the information can be updated data at the O/O account level.
At the common level you must indicate the Commercial Vehicle Operator Registration (CVOR), National Security Certificate (NSC) number or Exemption Code and Legal Name.
Note: Mandatory fields are indicated by a red asterisk (*).
Select: Enterprise – Applications – O/O – Account – New Account
Authorized User must select APPLICATIONS tab from the Enterprise Level Main Menu.
The Authorized User must select O/O to access the Oversized/Overweight Account level.
·
Authorized
User Clicks on the ACCOUNT tab and then selects NEW ACCOUNT to display the Account
Search screen.
·
Enter
the Account Number or CVOR or NSC number or Exemption number or the Legal Name
in the corresponding field.
·
Select
PROCEED on the Command Line at the bottom of the screen.
o
If the
Common Client record does not exist based on the information entered, the
system will display a message that no client exists for this Account Number,
CVOR, NSC Number or Legal Name. The authorized user must go to Client tab on
the Enterprise Level Main Menu to create the Common Client.
o
If the
carrier has an existing O/O account, a message will display to notify the user
that an account already exists.
o
If a
carrier already exists as a Common Client but does not have a CVOR, NSC Number
or an Exemption Code, a message will display to notify the user that the Common
Client does not have a CVOR, NSC Number or an Exemption Code.
o
If a
carrier already exists as a Common Client but does not have an O/O account, the
Account Details Screen is displayed.
Note: Client information from the Common
Client is populated on the screen.
Next, the Authorized User will create the O/O account profile.

The Account Screen has numerous sections some of the fields populate from the Common Client information and the Authorized User can record the O/O account specific details.
· Customer Details - This screen displays the following information from the Common Client Enterprise level and cannot be updated by an Authorized User.
o
Account
No.
o
CVOR
o
Client
Status
o
NSC
Number
o
BN
o
Exemption
Code
· Business Customer Details - The following information is populated from the Common Client account and cannot be updated by an Authorized User
o Legal Name
o Contact Name
o Email
o Phone Number (No.)
o Extension (Ext.)
o Fax Number (No.)
o Cell Phone Number (No.)
o The Authorized User can update the following fields:
o Account Type from the drop-down list, if applicable,
§ Department of National Defence
§ Marine Emergence Section of Transport Canada
§ Ontario Provincial Government Ministries
o Courier Information
§ Courier Name
§ Courier Account Number (No.)
§ Courier Phone Number (No.)
§ Extension (Ext.), if applicable
o Select a Service Location where the permit will be printed and available for pick-up from the drop-down list, if applicable.
o NOTE: System defaults to St. Catharines
o Prepaid Threshold the System sends out an email to the carrier to inform them that their account has fallen below a pre-set level.
· Address Information - An Authorized User can update address Information at the account level.
o The Physical Address is populated from the Common Client and cannot be changed by the user.
o Authorized User must Select the Address Type from the drop-down list:
§ Primary Mailing – By default, it populates from the Common Client and can be changed by the authorized user.
§ Mailing 2- Enter the Mailing 2, if applicable.
§ Mailing 3- Enter the Mailing 3, if applicable.
o Or enter Postal Code and then Select Suggestions
§ Suggestions – This link will provide suggestions on a correct address for the Postal Code (Canadian addresses only) entered. If you click on the Suggestions link, the system will display a pop-up screen with a list of suggestions based on the entered postal code.

·
To
update the address on the screen from an address in the bullet list, the authorized
user should do the following:
o
Select
the Address using the radio button on the left side of the grid.
o
Enter
the Suite Number, if applicable – the acceptable range of Suite Numbers is
provided on the screen.
o
Enter
the Street number from the acceptable range of Street Numbers provided on the
screen.
o
Authorized
User must Select Update to save
changes to address on the main screen.
o
Select
Quit to return to the main screen
without updating the address.
o
If the
address comes back as invalid, Authorize User can select Override.
o
NOTE:
The Override Button only pertains to the address
· Authorized User must Select ADD to record the address information.
· To remove an address, Select the Address Type and then click Delete.
· Service Provider Information - The designated Service Provider will be able to perform certain transactions for the carrier via external web transactions. Service Providers must be assigned to the account. A maximum of 5 Service Providers can be assigned to each O/O account.
· Select Service Provider Client ID/Name from the drop-down list and then Select ADD to update information.
o If the incorrect Service Provider is assigned to the account, the Authorized User must highlight the Service Provider from the drop-down list and then Select Delete to update.
o Note: Service Providers are added to the system at the Enterprise level using the Client tab as New Service Provider all required fields must be entered and then Select Proceed to add to the drop-down list at the account level. Section 1.2.1.4 – Service Provider
· Contact Information has two mandatory fields identified by a red asterisk (*)
o *Contact Name is a mandatory field the Authorized User must enter contact information.
o The Business Phone No. and Ext. can be changed at the account level.
o Authorized User must record an *Email address.
o The Authorized User can enter a Cell Phone No.
o Enter the contact fax no., if provided.
o Select ADD to record information.
o If the contact information has been entered incorrectly the Authorized User must Select Delete to remove the contact details
· Documentation Requirements
· Certain documents are required for creation of a New Account. If an interface is available, the system will check for the required documents automatically via a system interface and mark the document as being System Collected.
Options for the documents include:
o Collected – means the document has been submitted and approved by issuer.
o Not Required – means the document is not required for this transaction.
o Outstanding – means the document has not been submitted and approved yet.
o System Collected - means the system has some interface that provides verification that the documentation requirement has been met.
· Authorized User must Select the appropriate status from the drop-down list for mandatory documents, if required
o National Safety Certificate
o Permit Application Form
o O/O Account Application Form
· Documentation Requirements
· The system provides a feature to scan documents into the system at this point.
o Click on the Scan Documents link beside the Document Collection Label and the scanning process will be opened to image the document, index it, and store it for future retrieval.
· O/O Account Details
o O/O Account Status defaults to Active and cannot be changed by the Authorized User.
o Authorized User selects language Preference from a drop-down list.
o If the Client provides an email address in the common client information the “Email Notification” indicator may be selected, and notices will be sent electronically indicating renewal is due etc.
o Enter the appropriate comment. These comments are displayed on the Account Enquiry Screen to internal users only.
§ Select the appropriate access level for the comment from the drop-down list:
· Internal – means only internal resources are authorized to view the comment.
· Public – means the internal and external users are authorized to view the comments.
· Restricted – means only the defined authorized roles can view the comment.
· Note: Access is defined by roles i.e. Administrator
§ Select ADD/Update Comment
· Click this box if the authorized user wants to be able to delete comments.
· Select PROCEED from the Command Line at the bottom to execute the edits and display the verification screen.
· The verification screen displays showing the user a consolidated view of the account information. If the user determines some of the information is incorrect, they can select BACK on the Command Line and the system will display the account screen again. The user can make the required changes and select PROCEED.
· Select PROCEED on the Command Line and the O/O account information will be saved to the database. The user will then be returned to O/O main menu screen.
· A [I] message informs the user that the Account has been generated successfully with Account Number (No.): account number
This section has the same options as creating a new account except in the Authorized User can update Account Status and Certified Cheque and Head office review.

· Customer Details - The following information is populated from the Common Client Enterprise Level or Account Level and cannot be updated by an Authorized User.
o Account Number (No.)
o CVOR
o Client Status
o NSC Number
o Business Number (BN)
o Exemption Code
· Business Customer Details - Some of the fields populate from the Common Client Information and O/O account details and cannot be updated by the Authorized User.
o Legal Name
o Contact Name
o Email
o Phone Number (No.)
o Extension (Ext.)
o Fax Number (No.)
o Cell Phone Number (No.)
· The Authorized User can update the following fields, if applicable.
o Account Type
§ Department of National Defence
§ Marine Emergency Section of Transport Canada
§ Ontario Provincial Government Ministries
o Courier Information
§ Courier Name
§ Courier Account Number (No.)
§ Courier Phone Number (No.)
§ Extension (Ext.)
o Service Location
o Prepaid Threshold
· Address Information - The Authorized User can update the address information in this section.
o Authorized User must select the Address Type from the drop-down menu and then record information and select ADD to update information.
§ Primary Mailing
§ Mailing 2
§ Mailing 3
o Or enter Postal Code and then select Suggestions.
o Service Provider Information (can add up to 5)
o Select service provider client ID/Name from the dropdown list.
o Select Add Delete, as required.
· Contact Information - The Authorized User can record additional contacts in this section or select the registered contact.
o *Contact Name –Enter contact information.
o Business Phone No. – Enter the contact business phone no.
o Ext.
o *Email – Enter the contact email address.
o Cell Phone No. – Enter the contact cell phone no.
o Fax No. - Enter the contact fax no.
o Select ADD to record new contact information.
o Click Select to update existing contact information.
o Select Update to record changes.
o If the contact information is incorrect the Authorized User must Select Delete to remove the contact details
·
Documentation
Requirements
o
Select
a status from the drop-down list or select Scan Documents to scan into the
system, if applicable
§ Collected – means the document has been submitted
and approved by issuer.
§ Not Required – means the document is not
required for this transaction.
§ Outstanding – means the document has not
been submitted and approved yet.
§ System Collected - means the system has
some interface that provides verification that the documentation requirement
has been met.
o
Click
on the Scan Documents link beside the Document Collection Label and the
scanning process will be opened to image the document, index it, and store it
for future retrieval.
· O/O Account Details - The Authorized User can update the following information as required.
o
O/O
Account Status
§ Active - means the carrier is in active status.
§ Inactive – means the carrier is in inactive
status and cannot perform permit transactions unless they are reinstated to
active status.
§ Suspended – means the carrier has been
suspended and cannot perform permit transaction until the suspension is lifted.
o
Authorized
User can select the Language Preference of English or French, if applicable.
o
For Email
Notification to be activated by the Authorized User an email address must be recorded
in the Common Client at the Enterprise level. In this way renewal notifications
will be electronically sent to the account email address.
o
If Head
Office Review Required is checked, the Authorized User must record a comment.
§ Note: When this is selected auto-issuance will be disabled and must be submitted to the head office for internal review.
§ If an Authorized User checks Certified Cheque the Certified Cheque Date must be indicated and a comment is required.
§ Note: The cheque date is the last day a certified check will be accepted to pay for this transaction. The system will set a default date that the Authorized User can override, if required.
· Comments
o For an Authorized User to record a comment the Select Add/Update Comment must be selected and indicate level of access
§ Internal – means only internal resources are authorized to view the comment.
§ Public – means the internal and external users are authorized to view the comments.
§ Restricted – means only the defined authorized roles can view the comment.
o
When the
Delete Allowed is Selected the comment can be deleted by another Authorized
Users
· Select PROCEED to execute the edits and display the verification screen.
· The verification screen displays showing the user a consolidated view of the account information. If the Authorized User determines some of the information is incorrect, they can select BACK on the Command Line and the system will display the account screen again. The user can make the required changes and select PROCEED.
· Select PROCEED on the Command Line and the O/O account information will be saved to the database and the user will be returned to the O/O main menu screen.
· Display Message informing the user that the Account has been updated successfully
The authorized user will select the Permit Type from the menu items. The Permit menu will have all permit types applicable to Ontario.
· Annual - Annual Permit
· Single Trip - Single Trip Permit
· Project - Project Permit
· SVC -
o Bus Mounted Bike Racks SVC
o Car Carrier SVC
o Extended Permitting Dump Semi-Trailers SVC
o Generic SVC
o Go Double Decker Bus SVC
o Hamilton Steel SVC
o Long Combination Vehicle SVC
o NOLTA SVC
o Public Vehicle SVC
o Tire Pressure Control System SVC
· Certificates
o Disabled Vehicle Supplemental Towing Certificates
o Single Trip Batch Certificates

The O/O Account Search screen is a common screen among all the permits and is used to begin all the permit transactions. The O/O Account Number will be pre-populated for the external users. The internal user will have to provide the O/O Account Number for the selected permit type.

· The Authorized User must enter the Account No. or Legal Name in the corresponding field.
· When PROCEED is selected on the Command Line at the bottom of the screen.
o
A
validation of the CVOR status will be performed if O/O Account Number was
created with a CVOR.
o
If the
Account Level status is suspended or inactive, then a message will display
telling the user to please contact the Oversize/Overweight Permit section.
o
Copy
From provides the ability to copy data from a previously submitted permit for
the purpose of using the data in a new application or request.
Note:
Only permits form the account can be copied.
·
Authorized
User can enter the Account Number (No.) and/or Legal Name and Select Copy From to get a list of available
permits items to select.
·
And
then, Select the permit to be copied.
·
If the
Permit Number (No.) is entered the Authorized User can Select Copy From on the
Command Line to update the permit information
Note:
The information up to the conditions screen for the applicable Permit Type will
be displayed.
Select: Enterprise – Applications – O/O – Permit – Annual - Annual Permit
The transaction will start with the Account search screen to search for the O/O account.

There are several sections on the general screen.
The following information is populated from the Common Client Enterprise Level or Account Level and cannot be updated by an Authorized User.
· O/O Account Details
o Account Number (No.)
o Legal Name
o Application Number (No.) they system will generate the unique number for tracking the application.
o CVOR
o Client Status
o NSC Number
o Exemption Code if the Common Client has an Exemption Code it is checked, if expired then Authorized User must enter a valid exemption code.
o Physical Address
· The Authorized User can update the following fields:
o Mailing Address by default, it populates from the Account Level and the authorized user can select any one from the drop-down list.
o Issued At the Authorized User can select from the drop-down list.
o Authorized User must select a contact name from drop down list.
· Permit Details - The following information is generated by the system and cannot be updated by an Authorized User.
o Permit Type
o Transaction Type
o Application Status- For a new permit, application status is not submitted status.
o Note: The status will be updated to submitted after completing all tabs
o Application Status Date the date will be changed when the application status is updated.
o Permit Number (No.) for a new permit, it is blank, and the user will get a permit number after credentials have been issued.
· Authorized User must update or enter the required information into the following fields.
o Number (No.) of Permits Required – the number of identical permits that will be produced with different permit numbers and will be used in fee calculations and printing.
o If Bilingual format is checked, credentials will be generated in both English and French
o Authorized User must select the Start Date of the permit.
o The End Date defaults to on year from the Start Date an Authorized User can amend the date, if required
o Farm Plated Vehicles- if it is checked, a comment must be entered.
o Authorized User can enter the appropriate comment and then select Add/Update Comment
o Note: These comments are displayed on the General Enquiry Screen to internal users only.
§ If a comment is entered the appropriate access level for the comment from the drop-down list:
· Internal – means only internal resources are authorized to view the comment.
· Public – means the internal and external users are authorized to view the comments.
· Restricted – means only the defined authorized roles can view the comment.
§ When the Delete Allowed is selected the comment can be deleted by another Authorized Users
· Authorized User must Select PROCEED to execute the edits and display the verification screen.
· Command Line functions:
o Proceed – means the system will take the user to the next logical step required for the transaction.
o Refresh – means the system will return the screen to the original content when the user entered the screen for the first time.
o Quit – means the user is finished working on this transaction for the time being and the transaction is available for completion by any authorized user at a late time using the “work in progress” feature.
o Cancel – means the user has decided to discard all activity on this transaction as if they had never started it. The transaction log will show the transaction activity.
o Help – means the help screen will be provided for the current screen and the user may scan the help file for assistance.
· To return to an alternate screen while processing a transaction the user can select the appropriate tab along the top of the current screen and the system will asynchronously display the corresponding screen for processing by the user. After finishing reviewing and/or making changes to the screen the user can select the “Proceed” button to return to the screen they came from General.
· The verification screen displays showing the user a consolidated view of the general information. If the user determines some of the information is incorrect, they can select BACK on the Command Line and the system will display the general screen again. The user can make the required changes and select PROCEED.
· Select PROCEED on the Command Line and general information will be saved to the database. The Load and Dimensions Screen displays. For an SVC Permit, there will be no load & dimension screen. There will be either an SVC screen or a conditions screen as per configuration.
The next screen for the Annual Permit application collects information specific to the permit pertaining to the load and dimensions. This screen will include all the details required for all load categories.

There are several sections on the Load & Dimensions Screen.
The following fields are populated from the Common Client or Account Level, or System generated, and the Authorized User cannot change them.
· O/O Account Details
o Account No.
o Legal Name
o Application No.
o CVOR
o NSC Number
o Exemption Code
· Permit Details - The following fields are populated from the Common Client or Account Level, or System generated, and the Authorized User cannot change them.
o Transaction Type
o Permit Number (No.) is blank, it is system generated when credentials are issued.
· Load Details - A list on load details is required. The authorized user can add multiple load details with the Same Load Category.
o The Authorized User must select a Load Category from the drop-down list.
o Note: A valid Ministry Issued Configuration Number (VCE) can be entered if Mobile Cranes and Road Building Machines (RBM) are selected in Load Category.
o A list is populated for the Subcategory that an Authorized User can select from the drop-down list.
o The Authorized User can select any Load Type from the drop-down list.
o The Authorized User from the drop-down list selects equipment Type.
o By default, the permit configuration is populated based on the permit configuration.
·
The
Authorized User should review the information in the following fields and
update if required and then select ADD to record details.
o Overall Width (m) -
§ Highway Traffic Act
§ Two Lane (m)
§ Multi-Lane (m)
o Overall Length (m) only one of the following two are required:
§ Highway Traffic Act
§ Length (m)
o Overall, Height (m) only one of the following two are required:
§ Highway Traffic Act
§ Height (m)
o Overall, Weight (kg) one of the three options must be selected.
§ Highway Traffic Act
§ Standard Annual
§ Special Weights
· The Authorizing the Movement of section populates based on combinations from permit configuration.
o Note: To delete a selection, select the “x” in this section.
· Select Add to additional Load details – select the “X” to delete.
· The Authorizing in the Movement of along with dimensions will be populated above Axle Description.
· If a valid Vehicle Configuration Evaluation (VCE) is provided the Authorized User enters it in the Ministry Issued Configuration Number field to populate all details of VCE in the Axle Description table.
· When a Mobile Crane, Road Building Machine (RBM) or Other Permit is being applied for, additional vehicle information is required:
o Make
o Model Number (No.).
o Serial Number (No.)
o Unit Number (No.)
o Number (No.) of Vehicle Axles (Excl. Dolly Axles), if applicable
o Number (No.) of Boom Dolly Axles, if applicable.
o Rear Overhang (if Exceeds 4.65 m) measured from the center of the rearmost Axles (m), if applicable.
o Axle Description - If an authorized user checks Special Weights from the Load Details section, then an Axle Description is required. The Authorized User can add a maximum of 2 Load details that have Special Weights. If VCE has been entered, the fields will auto populate.
· If the Authorized User enters a Ministry Issued Configuration Number is checked, if valid the system will populate the axle information.
·
Weight
Type – Normal or Exceptional, if applicable
·
Authorized
User can update the following fields.
o
Total
Number of Axles
o
Number
of Axles (Power Units)
o
Equipment
Type select from the drop-down menu.
o
Number
of Tires per Axle
o
Manufacturer
Rated Axle Capacity (kg)
o
Tire
Width (mm)
o
Tire
Rating (kg)
o
Requested
Weight per Axle
§ Normal Load
§ Reduced Load
o
Inter-axle
Spacing (m)
· The Authorized User can use the following options in the table.
o
Repeat
– means the information entered for one of the parameters will be repeated for
all parameters.
o
Draw –
means the system will make a scale drawing of the tractor and trailer with axle
spacings.
o
Clear –
means the system will clear the parameters for subsequent entry of the required
field values.
· When the Authorized User selects the Bridge Formula a pop-up window will display the report.
· If The Authorized User can enter a comment the appropriate access level for the comment must be assigned from the drop-down list:
o If a comment is entered the appropriate access level for the comment from the drop-down list:
§ Internal – means only internal resources are authorized to view the comment.
§ Public – means the internal and external users are authorized to view the comments.
§ Restricted – means only the defined authorized roles can view the comment.
o When the Delete Allowed is selected the comment can be deleted by another Authorized Users
· Select PROCEED to execute the edits and display the verification screen.
· The verification screen displays showing the user a consolidated view of the load and dimensions information. If the user determines some of the information is incorrect, they can select BACK on the Command Line and the system will display the Load and Dimensions Screen again. The user can make the required changes and select PROCEED.
· Select PROCEED on the Command Line and the load and dimensions information will be saved to the database. The conditions screen displays.
· Command Line functions:
o Proceed – means the system will take the user to the next logical step required for the transaction.
o Refresh – means the system will return the screen to the original content when the user entered the screen for the first time.
o Quit – means the user is finished working on this transaction for the time being and the transaction is available for completion by any authorized user at a late time using the “work in progress” feature.
o Cancel – means the user has decided to discard all activity on this transaction as if they had never started it. The transaction log will show the transaction activity.
o Help – means the help screen will be provided for the current screen and the user may scan the help file for assistance.
· To return to an alternate screen while processing a transaction the user can select the appropriate tab along the top of the current screen and the system will asynchronously display the corresponding screen for processing by the user. After finishing reviewing and/or making changes to the screen the user can select the “Proceed” button to return to the screen they came from General.
The Authorized User can add conditions based on the permit type.

There are several sections on the Conditions Screen.
The following fields are populated from the Common Client or Account Level, or System generated, and the Authorized User cannot change them.
O/O Account Details
Account No.
Legal Name
Application No.
CVOR
NSC Number
Exemption Code
Permit Details
· Transaction Type
· Permit Number (No.) is blank, it is system generated when credentials are issued.
Conditions
· The Authorized User can select Condition Category from the drop-down list, if applicable. Conditions will populate based on the conditions category:
o All
o Standard
o Tow Trucks
o General
o Farm Permits
o Utility Poles
o Mobile Cranes
o Rail Emergency
o Pre-Manufactured Buildings
o Tree Length Logs
o Road Building Machines
· If applicable, Standard conditions are populated by default and cannot be changed by the Authorized User.
· Sequence Number (No.)
· Select
· Conditions Category populated as per configuration.
§ The Conditions are displayed in both English and French as per configuration Notes populated as per configuration.
Non-Standard
The Authorized User can check non-standard conditions if applicable.
o Sequence Number (No.) is populated as per configuration and cannot be changed by the user.
o The authorized user can select the Condition if applicable.
o Conditions Category populated as per configuration and cannot be changed by the user.
o The Conditions are displayed in both English and French as per configuration.
o Notes populated as per configuration and cannot be changed by the user.
Additional Conditions
The Authorized User can check or add additional conditions if applicable.
· Sequence No. - By default, populated as per configuration and cannot be changed by the user.
· To Add a Condition the Authorized User must select the green “+” sign to open a table to enter Condition details
· Authorized User must enter the Condition details in the Condition English field
· If Bilingual format has been selected the details must also be entered in French in the Condition French table
· To remove the Condition the Authorized User must select the red “x” to delete the entry
Select PROCEED to execute the edits and display the verification screen.
The verification screen displays showing the user a consolidated view of the conditions information. If the user determines some of the information is incorrect, they can select BACK on the Command Line and the system will display the conditions screen again. The user can make the required changes and select PROCEED.
Select PROCEED on the Command Line and the conditions information will be saved to the database. The billing Screen displays.
There are several sections on the Billing Screen.
The following fields are populated from the Common Client or Account Level, or System generated, and the Authorized User cannot change them.
O/O Account Details
Account No.
Legal Name
Application No.
CVOR
NSC Number
Exemption Code
Billing Details
· Transaction Type
· Permit Number (No.) is blank, it is system generated when credentials are issued.
· Billing Date
· Transaction Type
· Transaction Status has been updated to OPEN
o
Fees Section
By default, the following are populated from the enterprise screen and cannot be changed by the user.
· Prepaid Balance
· Stored Credit Balance
· Manual Adjustment Amount – Only an Authorized User can complete adjustment based on business rules
· Fee Table displays the following application details
o Fee Type
o Number (No.) of Permits Required
o Fee Amount
o Waive – Only an Authorized User can select based on eligibility criteria
Documentation
Requirements – this section allows user to scan, and upload required documents.
There are the following three radio buttons available:
·
Scan
now – allows to scan and upload documents at once
·
Scan
Later – allows to schedule document scan and submission for a later time
·
No
Scan Required – select this option if no documents are required to be uploaded
Certain documents are required for the creation of a New Permit. If the system can check for the document automatically via a system interface, it will mark the document as being System Collected.
· If documents are required based on the permit type, the document name will be displayed in the Documentation Requirements Section drop down list
· The Authorized User must select the document name; then click the Add link and the document name will be displayed in a list just below the drop down.
· Authorized User can select the appropriate status for that document from the Status drop down list.
o Collected – means the document has been submitted and approved by issuer.
o Not Required – means the document is not required for this transaction.
o Outstanding – means the document has not been submitted and approved yet.
o System Collected - means the system has some interface that provides verification that the documentation requirement has been met.
Attachment Upload
Documents that Authorized User will upload to attach to the permit
o Browse - Select a PDF file from the Browse link.
o Upload - Uploads a PDF file if required.
· Authorized User can select the PDF files from the Browse link
· To attach the selected file the Authorized User must click Upload to attach the file, if applicable
Delivery Details
The Authorized User must indicate the delivery method for the permit.
· Select the Delivery Method from the drop-down list
o Courier
§ If selected the Authorized User must enter the details of the Courier the Name, Account Number (No.) and Courier Phone Number (No.)
o Mailed
o Pick Up
§ If selected the Authorized User must select the pickup location
o Authorized Users must print annual permits, so the only Electronic Delivery Channel is print
o Authorized User can enter the appropriate comment that will be viewed on the Account Enquiry Screen by internal users only.
o The Authorized User must select the appropriate access level for the comment from the drop-down list:
o If a comment is entered the appropriate access level for the comment from the drop-down list:
§ Internal – means only internal resources are authorized to view the comment.
§ Public – means the internal and external users are authorized to view the comments.
§ Restricted – means only the defined authorized roles can view the
comment.
o When the Delete Allowed is selected the comment can be deleted by another Authorized Users
Command Line functions:
§ Proceed – means the system will take the user to the next logical step required for the transaction
§ Refresh – means the system will return the screen to the original content when the user entered the screen for the first time
§ Quit – means the user is finished working on this transaction for the time being and the transaction is available for completion by any authorized user at a late time using the “work in progress” feature.
§ Cancel – means the user has decided to discard all activity on this transaction as if they had never started it. The transaction log will show the transaction activity.
§ Help – means the help screen will be provided for the current screen and the user may scan the help file for assistance.
Select PROCEED to execute the edits and auto issuance criteria. If the auto issuance criteria fail, the application will be submitted to the workflow for review. Once the application has been approved by the authorized user and on “Done” click from the application approval details screen, the system will come back to the billing screen.
Select PROCEED on the Command Line; the billing information will be saved to the database and continue to the validation screen. From the billing validation screen, the authorized user can generate the invoice.
Note: Once the application has been invoiced the only way for an Authorized User to move through screens using the tabs is by selecting Cancel Bill.
Command Line functions:
Proceed – Means the systme will proceed to the next logical step in processing the transaction
Add to Cart – means the system will save the invoice information to a cart for future payment along with any other items placed in the cart as a result of subsequent transaction processing
Cancel Bill – means the invoice/bill that was calculated will be cancelled and the transaction will no longer be in “Invoiced” status and will be placed in an “Open” status”
Refresh – means the system will return the screen to the original content when the user entered the screen for the first time
Quit – means the user is finished working on this transaction for the time being and the transaction is available for completion by any authorized user at a late time using the “work in progress” feature.
Invoice – Means the system display the invoice
Draft Permit – means the system will provide a Draft Permit for verification by the user. No permit number is assigned at this point.
Help - means the system will provide a help screen for the current screen and the user can view the help information and scan the help file as required.
Payment Detail Screen – see 1.4.4.6-payment, p 131
Select: Enterprise – Applications – O/O – Permit – Annual - Annual - General Loads. The system displays the search screen as shown below:

Enter the Account Number and click Proceed.

For details on the General screen, refer to section 1.4.2.1.1.
The Previous Number of Permits Purchased will
populate the number of expiring permits for a 3-month duration starting from
the previous month until the end of next month.
Once the details on the General screen have been entered and verified, click Proceed from the command line to navigate to Load & Dimensions screen.


The fields on this screen will populate automatically. For information on Load & Dimensions screen, refer to section 1.4.2.1.2. Click Proceed from the command line to go to Conditions screen.


Refer to section 1.4.2.1.3 for details on Conditions screen. Click Proceed from the command line to view the verification screen.

Click Proceed from the verification screen to navigate to Billing.


Refer to section 1.4.2.1.4 for details on Billing screen. Click Proceed from billing screen to complete payment. For Payment Detail screen, refer section 1.4.4.6-payment.
External User
Select O/O from Applications - Permit - Annual - Annual-General Loads.
Search Screen

Proceeding from the search screen displays the General details screen.
On this screen, the details will prepopulate on Physical Address, Mailing Address and Contacts sections.

On the Permit Details section, the No. of Permits Required and Start
Date fields will be prefilled but are enabled for edits. The
Previous Number of Permits Purchased will populate the number of expiring
permits for a 3-month duration starting from the previous month until the end
of next month.
Once the details are entered as desired, click Proceed to navigate to Verification screen.

After proceeding from Verification screen, the Billing screen will display.
On the Billing screen, the Fees section will display the calculated fees. Enter your email address in the Delivery section and click the Add button corresponding the Email field.
Upload the required documents on the documentation requirements section. Refer to section 1.4.2.1.4 for more details on Billing screen.
Now click Proceed from the command line to go to the Web Processing screen. For additional Details on Web Processing see section 1.4.9
Select: Enterprise – Applications – O/O – Permit – Annual - Annual - Farm Equipment. The system displays the search screen as shown below:

Enter the Account Number and click Proceed.

All the details are auto populated on this screen. The
Previous Number of Permits Purchased will populate the number of expiring
permits for a 3-month duration starting from the previous month until the end
of next month.
If the Farm Plated Vehicles checkbox is checked, the corresponding Power Unit Farm License Plate No. field will enable. Checking this checkbox also waives off the fees charged otherwise.
For more details on the General screen, refer to section 1.4.2.1.1.
Once the details on the General screen have been entered and verified, click Proceed from the command line to navigate to Load & Dimensions screen.


The fields on this screen will populate automatically. For information on Load & Dimensions screen, refer to section 1.4.2.1.2. Click Proceed from the command line to go to Conditions screen.


Refer to section 1.4.2.1.3 for details on Conditions screen. Click Proceed from the command line to view the verification screen.

Click Proceed from the verification screen to navigate to Billing.


Refer to section 1.4.2.1.4 for details on Billing screen. Click Proceed from billing screen to complete payment. For Payment Detail screen, refer section 1.4.4.6-payment.
External User
Select O/O from Applications - Permit - Annual - Annual-Farm Equipment.
Search Screen

Proceeding from the search screen displays the General details screen.
On this screen, the details will prepopulate on Physical Address, Mailing Address and Contacts sections.

On the Permit Details section, the No. of Permits Required and Start Date fields will be prefilled but are enabled for edits.
If the Farm Plated Vehicles checkbox is checked, the corresponding Power Unit Farm License Plate No. field will enable. Checking this checkbox also waives off the fees charged otherwise.
The Previous Number of Permits Purchased will
populate the number of expiring permits for a 3-month duration starting from
the previous month until the end of next month.
Once the details are entered as desired, click Proceed to navigate to Verification screen.

After proceeding from Verification screen, the Billing screen will display.

On the Billing screen, the Fees section will display the calculated fees. In this scenario, the fees have been waived off as Farm Plated Vehicle checkbox was selected at the General level.
Enter your email address in the Delivery section and click the Add button corresponding the Email field.
Now click Proceed from the command line to go to the Web Processing screen. For additional Details on Web Processing see section 1.4.9
Select: Enterprise – Applications – O/O – Permit – Annual - Annual - Prefabricated Building. The system displays the search screen as shown below:

Enter the Account Number and click Proceed.

For details on the General screen, refer to section 1.4.2.1.1. The
Previous Number of Permits Purchased will populate the number of expiring
permits for a 3-month duration starting from the previous month until the end
of next month.
Once the details on the General screen have been entered and verified, click Proceed from the command line to navigate to Load & Dimensions screen.


The fields on this screen will populate automatically. For information on Load & Dimensions screen, refer to section 1.4.2.1.2. Click Proceed from the command line to go to Conditions screen.


Refer to section 1.4.2.1.3 for details on Conditions screen. Click Proceed from the command line to view the verification screen.

Click Proceed from the verification screen to navigate to Billing.


Refer to section 1.4.2.1.4 for details on Billing screen. Click Proceed from billing screen to complete payment. For Payment Detail screen, refer section 1.4.4.6-payment.
External User
Select O/O from Applications - Permit - Annual - Annual-Prefabricated Building.
Search Screen

Proceeding from the search screen displays the General details screen.
On this screen, the details will prepopulate on Physical Address, Mailing Address and Contacts sections.

On the Permit Details section, the No. of Permits Required and Start
Date fields will be prefilled but are enabled for edits. The
Previous Number of Permits Purchased will populate the number of expiring
permits for a 3-month duration starting from the previous month until the end
of next month.
Once the details are entered as desired, click Proceed to navigate to Verification screen.

After proceeding from Verification screen, the Billing screen will display.

On the Billing screen, the Fees section will display the calculated fees. Enter your email address in the Delivery section and click the Add button corresponding the Email field.
Now click Proceed from the command line to go to the Web Processing screen. For additional Details on Web Processing see section 1.4.9
Refer to section 1.4.4.6 for details on Payment, p 131.
Select: Enterprise – Applications – O/O – Permit – Annual - Annual - Self-Propelled Vehicles. The system displays the search screen as shown below:

Enter the Account Number and click Proceed.

For details on the General screen, refer to section 1.4.2.1.1. Once the details on the General screen have been entered and verified, click Proceed from the command line to navigate to Load & Dimensions screen.


On this screen, enter the following mandatory load details:
· Load Category – will default to Self-Propelled and cannot be changed
· Sub Category – select one of the following values from drop down:
o Concrete Pump
o Drill Rig
o Loader
o Mobile Crane with Boom Dolly
o Mobile Cranes
o Other
· Ministry Issued Configuration Number – this is a mandatory field and user must enter a valid VCE number. Click on Find button corresponding this field to validate the entered VCE number.
o Once the VCE number is validated, the Overall Width, Length, Make, Model No., VIN, No. of Vehicle Axles, and the Axle Description grid will auto populate.
· Click Add from the bottom of the Load Details section to add details to the record
For details on Load & Dimensions screen, refer to section 1.4.2.1.2. Once the Load & Dimensions details are entered, click Proceed from the bottom to go to Conditions screen.


Refer to section 1.4.2.1.3 for details on Conditions screen. Click Proceed from the command line to view the verification screen.

Click Proceed from the verification screen to navigate to Billing.


Refer to section 1.4.2.1.4 for details on Billing screen. Click Proceed from billing screen to complete payment. For Payment Detail screen, refer section 1.4.4.6-payment.
External User
Select O/O from Applications - Permit - Annual - Annual-Self-Propelled Vehicles.
Search Screen

Proceeding from the search screen displays the General details screen.
On this screen, the details will prepopulate on Physical Address, Mailing Address and Contacts sections.

On the Permit Details section, the No. of Permits Required field will be prefilled and protected. However, user can modify the Start Date as required. Once the details are entered as desired, click Proceed to navigate to Load & Dimensions screen.


On the Load & Dimensions screen, the user must enter one load detail at the minimum.
To enter the load details, perform the following steps:
· Load Category – will be defaulted to Self-Propelled and cannot be changed
· Sub Category – select one of the following values from the drop down:
o Concrete Pump
o Drill Rig
o Loader
o Mobile Crane with Boom Dolly
o Mobile Cranes
o Other
· Ministry Issued Configuration Number – this is a mandatory field and user must enter a valid VCE number
o Click Find button next to this field to validate the entered VCE number. If the entered VCE number is valid, the system auto populates the Overall Width, Length, Make, Model No., VIN/Serial No., No. of Vehicle Axles.
· Click on Add from the bottom of the Load Details section
· Details in the Axle Description table will also auto populate based on the Ministry Issued Configuration Number entered
Click Proceed from the command line to navigate to the Verification screen

After proceeding from Verification screen, the Billing screen will display.

On the Billing screen, the Fees section will display the calculated fees. Enter your email address in the Delivery section and click the Add button corresponding the Email field.
Now click Proceed from the command line to go to the Web Processing screen.

On the Web Processing screen, the user must:
· Click Browse to select the required file and click on Upload button
· Add the comment to the Comment box and click on Add/Update Comment button to save the comment
· Once the document is uploaded and comment is entered, click Submit from the command line to process the application request for an internal review.
The system then displays a success message the top.

Select: Enterprise – Applications – O/O – Permit – Annual - Annual - Tow Trucks. The system displays the search screen as shown below:

Enter the Account Number and click Proceed.

For details on the General screen, refer to section 1.4.2.1.1. The Previous Number of Permits Purchased will populate the number of expiring permits for a 3-month duration starting from the previous month until the end of next month.
Once the details on the General screen have been entered and verified, click Proceed from the command line to navigate to Load & Dimensions screen.


The fields on this screen will populate automatically. For information on Load & Dimensions screen, refer to section 1.4.2.1.2. Click Proceed from the command line to go to Conditions screen.


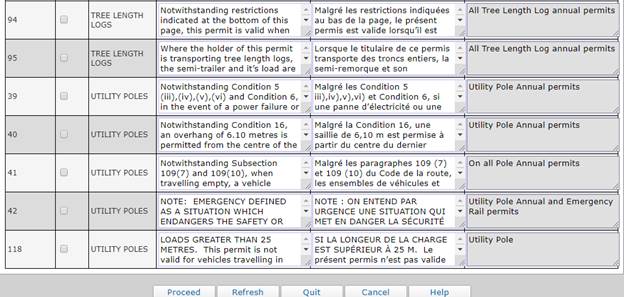
Refer to section 1.4.2.1.3 for details on Conditions screen. Click Proceed from the command line to view the verification screen.

Click Proceed from the verification screen to navigate to Billing.


Refer to section 1.4.2.1.4 for details on Billing screen. Click Proceed from billing screen to complete payment. For Payment Detail screen, refer section 1.4.4.6-payment.
External User
Select O/O from Applications - Permit - Annual - Annual-Tow Trucks.
Search Screen

Proceeding from the search screen displays the General details screen.
On this screen, the details will prepopulate on Physical Address, Mailing Address and Contacts sections.

On the Permit Details section, the No. of Permits Required and Start Date fields will be prefilled but are enabled for edits. The Previous Number of Permits Purchased will populate the number of expiring permits for a 3-month duration starting from the previous month until the end of next month.
Once the details are entered as desired, click Proceed to navigate to Verification screen.

After proceeding from Verification screen, the Billing screen will display.

On the Billing screen, the Fees section will display the calculated fees. Enter your email address in the Delivery section and click the Add button corresponding the Email field.
Now click Proceed from the command line to go to the Web Processing screen. For additional Details on Web Processing see section 1.4.9
Refer to section 1.4.4.6 for details on Payment, p 131.
Select: Enterprise – Applications – O/O – Permit – Annual - Annual - Tree Length Logs. The system displays the search screen as shown below:

Enter the Account Number and click Proceed.

For details on the General screen, refer to section 1.4.2.1.1. The Previous Number of Permits Purchased will populate the number of expiring permits for a 3-month duration starting from the previous month until the end of next month.
Once the details on the General screen have been entered and verified, click Proceed from the command line to navigate to Load & Dimensions screen.



The fields on this screen will populate automatically. For information on Load & Dimensions screen, refer to section 1.4.2.1.2. Click Proceed from the command line to go to Conditions screen.


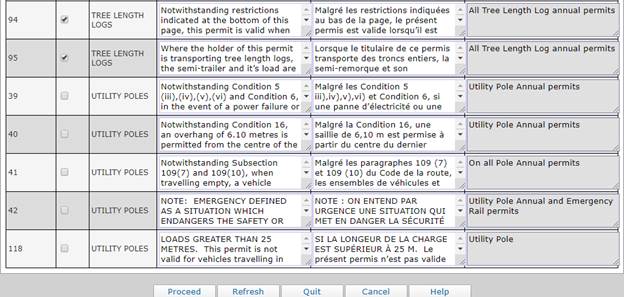
Refer to section 1.4.2.1.3 for details on Conditions screen. Click Proceed from the command line to view the verification screen.

Click Proceed from the verification screen to navigate to Billing.


Refer to section 1.4.2.1.4 for details on Billing screen. Click Proceed from billing screen to complete payment. For Payment Detail screen, refer section 1.4.4.6-payment.
External User
Select O/O from Applications - Permit - Annual - Annual-Tree Length Logs.
Search Screen
 Proceeding from the search screen displays the General details
screen.
Proceeding from the search screen displays the General details
screen.
On this screen, the details will prepopulate on Physical Address, Mailing Address and Contacts sections.

On the Permit Details section, the No. of Permits Required and Start Date fields will be prefilled but are enabled for edits. The Previous Number of Permits Purchased will populate the number of expiring permits for a 3-month duration starting from the previous month until the end of next month.
Once the details are entered as desired, click Proceed to navigate to Verification screen.

After proceeding from Verification screen, the Billing screen will display.

On the Billing screen, the Fees section will display the calculated fees. Enter your email address in the Delivery section and click the Add button corresponding the Email field.
Now click Proceed from the command line to go to the Web Processing screen. For additional Details on Web Processing see section 1.4.9
Refer to section 1.4.4.6 for details on Payment, p 131.
Select: Enterprise – Applications – O/O – Permit – Annual - Annual –Utility Poles. The system displays the search screen as shown below:

Enter the Account Number and click Proceed.

For details on the General screen, refer to section 1.4.2.1.1. The Previous Number of Permits Purchased will populate the number of expiring permits for a 3-month duration starting from the previous month until the end of next month.
Once the details on the General screen have been entered and verified, click Proceed from the command line to navigate to Load & Dimensions screen.



The fields on this screen will populate automatically. For information on Load & Dimensions screen, refer to section 1.4.2.1.2. Click Proceed from the command line to go to Conditions screen.


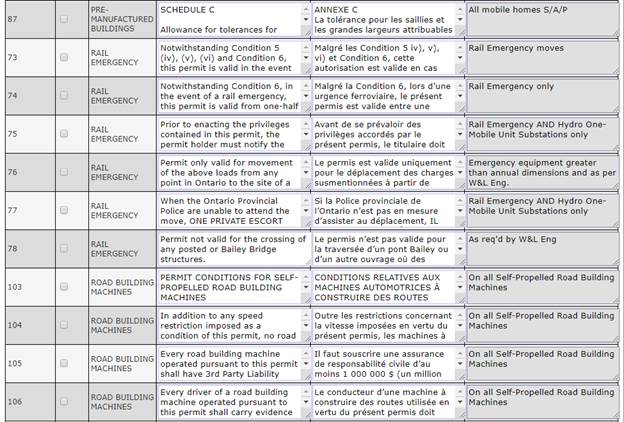


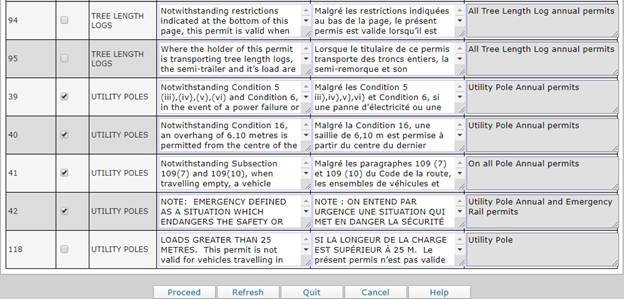
Refer to section 1.4.2.1.3 for details on Conditions screen. Click Proceed from the command line to view the verification screen.

Click Proceed from the verification screen to navigate to Billing.


Refer to section 1.4.2.1.4 for details on Billing screen. Click Proceed from billing screen to complete payment. For Payment Detail screen, refer section 1.4.4.6-payment.
External User
Select O/O from Applications - Permit - Annual - Annual-Utility Poles.
Search Screen

Proceeding from the search screen displays the General details screen.
On this screen, the details will prepopulate on Physical Address, Mailing Address and Contacts sections.

On the Permit Details section, the No. of Permits Required and Start Date fields will be prefilled but are enabled for edits. The Previous Number of Permits Purchased will populate the number of expiring permits for a 3-month duration starting from the previous month until the end of next month.
Once the details are entered as desired, click Proceed to navigate to Verification screen.

After proceeding from Verification screen, the Billing screen will display.

On the Billing screen, the Fees section will display the calculated fees. Enter your email address in the Delivery section and click the Add button corresponding the Email field.
Now click Proceed from the command line to go to the Web Processing screen. For additional Details on Web Processing see section 1.4.9
Select: Enterprise – Applications – O/O – Permit – Annual - Enhanced Annual - General Loads. The system displays the search screen as shown below:

Enter the Account Number and click Proceed.

For details on the General screen, refer to section 1.4.2.1.1. The Previous Number of Permits Purchased will populate the number of expiring permits for a 3-month duration starting from the previous month until the end of next month.
Once the details on the General screen have been entered and verified, click Proceed from the command line to navigate to Load & Dimensions screen.


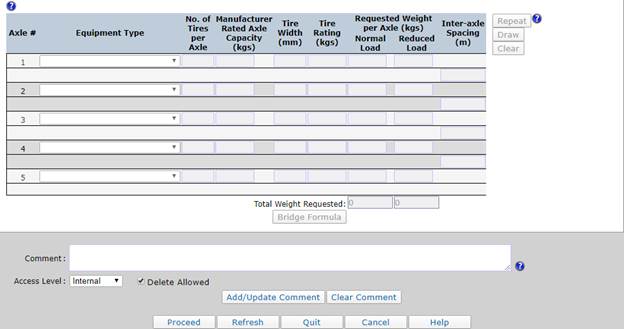
The fields on this screen will populate automatically. For information on Load & Dimensions screen, refer to section 1.4.2.1.2. Click Proceed from the command line to go to Conditions screen.


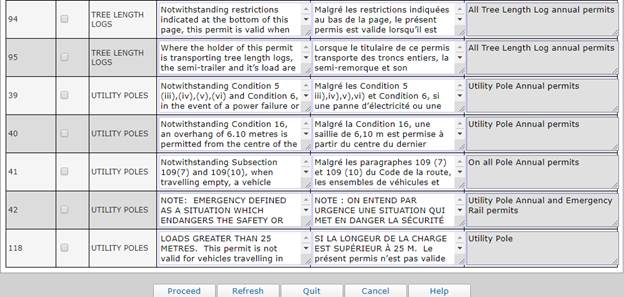
Refer to section 1.4.2.1.3 for details on Conditions screen. Click Proceed from the command line to view the verification screen.

Click Proceed from the verification screen to navigate to Billing.


Refer to section 1.4.2.1.4 for details on Billing screen. Click Proceed from billing screen to complete payment. For Payment Detail screen, refer section 1.4.4.6-payment.
External User
Select O/O from Applications - Permit - Annual - Enhanced Annual-General Loads.
Search Screen

Proceeding from the search screen displays the General details screen.
On this screen, the details will prepopulate on Physical Address, Mailing Address and Contacts sections.

On the Permit Details section, the No. of Permits Required and Start Date fields will be prefilled but are enabled for edits. The Previous Number of Permits Purchased will populate the number of expiring permits for a 3-month duration starting from the previous month until the end of next month.
Once the details are entered as desired, click Proceed to navigate to Verification screen.

After proceeding from Verification screen, the Billing screen will display.

On the Billing screen, the Fees section will display the calculated fees. Enter your email address in the Delivery section and click the Add button corresponding the Email field.
Now click Proceed from the command line to go to the Web Processing screen. For additional Details on Web Processing see section 1.4.9
Refer to section 1.4.4.6 for details on Payment, p 131.
Select: Enterprise – Applications – O/O – Permit – Annual - Enhanced Annual - Emergency Moves. The system displays the search screen as shown below:

Enter the Account Number and click Proceed.

For details on the General screen, refer to section 1.4.2.1.1. The Previous Number of Permits Purchased will populate the number of expiring permits for a 3-month duration starting from the previous month until the end of next month.
Once the details on the General screen have been entered and verified, click Proceed from the command line to navigate to Load & Dimensions screen.


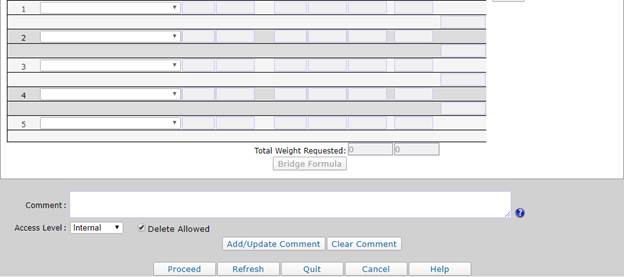
The fields on this screen will populate automatically. For information on Load & Dimensions screen, refer to section 1.4.2.1.2. Click Proceed from the command line to go to Conditions screen.


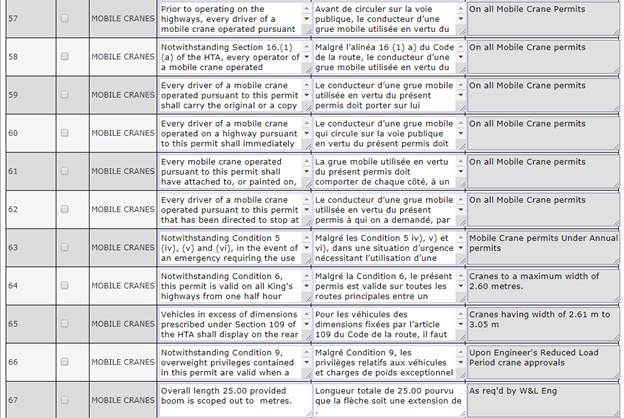


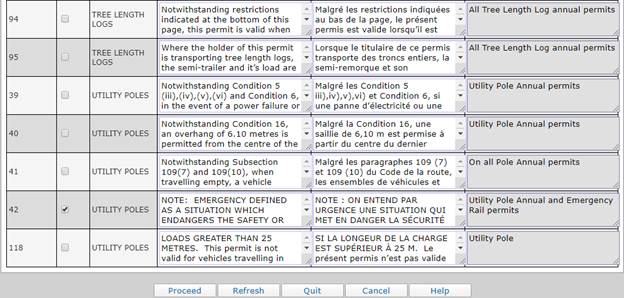
Refer to section 1.4.2.1.3 for details on Conditions screen. Click Proceed from the command line to view the verification screen.

Click Proceed from the verification screen to navigate to Billing.


Refer to section 1.4.2.1.4 for details on Billing screen. Click Proceed from billing screen to complete payment. For Payment Detail screen, refer section 1.4.4.6-payment.
External User
Select O/O from Applications - Permit - Annual - Enhanced Annual-Emergency Moves.
Search Screen

Proceeding from the search screen displays the General details screen.
On this screen, the details will prepopulate on Physical Address, Mailing Address and Contacts sections.

On the Permit Details section, the No. of Permits Required and Start Date fields will be prefilled but are enabled for edits. The Previous Number of Permits Purchased will populate the number of expiring permits for a 3-month duration starting from the previous month until the end of next month.
Once the details are entered as desired, click Proceed to navigate to Verification screen.

After proceeding from Verification screen, the Billing screen will display.

On the Billing screen, the Fees section will display the calculated fees. Enter your email address in the Delivery section and click the Add button corresponding the Email field.
Now click Proceed from the command line to go to the Web Processing screen.

On the Web Processing screen, the user must:
· Click Browse to select the required file and click on Upload button
· Add the comment to the Comment box and click on Add/Update Comment button to save the comment
· Once the document is uploaded and comment is entered, click Submit from the command line to process the application request for an internal review.
The system then redirects to the Billing screen to complete the payment.

The Billing screen displays the permit details, fees and documents uploaded. Verify the details and click Proceed to add the transaction to the cart.
Refer to section 1.4.4.6 for details on Payment, p 131.
Select: Enterprise – Applications – O/O – Permit – Annual - Enhanced Annual –Prefabricated Buildings. The system displays the search screen as shown below:

Enter the Account Number and click Proceed.

For details on the General screen, refer to section 1.4.2.1.1. The Previous Number of Permits Purchased will populate the number of expiring permits for a 3-month duration starting from the previous month until the end of next month.
Once the details on the General screen have been entered and verified, click Proceed from the command line to navigate to Load & Dimensions screen.

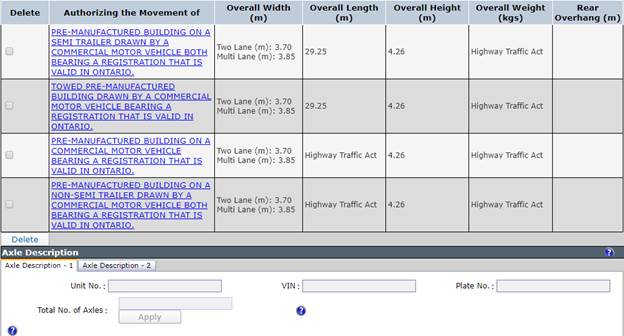
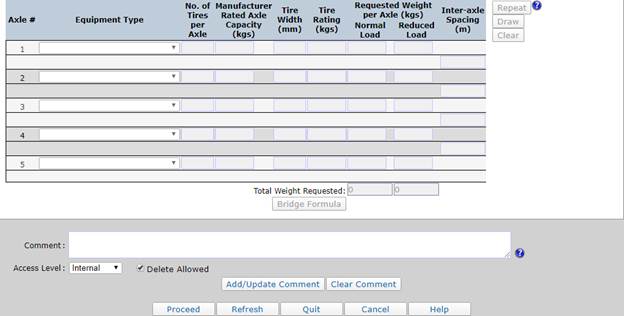
The fields on this screen will populate automatically. For information on Load & Dimensions screen, refer to section 1.4.2.1.2. Click Proceed from the command line to go to Conditions screen.


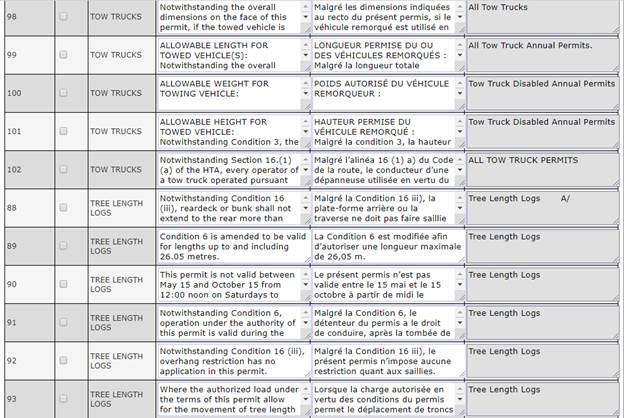
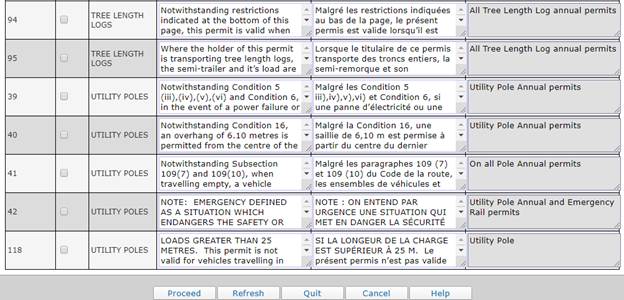
Refer to section 1.4.2.1.3 for details on Conditions screen. Click Proceed from the command line to view the verification screen.

Click Proceed from the verification screen to navigate to Billing.


Refer to section 1.4.2.1.4 for details on Billing screen. Click Proceed from billing screen to complete payment. For Payment Detail screen, refer section 1.4.4.6-payment.
External User
Select O/O from Applications - Permit - Annual - Enhanced Annual-Prefabricated Buildings.
Search Screen

Proceeding from the search screen displays the General details screen. The Previous Number of Permits Purchased will populate the number of expiring permits for a 3-month duration starting from the previous month until the end of next month.
On this screen, the details will prepopulate on Physical Address, Mailing Address and Contacts sections.

On the Permit Details section, the No. of Permits Required and Start Date fields will be prefilled but are enabled for edits. Once the details are entered as desired, click Proceed to navigate to Verification screen.

After proceeding from Verification screen, the Billing screen will display.

On the Billing screen, the Fees section will display the calculated fees. Enter your email address in the Delivery section and click the Add button corresponding the Email field.
Now click Proceed from the command line to go to the Web Processing screen. For additional Details on Web Processing see section 1.4.9
Select:
Enterprise – Application – O/O – Permit - Single Trip - Single Trip Permit
For external users the O/O Account number will be pre-populated. Internal Users will have to provide the O/O Account Number (No.), Legal Name or Permit Number (No.) in the corresponding field to process a permit application.
When PROCEED is selected on the Command Line at the bottom of the screen.
· A validation of the CVOR status will be performed if O/O Account Number was created with a CVOR.
· If the Account Level status is suspended or inactive, then a message will display telling the user to please contact the Oversize/Overweight Permit section.
Copy From provides the ability to copy data from a previously submitted permit for the purpose of using the data in a new application or request.
Note: Only permits form the account can be copied.
· Authorized User can enter the Account Number (No.) and/or Legal Name and Select Copy From to get a list of available permits items to select
· And then, Select the permit to be copied
· If the Permit Number (No.) is entered the Authorized User can Select Copy From on the Command Line to update the permit information
Note: The information up to the conditions screen for the applicable Permit Type will be displayed.
The general screen is the
first screen for the single trip permit.
There are several sections on the general screen. To get the details for
the other fields of the general process please refer to Section 1.4.2.1.1 or for
online users, click here
The following information is populated from the Common Client Enterprise Level or Account Level and cannot be updated by an Authorized User.
O/O Account Details
· Account Number (No.)
· Legal Name
· Application Number (No.) they system will generate the unique number for tracking the application
· CVOR
· Client Status
· NSC Number
· Exemption Code if the Common Client has an Exemption Code it is checked, if expired then Authorized User must enter a valid exemption code
· Physical Address
The Authorized User can update the following fields
· Mailing Address by default, it populates from the Account Level and the authorized user can select any one from the drop-down list.
· Issued At the Authorized User can select from the drop-down list.
· Authorized User must Select a contact name from drop down list
Permit Details
The following information is generated by the system and cannot be updated by an Authorized User.
· Permit Type
· Transaction Type
· Application Status - For a new permit, application status is not submitted status.
Note: The status will be updated to submitted after completing all tabs
· Application Status Date the date will be changed when the application status is updated
· Permit Number (No.) for a new permit, it is blank, and the user will get a permit number after credentials have been issued
Authorized User must update or enter the required information into the following fields.
· Number (No.) of Permits Required – the number of identical permits that will be produced with different permit numbers and will be used in fee calculations and printing.
· If Bilingual format is checked, credentials will be generated in both English and French
· Authorized User must select the Start Date of the permit
· Authorized User must select the End Date of the permit.
· Farm Plated Vehicles- if it is checked, a comment must be entered
· Check if the Weekend Travel Requested box if the permit will travel over the weekend
· Authorized User can enter the appropriate comment and then select Add/Update Comment
· If a comment is entered the appropriate access level for the comment from the drop-down list:
o Internal – means only internal resources are authorized to view the comment.
o Public – means the internal and external users are authorized to view the comments.
o Restricted – means only the defined authorized roles can view the
comment.
· When the Delete Allowed is Selected the comment can be deleted by another Authorized Users
Authorized User must Select PROCEED to execute the edits and display the verification screen.
Command Line functions:
Proceed – means the system will take the user to the next logical step required for the transaction
Refresh – means the system will return the screen to the original content when the user entered the screen for the first time
Quit – means the user is finished working on this transaction for the time being and the transaction is available for completion by any authorized user at a late time using the “work in progress” feature.
Cancel – means the user has decided to discard all activity on this transaction as if they had never started it. The transaction log will show the transaction activity.
Help – means the help screen will be provided for the current screen and the user may scan the help file for assistance.
To return to an alternate screen while processing a transaction the user can select the appropriate tab along the top of the current screen and the system will asynchronously display the corresponding screen for processing by the user. After fijnishing rfeviewing and/or making changes to the screen the user can select the “Proceed” button to return to the screen they came from General.
The verification screen displays showing the user a consolidated view of the general information. If the user determines some of the information is incorrect, they can select BACK on the Command Line and the system will display the general screen again. The user can make the required changes and select PROCEED.
Select PROCEED on the Command Line and general information will be saved to the database. The Load and Dimensions Screen displays.
The next screen for the single trip permit application collects information specific to the permit pertaining to the load and dimensions. This screen will include all the details required for all load categories.

There are several sections on the Load & Dimensions Screen.
The following fields are populated from the Common Client or Account Level, or System generated, and the Authorized User cannot change them.
O/O Account Details
Account No.
Legal Name
Application No.
CVOR
NSC Number
Exemption Code
Permit Details
The following fields are populated from the Common Client or Account Level, or System generated, and the Authorized User cannot change them.
· Transaction Type
· Permit Number (No.) is blank, it is system generated when credentials are issued.
Load Details
The Authorized User must record the load details being requested for the permit(s)
· Select a Load Description
o Tow
o Carry
o Operate
· The Load Type must be selected from the drop-down menu that is populated based on the selected Load
Note: When the Load Type of Other is selected the Authorized User must record a description in the field labelled Other
· If operate is Selected, the following vehicle information is required:
o Make
o Model No. (Number)
o Serial No. (Number)
· Authorized User must indicate if the load is destined for scrap.
· Record the number of item(s) for selected Load Type, if applicable.
· If a Ministry Issued Configuration Number is not provided the Authorized User must enter the number and then select Find to the populate load details.
Dimension Details
The Authorized User must enter the dimensions details of the load within a valid range, as required
o Vehicle (Power Unit) Length (m)
o Trailer Width (m)
o Trailer Length (m)
o Manufacturer’s Rated Capacity of Trailer (kg)
o Load Length (m)
o Load Width (m)
o Load Height (m)
o Load Weight (kg)
o Overall Combined Length (m)
o Overall Width (m)
o Overall Height (m)
o Rear Overhang (If Exceeds 4.65 m)
· Authorized User must indicate if the Gross Weight is within or exceeds HTA weights
· The Authorized User must enter the Bill of Lading Number, if applicable.
Axle Description
If the authorized user selects Exceeds HTA, the Axle description or Ministry Issued Configuration Number, is required.
o Authorized User can enter a valid Ministry Issued Configuration Number to populate the axle information
o If a Ministry Issued Configuration Number is not providing the Authorized User must complete the Axle Description table.
§ Select the Equipment Type from the drop-down screen
§ Enter the Number of Tires per Axles
§ Enter the Manufacturer Rated Axle Capacity (kg)
§ Enter the Tire Width (mm)
§ Enter the Tire Rating (kg)
§ Enter Requested Weight per Axle (kg)
§ Enter Inter-Axle Spacing (m)
The Authorized User can use the following options in the table
o Repeat – means the information entered for one of the parameters will be repeated for all parameters
o Draw – means the system will make a scale drawing of the tractor and trailer with axle spacing’s
o Clear – means the system will clear the parameters for subsequent entry of the required field values
· Bridge Formula- pop up window
Registered Gross Vehicle Weight
Authorized Users must record the Registered Gross Vehicle Weight.
For Ontario Carriers registered in Ontario the Registered Gross Vehicle Weight (RGVW) should be recorded, if applicable.
If the Carrier is registered in another jurisdiction (Out of Province Carriers) the Registered Gross Vehicle Weight should be blank the following information is required.
§ Indicated if Ontario is a registered jurisdiction on the IRP apportioned cab card
§ If yes, record the Registered Gross Vehicle Weight (RGVW) for Ontario
§ If not, record the Registered Gross Vehicle Weight (RGVW) of the power unit in the registered jurisdiction
§ Comment - Enter the appropriate comment.
§ Access Level - Select the appropriate access level for the comment from the dropdown list:
· Internal – means only internal resources are authorized to view the comment.
· Public – means the internal and external users are authorized to view the comments.
·
Restricted – means only
the defined authorized roles can view the comment.
§ Delete Allowed - Click this box if the authorized user wants to be able to delete this comment.
Select PROCEED to execute the edits and display the verification screen.
The verification screen displays showing the user a consolidated view of the load and dimensions information. If the user determines some of the information is incorrect, they can select BACK on the Command Line and the system will display the Load and Dimensions Screen again. The user can make the required changes and select PROCEED.
Select PROCEED on the Command Line and the load and dimensions information will be saved to the database. The Routing screen displays.
The next screen is the Routing screen to capture the route details for routing. There are two options Manual and Assisted routing.
Manual Routing - The Authorized User can enter the address and distance and then select PROCEED to continue.
Note: The system does not validate the address

The following fields are populated from the Common Client or Account Level, or System generated, and the Authorized User cannot change them.
O/O Account Details
Account No.
Legal Name
Application No.
CVOR
NSC Number
Exemption Code
Permit Details
The following fields are populated from the Common Client or Account Level, or System generated, and the Authorized User cannot change them.
· Transaction Type
· Permit Number (No.) is blank, it is system generated when credentials are issued.
Routing Details
Dimension Details
· The following fields are populated from the Common Client or Account Level, or System generated, and the Authorized User cannot change them.
o Overall Width
o Overall Height
o Overall Length
o Overall Weight.
Stops
The Authorized User must record the routing details for the permit(s)
§ Select Route Type from drop down list
· Address
Note: To add additional stops, select Address from the drop-down menu and click add or update the route in the table by using the red “x” to delete points.
· Enter each address from the origin to destination
Note: Abbreviations cannot be used when entering an address (i.e., St, Ave, E, or HWY) the word must be entered in full.
· Total Distance travelled along the Kings Highways must be recorded
· Authorized User must record the Route Details in this section separated by commas.
Example:
Route Details: Sarnia, Highway 402, Ontario/Quebec border
· Authorized User must check the box if travelling outside of the province.
407 ETR
· If the route travels on the 407ETR the Authorized User needs to indicate Yes on the 407ETR tab
· The Authorized User must record the following information, if applicable.
o Transponder Number (No.)
o Tractor Plate Number (No.)
o Trailer Plate Number (No.) 1
o Trailer Plate Number (No.) 2
o Trailer Plate Number (No.) 3
· Select Proceed to execute the edits and display verification screen.
Select PROCEED on the Command Line and the route information will save to the database. The conditions screen displays.
Command Line:
Proceed – means the system will take the user to the next logical step required for the transaction
Refresh – means the system will return the screen to the original content when the user entered the screen for the first time
Quit – means the user is finished working on this transaction for the time being and the transaction is available for completion by any authorized user at a late time using the “work in progress” feature.
Cancel – means the user has decided to discard all activity on this transaction as if they had never started it. The transaction log will show the transaction activity.
Help – means the help screen will be provided for the current screen and the user may scan the help file for assistance.
To return to an alternate screen while processing a transaction the user can select the appropriate tab along the top of the current screen and the system will asynchronously display the corresponding screen for processing by the user. After fijnishing rfeviewing and/or making changes to the screen the user can select the “Proceed” button to return to the screen they came from General.

To get the details of the routing process, please refer to section 1.4.2.2.3 or for online users, clickhere.
Assisted Routing
Allows the Authorized User to enter an address or select points on the map to generate a route. The Authorized User has the option to view the map in various formats
o Topographical - This is a map provided by MNR
o O/O Map – This Ontario wide street map presents highway level details and street level data for Ontario, Canada.
o Imagery
The following fields are populated from the Common Client or Account Level, or System generated, and the Authorized User cannot change them.
O/O Account Details
Account No.
Legal Name
Application No.
CVOR
NSC Number
Exemption Code
Permit Details
The following fields are populated from the Common Client or Account Level, or System generated, and the Authorized User cannot change them.
· Transaction Type
· Permit Number (No.) is blank, it is system generated when credentials are issued.
Routing Details
Dimension Details
· The following fields are populated from the Common Client or Account Level, or System generated, and the Authorized User cannot change them.
o Overall Width
o Overall Height
o Overall Length
o Overall Weight
Note: The above fields can be hidden during routing by expanding the view of the map select Expand Map button “[]” on the right of the screen and to view the permit details select “-”.
The Authorized User can select from a few options on the Routing screen.
Routing:
MTO Common Corridor
This allows Authorized User to view and select a designated route from populate by the Ministry of Transportation.
· The Authorized User can view a route on the map by highlighting the desired route in the table.
· To select the route, the Authorized User must highlight the route and then select Load Selected MTO Common Corridor
· Select Close or click on the “x” in the top right to return to the main map
Load Trip
This feature allows Authorized User to load commonly travelled routes on their account.
· The Authorized User can view a route on the map by highlighting the desired route in the table.
· To select the route, the Authorized User must highlight the route and then select Load Selected Route
· The Authorized User can manage the routes saved to the account by highlighting designated route and then selecting Delete Selected Route
· Select Close or click on the “x” in the top right to return to the main map
Routing Option
· The Authorized User can check any route option from the list.
Map Navigation Control Tools:
§  The Zoom In icon increases
the zoom on the map.
The Zoom In icon increases
the zoom on the map.
§  The Zoom Out icon reduces the
zoom on the map.
The Zoom Out icon reduces the
zoom on the map.
§  The Hand icon enables
panning.
The Hand icon enables
panning.
§ The Right Arrow icon sign
allows panning right on map.
§ The Left Arrow sign allows panning
left on map.
§ The Magnifying Glass icon is
used to display the default Map.
§ The Stretch screen icon is
used to display Map in full screen.
o – The Minus sign is used to collapse the Stops and Direction panel.
o + The Plus sign is used to expand the Stops and Direction panel.
Add Way Points
§ When selected the Stops and Directions opens to allow Authorized User to enter routing information.
Direction
§ Provides a turn-by-turn direction with the distance highlighted only on the Kings Highway Segment
§ If Route is selected it will provide you with the entire route displayed – from start to end
Via Routes
§ This text box is a mandatory field that defines all roads used in identifying specific route
Waypoints
o This allows the Authorized User to indicate the points along the route.
o Authorized User must highlight one of the following Route Types and then select ADD or select points on the map
§ In/Out Route
· To be selected in the case of Ontario Border Crossing from the following Provinces or States.
o QB - Quebec
o NY – New York
o MI _ Michigan
o MN - Minnesota
o MB - Manitoba
· Authorized User can then select the highway or bridge that will be used to enter or exit Ontario.
§ Intersection
· Format
o Highway 401, Queen Elizabeth Way
o Regional Road 9, Highway 400
o County Road 9m Burrock Avenue
· All the following must be spelled out:
o E.g., Avenue, Street, Road
o Directional Suffix mandatory if it exists in the street name e.g., Burlington Street East
· Tip: To determine the street name, you can add a waypoint directly onto the street. You must be zoomed in very close to ensure that you have places your waypoint on the correct road. You may then remove the road if you do not intend to use it as a waypoint.
§ Latitude/Longitude
· Latitude is a geographical coordinate that specifies the north-south position of a point on the Earth’s surface
· Longitude is a geographical coordinate that specifies the east-west position of a point on the Earth’s surface
· 6 decimal minimum is required for correct usage of this option
o e.g., 43.782615 – 79.287858
o 43.771672 – 79.3213320
§ Address
· A formal address can be entered
· Municipality is required
· Commas are used to separate street address and municipality
Note: Abbreviations cannot be used.
· Format
o 12 Regional Road 9, Peterborough
o 144 County Road, Mississauga
o All the following must be spelled out:
o e.g., Avenue, Street, Road
o Directional Suffix is mandatory if it exists in the street name - Burlington Street East
o
o Tip: To determine the street name, you can add a waypoint directly onto the street. You must be zoomed in very close to ensure that you have places your waypoint on the correct road. You may then remove the road if you do not intend to use it as a waypoint.
o
§ Exit Number
§ In most cases this option applies to King’s Highways
o e.g., Highway 401, Highway 400
· First field requires the Highway, and the second field requires the exit number
o e.g., First field: Highway 401, Second Field 110
o
Note: Waypoints can be deleted by selecting the red “X” or the routing sequence can be updated by using the corresponding green arrows to the right.
· The Authorized User must enter the via route information
o Format
§ Highway 401, Queen Elizabeth Way
§ Regional Road 9, Highway 400
§ County Road 9m Burrock Avenue
o All the following must be spelled out:
§ E.g., Avenue, Street, Road
§ Directional Suffix mandatory if it exists in the street name e.g., Burlington Street East
§ Tip: To determine the street name, you can add a waypoint directly onto the street. You must be zoomed in very close to ensure that you have places your waypoint on the correct road. You may then remove the road if you do not intend to use it as a waypoint
o Authorized User must check the box if travelling outside of the province: specify that it is Border Crossing checkbox.
o Once route details have been entered under the Waypoints tab the Authorized User can select an option from the command line.
§ Check Route
§ Clear
§ Save Route
§ Printable Version
§ Municipality List
o
o Total Distance being travelled along the Kings Highways will be generated automatically by the solution.
o Restrictions and Warnings
§ All restrictions will be displayed in this tab as text mode. You can click the zoom icon to focus in on the geographical location of the restriction.
§ The Authorized User can add a comment in this area and submit for review.
407 ETR
· If the route travels on the 407ETR the Authorized User needs to indicate Yes on the 407ETR tab
· The Authorized User must record Transponder Number and Plate Number
§
§ Authorized User can proceed by selecting one of the commands at the bottom of the screen
o Proceed – Proceed to Permit Conditions Screen
o Back – Back to Load and Dimensions Screen
o Refresh – Return to default start of assisted routing and clear all routing data
o Quit
o Cancel – Cancel the permit application
o Help – Display help for this section

To get the details of the conditions process, please refer to section 1.4.2.1.3 or for online users, clickfor online users, clickhere.
The following fields are populated from the Common Client or Account Level, or System generated, and the Authorized User cannot change them.
O/O Account Details
Account No.
Legal Name
Application No.
CVOR
NSC Number
Exemption Code
Permit Details
· Transaction Type
· Permit Number (No.) is blank, it is system generated when credentials are issued.
Conditions
The Authorized User can select Condition Category from the drop-down list, if applicable. Conditions will populate based on the conditions category
o All
o Standard
o Non-Standard
o General
o Mobile Cranes
o Tow Trucks
o Pre-Manufactured Buildings
o Road Building Machines
o Tree Length Logs
· If applicable, Standard conditions are populated by default and cannot be changed by the Authorized User.
· Sequence Number (No.)
· Select
· Conditions Category populated as per configuration
§ The Conditions are displayed in both English and French as per configuration Notes populated as per configuration
Non-Standard
The Authorized User can check non-standard conditions, if applicable.
o Sequence Number (No.) is populated as per configuration and cannot be changed by the user
o The authorized user can select the Condition if applicable.
o Conditions Category populated as per configuration and cannot be changed by the user.
o The Conditions are displayed in both English and French as per configuration
o Notes populated as per configuration and cannot be changed by the user
Additional Conditions
The Authorized User can check or add additional conditions if applicable.
· Sequence No. - By default, populated as per configuration and cannot be changed by the user.
· To Add a Condition the Authorized User must select the green “+” sign to open a table to enter Condition details
· Authorized User must enter the Condition details in the Condition English field
· If Bilingual format has been selected the details must also be entered in French in the Condition French table
· To remove the Condition the Authorized User must select the red “x” to delete the entry
Select PROCEED to execute the edits and display the verification screen.
The verification screen displays showing the user a consolidated view of the conditions information. If the user determines some of the information is incorrect, they can select BACK on the Command Line and the system will display the conditions screen again. The user can make the required changes and select PROCEED.
Select PROCEED on the Command Line and the conditions information will be saved to the database. The billing Screen will be displayed.

There are several sections on the billing screen.
To get the details for the other fields in the billing process, please refer to section 1.4.2.1.4 or click for online users click here.
Billing Details
The following fields are populated from the Common Client or Account Level, or System generated, and the Authorized User cannot change them.
O/O Account Details
Account No.
Legal Name
Application No.
CVOR
NSC Number
Exemption Code
Billing Details
· Transaction Type
· Permit Number (No.) is blank, it is system generated when credentials are issued.
· Billing Date
· Transaction Type
· Transaction Status has been updated to OPEN
The following fields are populated by the system, but the Authorized User can update as required
o Start Date 1
o End Date 1
o Start Date 2
o
End Date 2
Fees Section
By default, the following are populated from the enterprise screen and cannot be changed by the user.
· Prepaid Balance
· Stored Credit Balance
· Manual Adjustment Amount – Only an Authorized User can complete adjustment based on business rules
· Fee Table displays the following application details
o Fee Type
o Number (No.) of Permits Required
o Fee Amount
o Waive – Only an Authorized User can select based on eligibility criteria
Documentation Requirements
Certain documents are required for the creation of a New Permit. If the system can check for the document automatically via a system interface, it will mark the document as being System Collected.
· If a document is required, the document name will be displayed in the Documentation Requirements Section drop down list.
· The Authorized User must select the document name; then click the Add link and the document name will be displayed in a list just below the drop down.
· Authorized User can select the appropriate status for that document from the Status drop down list.
o Collected – means the document has been submitted and approved by issuer.
o Not Required – means the document is not required for this transaction.
o Outstanding – means the document has not been submitted and approved yet.
o System Collected - means the system has some interface that provides verification that the documentation requirement has been met.
Attachment Upload
Documents that Authorized User will upload to attach to the permit
· Authorized User can select the PDF files from the Browse link
· To attach the selected file the Authorized User must click Upload to attach the file, if applicable
Delivery Details
The Authorized User must indicate the delivery method for the permit.
· Select the Delivery Method from the drop-down list
o Courier
§ If selected the Authorized User must enter the details of the Courier the Name, Account Number (No.) and Courier Phone Number (No.)
o Mailed
o Pick Up
§ If selected the Authorized User must select the pickup location
o The Electronic Delivery Channel must be selected from the drop-down menu
· PDF – View format the default for external users.
· Email – The email address will default from the Account level email. The Authorized User can update the field
Note: Updating this field will not update the Account.
· Fax – The fax number will default from the Account level. An Authorized User can record a different fax number.
Note: Updating this field will not update the Account.
o The Authorized User must select the appropriate access level for the comment from the drop-down list:
§ Internal – means only internal resources are authorized to view the comment.
§ Public – means the internal and external users are authorized to view the comments.
§ Restricted – means only the defined authorized roles can view the
comment.
· When the Delete Allowed is Selected the comment can be deleted by another Authorized Users
Note: Overrides require Authorized User to enter User ID.
Command Line functions:
Proceed – means the system will take the user to the next logical step required for the transaction
Refresh – means the system will return the screen to the original content when the user entered the screen for the first time
Quit – means the user is finished working on this transaction for the time being and the transaction is available for completion by any authorized user at a late time using the “work in progress” feature.
Cancel – means the user has decided to discard all activity on this transaction as if they had never started it. The transaction log will show the transaction activity.
Help – means the help screen will be provided for the current screen and the user may scan the help file for assistance.
Select PROCEED to execute the edits and auto issuance criteria. If the auto issuance criteria fail, the application will be submitted to the workflow for review. Once the application has been approved by the authorized user and on “Done” click from the application approval details screen, the system will come back to the billing screen.
Select PROCEED on the Command Line; the billing information will be saved to the database and continue to the validation screen. From the billing validation screen, the authorized user can generate the invoice.
Note: Once the application has been invoiced the only way for an Authorized User to move through screens using the tabs is by selecting Cancel Bill.
Command Line functions:
Proceed – Means the systme will proceed to the next logical step in processing the transaction
Add to Cart – means the system will save the invoice information to a cart for future payment along with any other items placed in the cart as a result of subsequent transaction processing
Cancel Bill – means the invoice/bill that was calculated will be cancelled and the transaction will no longer be in “Invoiced” status and will be placed in an “Open” status”
Refresh – means the system will return the screen to the original content when the user entered the screen for the first time
Quit – means the user is finished working on this transaction for the time being and the transaction is available for completion by any authorized user at a late time using the “work in progress” feature.
Invoice – Means the system display the invoice
Draft Permit – means the system will provide a Draft Permit for verification by the user. No permit number is assigned at this point.
Help - means the system will provide a help screen for the current screen and the user can view the help information and scan the help file as required.
Payment Detail Screen – see 1.4.4.6-payment, p 131
For details on the search screen, refer to section 1.4.2.12.1.1

For details on the search
screen, refer to section 1.4.2.12.1.1.

For details on the General
screen, refer to section 1.4.2.12.1.1.
The Weekend Travel Requested checkbox will be checked by default and user cannot uncheck it. Additionally, user cannot uncheck the Farm Plated Vehicles checkbox.
Once the details on the General screen have been entered and verified, click Proceed from the command line to navigate to Load & Dimensions screen.

For details on the Load & Dimensions Screen, refer to section 1.4.2.1.2 . User can select the load details according to the requirement.
Once the details on the Load & Dimensions Screen have been entered and verified, click Proceed from the command line to navigate to the Routing Screen.

For details on the Routing Screen, refer to section 1.4.2.12.1.3. User cannot access the 407ETR Tab.
Once the details on the Routing Screen have been entered and verified, click Proceed from the command line to navigate to Conditions Screen.

For details on the Condition Screen, refer to section 1.4.2.12.1.4. Once the details on the Condition Screen have been entered and verified, click Proceed from the command line to navigate to Verification Screen.

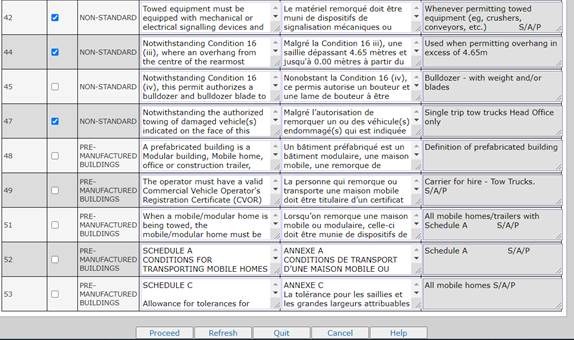
Verify your details on this tab and click Proceed from the verification screen to navigate to Billing.

Refer to section 1.4.2.1.4 for details on Billing screen.
Click Proceed from billing screen to complete payment. For Payment Detail screen, refer section 1.4.4.6-payment.

For details on the Search
screen, refer to section 1.4.2.12.1.1.

For details on the Search screen, refer to section 1.4.2.12.1.1.

For details on the General screen, refer to section 1.4.2.12.1.1. User cannot check the Farm Plated Vehicles checkbox.
Once the details on the General screen have been entered and verified, click Proceed from the command line to navigate to Load & Dimensions screen.

For details on the Load & Dimensions Screen, refer to section 1.4.2.1.2 . User can select the load details according to the requirement. For this permit only 1 load combination is allowed.
Once the details on the Load & Dimensions Screen have been entered and verified, click Proceed from the command line to navigate to Routing Screen.

For details on the Routing Screen, refer to section 1.4.2.12.1.3.
Once the details on the Routing Screen have been entered and verified, click Proceed from the command line to navigate to Conditions Screen.

For details on the Condition Screen, refer to section 1.4.2.12.1.4.
Once the details on the Condition Screen have been entered and verified, click Proceed from the command line to navigate to Verification Screen.

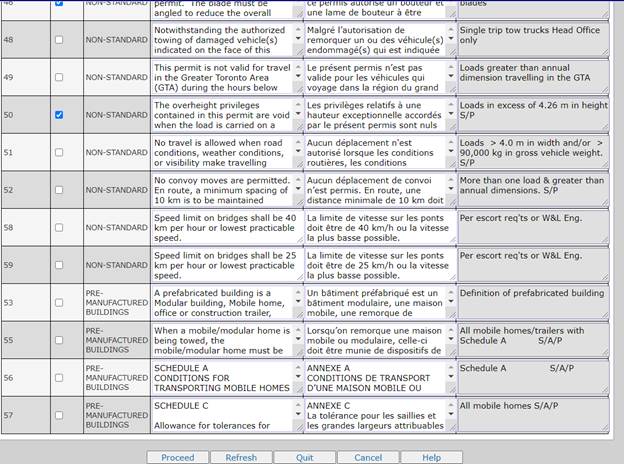
Verify your details on this tab and Click Proceed from the verification screen to navigate to Billing.

Refer to section 1.4.2.1.4 for details on Billing screen.
Click Proceed from billing screen to complete payment. For Payment Detail screen, refer section 1.4.4.6-payment.

Project permits are issued to allow carriers to move similar loads, objects, and structures over the same specified route for a period of up to 6 months depending on the duration of the project contract.
Select: Enterprise – Applications – O/O - Permit – Project – Project Permit
The general application screen is the first screen for the project permit application. The user will select specifics about the permit including language and addresses.

To get the details of the general process, please refer to section 1.4.2.1.1 or for online users, click here.
For external users the O/O Account number will be pre-populated. Internal Users will have to provide the O/O Account Number (No.), Legal Name or Permit Number (No.) in the corresponding field to process a permit application.
When PROCEED is selected on the Command Line at the bottom of the screen.
· A validation of the CVOR status will be performed if O/O Account Number was created with a CVOR.
· If the Account Level status is suspended or inactive, then a message will display telling the user to please contact the Oversize/Overweight Permit section.
Copy From provides the ability to copy data from a previously submitted permit for the purpose of using the data in a new application or request.
Note: Only permits form the account can be copied.
· Authorized User can enter the Account Number (No.) and/or Legal Name and Select Copy From to get a list of available permits items to select
· And then, Select the permit to be copied
· If the Permit Number (No.) is entered the Authorized User can Select Copy From on the Command Line to update the permit information
Note: The information up to the conditions screen for the applicable Permit Type will be displayed.
The general screen is the
first screen for the project permit. There
are several sections on the general screen. To get the details for the other
fields of the general process please refer to Section 1.4.2.1.1 or for online
users, click here
The following information is populated from the Common Client Enterprise Level or Account Level and cannot be updated by an Authorized User.
O/O Account Details
· Account Number (No.)
· Legal Name
· Application Number (No.) they system will generate the unique number for tracking the application
· CVOR
· Client Status
· NSC Number
· Exemption Code if the Common Client has an Exemption Code it is checked, if expired then Authorized User must enter a valid exemption code
· Physical Address
The Authorized User can update the following fields
· Mailing Address by default, it populates from the Account Level and the authorized user can select any one from the drop-down list.
· Issued At the Authorized User can select from the drop-down list.
· Authorized User must Select a contact name from drop down list
Permit Details
The following information is generated by the system and cannot be updated by an Authorized User.
· Permit Type
· Transaction Type
· Application Status - For a new permit, application status is not submitted status.
Note: The status will be updated to submitted after completing all tabs
· Application Status Date the date will be changed when the application status is updated
· Permit Number (No.) for a new permit, it is blank, and the user will get a permit number after credentials have been issued
Authorized User must update or enter the required information into the following fields.
· *Number (No.) of Permits Required – the number of identical permits that will be produced with different permit numbers and will be used in fee calculations and printing.
· If Bilingual format is checked, credentials will be generated in both English and French
· *Authorized User must select the Start Date of the permit
· *Authorized User must select the End Date of the permit
· Farm Plated Vehicles- if it is checked, a comment must be entered
· Check if the Weekend Travel Requested box if the permit will travel over the weekend
· Authorized User can enter the appropriate comment and then select Add/Update Comment
· If a comment is entered the appropriate access level for the comment from the drop-down list:
§ Internal – means only internal resources are authorized to view the comment.
§ Public – means the internal and external users are authorized to view the comments.
§ Restricted – means only the defined authorized roles can view the comment.
· When the Delete Allowed is Selected the comment can be deleted by another Authorized Users
Authorized User must Select PROCEED to execute the edits and display the verification screen.
Proceed – means the system will take the user to the next logical step required for the transaction
Refresh – means the system will return the screen to the original content when the user entered the screen for the first time
Quit – means the user is finished working on this transaction for the time being and the transaction is available for completion by any authorized user at a late time using the “work in progress” feature.
Cancel – means the user has decided to discard all activity on this transaction as if they had never started it. The transaction log will show the transaction activity.
Help – means the help screen will be provided for the current screen and the user may scan the help file for assistance.
To return to an alternate screen while processing a transaction the user can select the appropriate tab along the top of the current screen and the system will asynchronously display the corresponding screen for processing by the user. After fijnishing rfeviewing and/or making changes to the screen the user can select the “Proceed” button to return to the screen they came from General.
The verification screen displays showing the user a consolidated view of the general information. If the user determines some of the information is incorrect, they can select BACK on the Command Line and the system will display the general screen again. The user can make the required changes and select PROCEED.
Select PROCEED on the
Command Line and general information will be saved to the database. The Load
and Dimensions Screen display
The next screen for the project permit application collects information specific to the permit pertaining to the load and dimensions.

There are several sections on the Load and Dimensions Screen.
The Load Details – The authorized user can add more than one load detail with different load descriptions.
The following fields are populated from the Common Client or Account Level, or System generated, and the Authorized User cannot change them.
O/O Account Details
Account No.
Legal Name
Application No.
CVOR
NSC Number
Exemption Code
Permit Details
The following fields are populated from the Common Client or Account Level, or System generated, and the Authorized User cannot change them.
· Transaction Type
· Permit Number (No.) is blank, it is system generated when credentials are issued.
Load Details
The Authorized User must record the load details being requested for the permit(s)
· Select the Load Description
o Tow
o Carry
o Operate
· The Load Type must be selected from the drop-down menu
o Empty Over width Float Type Trailer
o Modular Building
o Construction Machinery or Equipment
o Forestry Equipment or Machinery
o Modular Building
o Steel Beams
o Other
· When a mobile crane or a road building machine permit is being applied for, additional information is required:
o Make- Enter Make, if applicable.
o Model No. – Enter Model No., if applicable.
o Serial No. – Enter Serial No., if applicable.
o Unit No. – Enter Unit No., if applicable.
o No. of Vehicle Axles (Excl. Dolly Axles) – Enter No. of Vehicle Axles (excl. Dolly Axles), if applicable.
o No. of Boom Dolly Axle(s)- Enter No. of Boom Dolly Axles, if applicable.
o Rear Overhang (If it exceeds 4.65) Measured from the center of the Rearmost axles (m) – Enter rear overhang (if exceeds 4.65 m) measured from the center of the rearmost axles if applicable.
· The Authorized User must record a description in the field when the Load Type of Other is selected.
· If a valid Vehicle Configuration Evaluation (VCE) is provided the Authorized User enters it in the Ministry Issued Configuration Number field to populate all details of VCE in the Axle Description table.
By default, the permit configuration is populated based on the permit configuration.
The Authorized User should review the information in the following fields and update if required and then select ADD to record details.
Note: If Highway Traffic Act (HTA) is selected for width or height the other fields will remain blank.
· Overall Width (m) –
o Highway Traffic Act (HTA)
o Two Lane (m)
o Multi-Lane (m)
· Overall Length (m) only one of the following two are required:
§ Highway Traffic Act
§ Length (m)
o Overall Height (m) only one of the following two are required:
§ Highway Traffic Act
§ Height (m)
o Overall Weight (kg) one of the three options must be selected
§ Highway Traffic Act
§ Standard Annual
§ Special Weights
The Authorizing the Movement of section will populate based on permit configuration when ADD is selected
Note: To manage the Authorized Movement table Authorized Users can add, update, or delete entries.
· ADD – Enter load information and select Add
· Update – Highlight load under Authorizing Movement and then select Update. Once changes have been made the Authorized User must select Add to save the edits.
· Delete – Select Delete on right and then click the red “x”
· Clear – Resets the load tables
Axle Description – If an authorized user checks Special Weights from the Load Details section, then an Axle Description is required. The Authorized User can add a maximum of 2 Load details that have Special Weights. If VCE has been entered, the fields will auto populate.
· If the Authorized User enters a Ministry Issued Configuration Number is checked, if valid the system will populate the axle information
· Weight Type – Normal or Exceptional, if applicable
· Authorized User can update the following fields
o Total Number of Axles
o Number of Axles (Power Units)
o Equipment Type select from the drop-down menu
o Number of Tires per Axle
o Manufacturer Rated Axle Capacity (kg)
o Tire Width (mm)
o Tire Rating (kg)
o Requested Weight per Axle
§ Normal Load
§ Reduced Load
o Inter-axle Spacing (m)
The Authorized User can use the following options in the table
o Repeat – means the information entered for one of the parameters will be repeated for all parameters
o Draw – means the system will make a scale drawing of the tractor and trailer with axle spacings
o Clear – means the system will clear the parameters for subsequent entry of the required field values
When the Authorized User selects the Bridge Formula a pop-up window will display the report
· If The Authorized User can enter a comment the appropriate access level for the comment must be assigned from the drop-down list:
§ Internal – means only internal resources are authorized to view the comment.
§ Public – means the internal and external users are authorized to view the comments.
§ Restricted – means only the defined authorized roles can view the comment.
· When the Delete Allowed is Selected the comment can be deleted by another Authorized Users
Select PROCEED to execute the edits and display the verification screen.
The verification screen displays showing the user a consolidated view of the load and dimensions information. If the user determines some of the information is incorrect, they can select BACK on the Command Line and the system will display the Load and Dimensions Screen again. The user can make the required changes and select PROCEED.
Select PROCEED on the Command Line and the load and dimensions information will be saved to the database. The conditions screen displays.
Command Line functions:
Proceed – means the system will take the user to the next logical step required for the transaction
Refresh – means the system will return the screen to the original content when the user entered the screen for the first time
Quit – means the user is finished working on this transaction for the time being and the transaction is available for completion by any authorized user at a late time using the “work in progress” feature.
Cancel – means the user has decided to discard all activity on this transaction as if they had never started it. The transaction log will show the transaction activity.
Help – means the help screen will be provided for the current screen and the user may scan the help file for assistance.
To return to an alternate screen while processing a transaction the user can select the appropriate tab along the top of the current screen and the system will asynchronously display the corresponding screen for processing by the user. After fijnishing rfeviewing and/or making changes to the screen the user can select the “Proceed” button to return to the screen they came from General.
To resume an application from the O/O level the Authorized User must select WIP (Work in Progress) - Resume Application and then enter Account Number (No.) then click proceed to select application from the list
Select PROCEED to execute the edits and display the verification screen.
The verification screen displays showing the user a consolidated view of the load and dimensions information. If the user determines some of the information is incorrect, they can select BACK on the Command Line and the system will display the Load and Dimensions Screen again. The user can make the required changes and select PROCEED.
Select PROCEED on the Command Line and the load and dimensions information will be saved to the database. The Routing screen displays.
To get the details for other fields of the load and dimensions process, please refer to section 1.4.2.1.2 or for online users, click here.
The next screen is the Routing screen to capture the route details for routing. There are two options Manual and Assisted routing.
Manual Routing – The Authorized User can enter the address and distance and then select PROCEED to continue.
Note: The system does not validate the address

The following fields are populated from the Common Client or Account Level, or System generated, and the Authorized User cannot change them.
O/O Account Details
Account No.
Legal Name
Application No.
CVOR
NSC Number
Exemption Code
Permit Details
The following fields are populated from the Common Client or Account Level, or System generated, and the Authorized User cannot change them.
· Transaction Type
· Permit Number (No.) is blank, it is system generated when credentials are issued.
Routing Details
Dimension Details
· The following fields are populated from the Common Client or Account Level, or System generated, and the Authorized User cannot change them.
o Overall Width
o Overall Height
o Overall Length
o Overall Weight.
Stops
The Authorized User must record the routing details for the permit(s)
§ Select Route Type from drop down list
· Address
Note: To add additional stops, select Address from the drop-down menu and click add or update the route in the table by using the red “x” to delete points.
· Enter each address from the origin to destination
Note: Abbreviations cannot be used when entering an address (i.e., St, Ave, E, or HWY) the word must be entered in full.
· Total Distance travelled along the Kings Highways must be recorded
· Authorized User must record the Route Details in this section separated by commas.
Example:
Route Details: Sarnia, Highway 402, Ontario/Quebec border
· Authorized User must check the box if travelling outside of the province.
407 ETR
· If the route travels on the 407ETR the Authorized User needs to indicate Yes on the 407ETR tab
· The Authorized User must record the following information, if applicable.
o Transponder Number (No.)
o Tractor Plate Number (No.)
o Trailer Plate Number (No.) 1
o Trailer Plate Number (No.) 2
o Trailer Plate Number (No.) 3
· Select Proceed to execute the edits and display verification screen.
Select PROCEED on the Command Line and the route information will save to the database. The conditions screen displays.
Command Line:
Proceed – means the system will take the user to the next logical step required for the transaction
Back – go back to the previous screen
Refresh – means the system will return the screen to the original content when the user entered the screen for the first time
Quit – means the user is finished working on this transaction for the time being and the transaction is available for completion by any authorized user at a late time using the “work in progress” feature.
Cancel – means the user has decided to discard all activity on this transaction as if they had never started it. The transaction log will show the transaction activity.
Help – means the help screen will be provided for the current screen and the user may scan the help file for assistance.
To get the details of the routing process, please refer to section 1.4.2.2.3 or for online users, clickhere.
Assisted Routing
Allows the Authorized User to enter an address or select points on the map to generate a route. The Authorized User has the option to view the map in various formats
o Topographical - This is a map provided by MNR
o O/O Map – This Ontario wide street map presents highway level details and street level data for Ontario, Canada.
o Imagery
The following fields are populated from the Common Client or Account Level, or System generated, and the Authorized User cannot change them.
O/O Account Details
Account No.
Legal Name
Application No.
CVOR
NSC Number
Exemption Code
Permit Details
The following fields are populated from the Common Client or Account Level, or System generated, and the Authorized User cannot change them.
· Transaction Type
· Permit Number (No.) is blank, it is system generated when credentials are issued.
Routing Details
Dimension Details
· The following fields are populated from the Common Client or Account Level, or System generated, and the Authorized User cannot change them.
o Overall Width
o Overall Height
o Overall Length
o Overall Weight
Note: The above fields can be hidden during routing by expanding the view of the map select Expand Map button “[]” on the right of the screen and to view the permit details select “-”.
The Authorized User can select from a few options on the Routing screen.
Routing:
MTO Common Corridor
This allows Authorized User to view and select a designated route from populate by the Ministry of Transportation.
· The Authorized User can view a route on the map by highlighting the desired route in the table.
· To select the route, the Authorized User must highlight the route and then select Load Selected MTO Common Corridor
· Select Close or click on the “x” in the top right to return to the main map
Load Trip
This feature allows Authorized User to load commonly travelled routes on their account.
· The Authorized User can view a route on the map by highlighting the desired route in the table.
· To select the route, the Authorized User must highlight the route and then select Load Selected Route
· The Authorized User can manage the routes saved to the account by highlighting designated route and then selecting Delete Selected Route
· Select Close or click on the “x” in the top right to return to the main map
Routing Option
· The Authorized User can check any route option from the list.
Map Navigation Control Tools:
§ The Zoom In icon increases
the zoom on the map.
§ The Zoom Out icon reduces the
zoom on the map.
§ The Hand icon enables
panning.
§ The Right Arrow icon sign
allows panning right on map.
§ The Left Arrow sign allows panning
left on map.
§ The Magnifying Glass icon is
used to display the default Map.
§ The Stretch screen icon is
used to display Map in full screen.
o – The Minus sign is used to collapse the Stops and Direction panel.
o + The Plus sign is used to expand the Stops and Direction panel.
Add Way Points
§ When selected the Stops and Directions opens to allow Authorized User to enter routing information.
Direction
§ Provides a turn-by-turn direction with the distance highlighted only on the Kings Highway Segment
§ If Route is selected it will provide you with the entire route displayed – from start to end
Via Routes
§ This text box is a mandatory field that defines all roads used in identifying specific route
Waypoints
o This allows the Authorized User to indicate the points along the route.
o Authorized User must highlight one of the following Route Types and then select ADD or select points on the map
§ In/Out Route
· To be selected in the case of Ontario Border Crossing from the following Provinces or States.
o QB - Quebec
o NY – New York
o MI _ Michigan
o MN - Minnesota
o MB - Manitoba
· Authorized User can then select the highway or bridge that will be used to enter or exit Ontario.
§ Intersection
· Format
o Highway 401, Queen Elizabeth Way
o Regional Road 9, Highway 400
o County Road 9m Burrock Avenue
· All the following must be spelled out:
o E.g., Avenue, Street, Road
o Directional Suffix mandatory if it exists in the street name e.g., Burlington Street East
· Tip: To determine the street name, you can add a waypoint directly onto the street. You must be zoomed in very close to ensure that you have places your waypoint on the correct road. You may then remove the road if you do not intend to use it as a waypoint.
§ Latitude/Longitude
· Latitude is a geographical coordinate that specifies the north-south position of a point on the Earth’s surface
· Longitude is a geographical coordinate that specifies the east-west position of a point on the Earth’s surface
· 6 decimal minimum is required for correct usage of this option
o e.g., 43.782615 – 79.287858
o 43.771672 – 79.3213320
§ Address
· A formal address can be entered
· Municipality is required
· Commas are used to separate street address and municipality
Note: Abbreviations cannot be used.
· Format
o 12 Regional Road 9, Peterborough
o 144 County Road, Mississauga
o All the following must be spelled out:
o e.g., Avenue, Street, Road
o Directional Suffix is mandatory if it exists in the street name - Burlington Street East
o
o Tip: To determine the street name, you can add a waypoint directly onto the street. You must be zoomed in very close to ensure that you have places your waypoint on the correct road. You may then remove the road if you do not intend to use it as a waypoint.
o
§ Exit Number
§ In most cases this option applies to King’s Highways
o e.g., Highway 401, Highway 400
· First field requires the Highway, and the second field requires the exit number
o e.g., First field: Highway 401, Second Field 110
o
Note: Waypoints can be deleted by selecting the red “X” or the routing sequence can be updated by using the corresponding green arrows to the right.
· The Authorized User must enter the via route information
o Format
§ Highway 401, Queen Elizabeth Way
§ Regional Road 9, Highway 400
§ County Road 9m Burrock Avenue
o All the following must be spelled out:
§ E.g., Avenue, Street, Road
§ Directional Suffix mandatory if it exists in the street name e.g., Burlington Street East
§ Tip: To determine the street name, you can add a waypoint directly onto the street. You must be zoomed in very close to ensure that you have places your waypoint on the correct road. You may then remove the road if you do not intend to use it as a waypoint
o Authorized User must check the box if travelling outside of the province: specify that it is Border Crossing checkbox.
o Once route details have been entered under the Waypoints tab the Authorized User can select an option from the command line.
§ Check Route
§ Clear
§ Save Route
§ Printable Version
§ Municipality List
o Total Distance being travelled along the Kings Highways will be generated automatically by the solution.
o Restrictions and Warnings
§ All restrictions will be displayed in this tab as text mode. You can click the zoom icon to focus in on the geographical location of the restriction.
§ The Authorized User can add a comment in this area and submit for review.
407 ETR
· If the route travels on the 407ETR the Authorized User needs to indicate Yes on the 407ETR tab
· The Authorized User must record Transponder Number and Plate Number
§
§ Authorized User can proceed by selecting one of the commands at the bottom of the screen
o Proceed – Proceed to Permit Conditions Screen
o Back – Back to Load and Dimensions Screen
o Refresh – Return to default start of assisted routing and clear all routing data
o Quit
o Cancel – Cancel the permit application
o Help – Display help for this section

To get the details of the conditions process, please refer to section 1.4.2.1.3 or for online users, click here.
Conditions
· The Authorized User can select Condition Category from the drop-down list, if applicable. Conditions will populate based on the conditions category
o All
o Standard
o Non-Standard
o Mobile Cranes
o Road Building Machines
o General
o Pre-Manufactured Buildings
· If applicable, Standard conditions are populated by default and cannot be changed by the Authorized User.
· Sequence Number (No.)
· Select
· Conditions Category populated as per configuration
§ The Conditions are displayed in both English and French as per configuration Notes populated as per configuration
Non-Standard
The Authorized User can check non-standard conditions if applicable.
o Sequence Number (No.) is populated as per configuration and cannot be changed by the user
o The authorized user can select the Condition if applicable.
o Conditions Category populated as per configuration and cannot be changed by the user.
o The Conditions are displayed in both English and French as per configuration
o Notes populated as per configuration and cannot be changed by the user
Additional Conditions
The Authorized User can check or add additional conditions if applicable.
· Sequence No. - By default, populated as per configuration and cannot be changed by the user.
· To Add a Condition the Authorized User must select the green “+” sign to open a table to enter Condition details
· Authorized User must enter the Condition details in the Condition English field
· If Bilingual format has been selected the details must also be entered in French in the Condition French table
· To remove the Condition the Authorized User must select the red “x” to delete the entry
Select PROCEED to execute the edits and display the verification screen.
The verification screen displays showing the user a consolidated view of the conditions information. If the user determines some of the information is incorrect, they can select BACK on the Command Line and the system will display the conditions screen again. The user can make the required changes and select PROCEED.
Select PROCEED on the Command Line and the conditions information will be saved to the database. The billing Screen displays.

To get the details of the billing process, please refer to section 1.4.2.1.4 or for online users, click here.
There are several sections on the Billing Screen.
The following fields are populated from the Common Client or Account Level, or System generated, and the Authorized User cannot change them.
O/O Account Details
Account No.
Legal Name
Application No.
CVOR
NSC Number
Exemption Code
Billing Details
· Transaction Type
· Permit Number (No.) is blank, it is system generated when credentials are issued.
· Billing Date
· Transaction Type
· Transaction Status has been updated to OPEN
o
Fees Section
By default, the following are populated from the enterprise screen and cannot be changed by the user.
· Prepaid Balance
· Stored Credit Balance
· Manual Adjustment Amount – Only an Authorized User can complete adjustment based on business rules
· Fee Table displays the following application details
o Fee Type
o Number (No.) of Permits Required
o Fee Amount
o Waive – Only an Authorized User can select based on eligibility criteria
Documentation
Requirements – this section allows user to scan, and upload required documents.
There are the following three radio buttons available:
·
Scan
now – allows to scan and upload documents at once
·
Scan
Later – allows to schedule document scan and submission for a later time
·
No
Scan Required – select this option if no documents are required to be uploaded
Certain documents are required for the creation of a New Permit. If the system can check for the document automatically via a system interface, it will mark the document as being System Collected.
· The Project Contract must be scanned, and status updated before the permit can be issued by the Authorized User
· The Authorized User must select the document name; then click the Add link and the document name will be displayed in a list just below the drop down.
· Authorized User can select the appropriate status for that document from the Status drop down list.
o Collected – means the document has been submitted and approved by issuer.
o Not Required – means the document is not required for this transaction.
o Outstanding – means the document has not been submitted and approved yet.
o System Collected – means the system has some interface that provides verification that the documentation requirement has been met.
Attachment Upload
Documents that Authorized User will upload to attach to the permit
o Browse – Select a PDF file from the Browse link.
o Upload – Uploads a PDF file if required.
· Authorized User can select the PDF files from the Browse link
· To attach the selected file the Authorized User must click Upload to attach the file, if applicable
Delivery Details
The Authorized User must indicate the delivery method for the permit.
· Select the Delivery Method from the drop-down list
o Courier
§ If selected the Authorized User must enter the details of the Courier the Name, Account Number (No.) and Courier Phone Number (No.)
o Mailed
o Pick Up
§ If selected the Authorized User must select the pickup location
o Authorized Users must print project permits, so the only Electronic Delivery Channel is print
o Authorized User can enter the appropriate comment that will be viewed on the Account Enquiry Screen by internal users only.
o The Authorized User must select the appropriate access level for the comment from the drop-down list:
§ Internal – means only internal resources are authorized to view the comment.
§ Public – means the internal and external users are authorized to view the comments.
§ Restricted – means only the defined authorized roles can view the comment.
· When the Delete Allowed is Selected the comment can be deleted by another Authorized Users
Command Line functions:
Proceed – means the system will take the user to the next logical step required for the transaction
Refresh – means the system will return the screen to the original content when the user entered the screen for the first time
Quit – means the user is finished working on this transaction for the time being and the transaction is available for completion by any authorized user at a late time using the “work in progress” feature.
Cancel – means the user has decided to discard all activity on this transaction as if they had never started it. The transaction log will show the transaction activity.
Help – means the help screen will be provided for the current screen and the user may scan the help file for assistance.
Select PROCEED to execute the edits and auto issuance criteria. If the auto issuance criteria fail, the application will be submitted to the workflow for review. Once the application has been approved by the authorized user and on “Done” click from the application approval details screen, the system will come back to the billing screen.
Select PROCEED on the Command Line; the billing information will be saved to the database and continue to the validation screen. From the billing validation screen, the authorized user can generate the invoice.
Note: Once the application has been invoiced the only way for an Authorized User to move through screens using the tabs is by selecting Cancel Bill.
Command Line functions:
Proceed – Means the system will proceed to the next logical step in processing the transaction
Add to Cart – means the system will save the invoice information to a cart for future payment along with any other items placed in the cart as a result of subsequent transaction processing
Cancel Bill – means the invoice/bill that was calculated will be cancelled and the transaction will no longer be in “Invoiced” status and will be placed in an “Open” status”
Refresh – means the system will return the screen to the original content when the user entered the screen for the first time
Quit – means the user is finished working on this transaction for the time being and the transaction is available for completion by any authorized user at a late time using the “work in progress” feature.
Invoice – Means the system display the invoice
Draft Permit – means the system will provide a Draft Permit for verification by the user. No permit number is assigned at this point.
Help - means the system will provide a help screen for the current screen and the user can view the help information and scan the help file as required.
Payment Detail Screen – see 1.4.4.6-payment, p 131
Select: Enterprise – Applications – O/O – Permit – SVC - Bus Mounted Bike Racks SVC
The Credential tab may or may not be available to external users –this depends on whether the user applies for a fleet permit, then it’s electronic.
The general application screen is the first screen for the bus mounted bike racks SVC permit application. The user will select specifics about the permit including language and addresses.
Select: Enterprise – Applications – O/O – Permit – SVC - Bus Mounted Bike Racks SVC
For external users the O/O Account number will be pre-populated. Internal Users will have to provide the O/O Account Number (No.), Legal Name or Permit Number (No.) in the corresponding field to process a permit application.
When PROCEED is selected on the Command Line at the bottom of the screen.
· A validation of the CVOR status will be performed if O/O Account Number was created with a CVOR.
· If the Account Level status is suspended or inactive, then a message will display telling the user to please contact the Oversize/Overweight Permit section.
Copy From provides the ability to copy data from a previously submitted permit for the purpose of using the data in a new application or request.
Note: Only permits form the account can be copied.
· Authorized User can enter the Account Number (No.) and/or Legal Name and Select Copy From to get a list of available permits items to select
· And then, Select the permit to be copied
· If the Permit Number (No.) is entered the Authorized User can Select Copy From on the Command Line to update the permit information
Note: The information up to the conditions screen for the applicable Permit Type will be displayed.

To get the details for other fields of the general process, please refer to section 1.4.2.1.1 or for online users, click here.
The following information is populated from the Common Client Enterprise Level or Account Level and cannot be updated by an Authorized User.
O/O Account Details
· Account Number (No.)
· Legal Name
· Application Number (No.) they system will generate the unique number for tracking the application
· CVOR
· Client Status
· NSC Number
· Exemption Code if the Common Client has an Exemption Code it is checked, if expired then Authorized User must enter a valid exemption code
· Physical Address
The Authorized User can update the following fields
· Mailing Address by default, it populates from the Account Level and the authorized user can select any one from the drop-down list.
· Issued At the Authorized User can select from the drop-down list.
· Authorized User must Select a contact name from drop down list
Permit Details
The following information is generated by the system and cannot be updated by an Authorized User.
· Permit Type
· Transaction Type
· Application Status – For a new permit, application status is not submitted status.
Note: The status will be updated to submitted after completing all tabs
· Application Status Date the date will be changed when the application status is updated
· Permit Number (No.) for a new permit, it is blank, and the user will get a permit number after credentials have been issued
Authorized User must update or enter the required information into the following fields.
· Select if Permit Request is for an Individual or Fleet permit
Note: If Fleet Permit selected limited to 1 permit.
· *Number (No.) of Permits Required the number of identical permits that will be produced with different permit numbers and will be used in fee calculations and printing.
· If Bilingual format is checked, credentials will be generated in both English and French
· *Authorized User must select the Start Date of the permit
· The End Date
· Authorized User can enter the appropriate comment and then select Add/Update Comment
· If a comment is entered the appropriate access level for the comment from the drop-down list:
o Internal – means only internal resources are authorized to view the comment.
o Public – means the internal and external users are authorized to view the comments.
o Restricted – means only the defined authorized roles can view the comment.
· When the Delete Allowed is Selected the comment can be deleted by another Authorized Users
Authorized User must Select PROCEED to execute the edits and display the verification screen.
Proceed – means the system will take the user to the next logical step required for the transaction
Refresh – means the system will return the screen to the original content when the user entered the screen for the first time
Quit – means the user is finished working on this transaction for the time being and the transaction is available for completion by any authorized user at a late time using the “work in progress” feature.
Cancel – means the user has decided to discard all activity on this transaction as if they had never started it. The transaction log will show the transaction activity.
Help – means the help screen will be provided for the current screen and the user may scan the help file for assistance.
To return to an alternate screen while processing a transaction the user can select the appropriate tab along the top of the current screen and the system will asynchronously display the corresponding screen for processing by the user. After fijnishing rfeviewing and/or making changes to the screen the user can select the “Proceed” button to return to the screen they came from General.
The verification screen displays showing the user a consolidated view of the general information. If the user determines some of the information is incorrect, they can select BACK on the Command Line and the system will display the general screen again. The user can make the required changes and select PROCEED.
Select PROCEED on the Command Line and general information will be saved to the database.

SVC
The following fields are populated from the Common Client or Account Level, or System generated, and the Authorized User cannot change them.
O/O Account Details
Account No.
Legal Name
Application No.
CVOR
NSC Number
Exemption Code
Permit Details
The following fields are populated from the Common Client or Account Level, or System generated, and the Authorized User cannot change them.
· Transaction Type
· Permit Number (No.) is blank, it is system generated when credentials are issued.
SVC
The Authorized User must record the dimensions and destination information being requested for the permit(s) and there are a few mandatory fields indicated by a red asterisk (*)
Dimensions:
· *Bus Length (m)
· *Overall Length with Rack Retracted (m)
· *Overall Length with Rack Deployed (m)
· Articulated Bus Length (m)
· Articulated Bus Length with Rack Retracted (m)
· Articulated Bus Length with Rack Deployed (m)
· *Number (No.) of buses Equipped with Bike Rack
Origin Address
· Origin City the start points of the route
· Origin Province/State
Destination Address
· Destination City the end point of the route
· Destination Province/State
Route Details – All the details must be entered in the field.
*Authorizing the Movement of (EN)
*Authorizing the Movement of (FR
Comment – Enter the appropriate comment. These comments are displayed on the SVC enquiry screen to internal users only.
Access Level – Select the appropriate access level for the comment from the dropdown list:
o Internal – means only internal resources are authorized to view the comment.
o Public – means the internal and external users are authorized to view the comments.
o Restricted – means only the defined authorized roles can view the comment.
Delete Allowed – Click this box if the authorized user wants to be able to delete this comment.
Select PROCEED to execute the edits and display the verification screen.
The verification screen displays showing the user a consolidated view of the SVC information. If the user determines some of the information is incorrect, they can select BACK on the Command
Line and the system will display the SVC screen again. The user can make the required changes and select PROCEED.
Select PROCEED on the Command Line and the SVC information is saved to the database. The conditions screen will display.
Command Line functions:
Proceed – means the system will take the user to the next logical step required for the transaction
Refresh – means the system will return the screen to the original content when the user entered the screen for the first time
Quit – means the user is finished working on this transaction for the time being and the transaction is available for completion by any authorized user at a late time using the “work in progress” feature.
Cancel – means the user has decided to discard all activity on this transaction as if they had never started it. The transaction log will show the transaction activity.
Help – means the help screen will be provided for the current screen and the user may scan the help file for assistance.
To return to an alternate screen while processing a transaction the user can select the appropriate tab along the top of the current screen and the system will asynchronously display the corresponding screen for processing by the user. After fijnishing rfeviewing and/or making changes to the screen the user can select the “Proceed” button to return to the screen they came from General.

To get the details of the conditions process, please refer to section 1.4.2.1.3 or for online users, click here.
Conditions
The Authorized User can select Condition Category from the drop-down list, if applicable. Conditions will populate based on the conditions category
o All
o Standard
· If applicable, Standard conditions are populated by default and cannot be changed by the Authorized User.
· Sequence Number (No.)
· Select
· Conditions Category populated as per configuration
§ The Conditions are displayed in both English and French as per configuration Notes populated as per configuration
Non-Standard
The Authorized User can check non-standard conditions if applicable.
o Sequence Number (No.) is populated as per configuration and cannot be changed by the user
Additional Conditions
The Authorized User can check or add additional conditions if applicable.
· Sequence No. – By default, populated as per configuration and cannot be changed by the user.
· To Add a Condition the Authorized User must select the green “+” sign to open a table to enter Condition details
· Authorized User must enter the Condition details in the Condition English field
· If Bilingual format has been selected the details must also be entered in French in the Condition French table
· To remove the Condition the Authorized User must select the red “x” to delete the entry
Select PROCEED to execute the edits and display the verification screen.
The verification screen displays showing the user a consolidated view of the conditions information. If the user determines some of the information is incorrect, they can select BACK on the Command Line and the system will display the conditions screen again. The user can make the required changes and select PROCEED.
Select PROCEED on the Command Line and the conditions information will be saved to the database. The billing Screen displays.

To get the details of the billing process, please refer to section 1.4.2.1.4 or for online users, clickhere.
There are several sections on the Billing Screen.
The following fields are populated from the Common Client or Account Level, or System generated, and the Authorized User cannot change them.
O/O Account Details
Account No.
Legal Name
Application No.
CVOR
NSC Number
Exemption Code
Billing Details
· Transaction Type
· Permit Number (No.) is blank, it is system generated when credentials are issued.
· Billing Date
· Transaction Type
· Transaction Status has been updated to OPEN
Fees Section
By default, the following are populated from the enterprise screen and cannot be changed by the user.
· Prepaid Balance
· Stored Credit Balance
· Manual Adjustment Amount – Only an Authorized User can complete adjustment based on business rules
· Fee Table displays the following application details
o Fee Type
o Number (No.) of Permits Required
o Fee Amount
o Waive – Only an Authorized User can select based on eligibility criteria
Documentation Requirements – this section
allows user to scan, and upload required documents. There are the following
three radio buttons available:
·
Scan
now – allows to scan and upload documents at once
·
Scan
Later – allows to schedule document scan and submission for a later time
·
No
Scan Required – select this option if no documents are required to be uploaded
Certain documents are required for the creation of a New Permit. If the system can check for the document automatically via a system interface, it will mark the document as being System Collected.
· The SVC documents must be scanned, and status updated before the permit can be issued by the Authorized User
· The Authorized User must select the document name; then click the Add link and the document name will be displayed in a list just below the drop down.
· Authorized User can select the appropriate status for that document from the Status drop down list.
o Collected – means the document has been submitted and approved by issuer.
o Not Required – means the document is not required for this transaction.
o Outstanding – means the document has not been submitted and approved yet.
o System Collected - means the system has some interface that provides verification that the documentation requirement has been met.
Attachment Upload
Documents that Authorized User will upload to attach to the permit
· Authorized User can select the PDF files from the Browse link
· To attach the selected file the Authorized User must click Upload to attach the file, if applicable
Delivery Details
The Authorized User must indicate the delivery method for the permit.
· Select the Delivery Method from the drop-down list
o Courier
§ If selected the Authorized User must enter the details of the Courier the Name, Account Number (No.) and Courier Phone Number (No.)
o Mailed
o Pick Up
§ If selected the Authorized User must select the pickup location
o Authorized Users must print permits, so the only Electronic Delivery Channel is print
o Authorized User can enter the appropriate comment that will be viewed on the Account Enquiry Screen by internal users only.
o The Authorized User must select the appropriate access level for the comment from the drop-down list:
§ Internal – means only internal resources are authorized to view the comment.
§ Public – means the internal and external users are authorized to view the comments.
§ Restricted – means only the defined authorized roles can view the comment.
· When the Delete Allowed is Selected the comment can be deleted by another Authorized Users
Command Line functions:
Proceed – means the system will take the user to the next logical step required for the transaction
Refresh – means the system will return the screen to the original content when the user entered the screen for the first time
Quit – means the user is finished working on this transaction for the time being and the transaction is available for completion by any authorized user at a late time using the “work in progress” feature.
Cancel – means the user has decided to discard all activity on this transaction as if they had never started it. The transaction log will show the transaction activity.
Help – means the help screen will be provided for the current screen and the user may scan the help file for assistance.
Select PROCEED to execute the edits and auto issuance criteria. If the auto issuance criteria fail, the application will be submitted to the workflow for review. Once the application has been approved by the authorized user and on “Done” click from the application approval details screen, the system will come back to the billing screen.
Select PROCEED on the Command Line; the billing information will be saved to the database and continue to the validation screen. From the billing validation screen, the authorized user can generate the invoice.
Note: Once the application has been invoiced the only way for an Authorized User to move through screens using the tabs is by selecting Cancel Bill.
Command Line functions:
Proceed – Means the system will proceed to the next logical step in processing the transaction
Add to Cart – means the system will save the invoice information to a cart for future payment along with any other items placed in the cart as a result of subsequent transaction processing
Cancel Bill – means the invoice/bill that was calculated will be cancelled and the transaction will no longer be in “Invoiced” status and will be placed in an “Open” status”
Refresh – means the system will return the screen to the original content when the user entered the screen for the first time
Quit – means the user is finished working on this transaction for the time being and the transaction is available for completion by any authorized user at a late time using the “work in progress” feature.
Invoice – Means the system display the invoice
Draft Permit – means the system will provide a Draft Permit for verification by the user. No permit number is assigned at this point.
Help - means the system will provide a help screen for the current screen and the user can view the help information and scan the help file as required.
Payment Detail Screen – see 1.4.4.6-payment, p 131
Select: Enterprise – Applications – O/O – Permit – SVC - Car Carrier
For external users the O/O Account number will be pre-populated. Internal Users will have to provide the O/O Account Number (No.), Legal Name or Permit Number (No.) in the corresponding field to process a permit application.
When PROCEED is selected on the Command Line at the bottom of the screen.
· A validation of the CVOR status will be performed if O/O Account Number was created with a CVOR.
· If the Account Level status is suspended or inactive, then a message will display telling the user to please contact the Oversize/Overweight Permit section.
Copy From provides the ability to copy data from a previously submitted permit for the purpose of using the data in a new application or request.
Note: Only permits form the account can be copied.
· Authorized User can enter the Account Number (No.) and/or Legal Name and Select Copy From to get a list of available permits items to select
· And then, Select the permit to be copied
· If the Permit Number (No.) is entered the Authorized User can Select Copy From on the Command Line to update the permit information
Note: The information up to the conditions screen for the applicable Permit Type will be displayed.

To get the details of the general process, please refer to section 1.4.2.1.1 or for online users, clickhere.
The following fields are populated from the Common Client or Account Level, or System generated, and the Authorized User cannot change them.
O/O Account Details
Account No.
Legal Name
Application No.
CVOR
NSC Number
Exemption Code
· Physical Address
The Authorized User can update the following fields
· Mailing Address by default, it populates from the Account Level and the authorized user can select any one from the drop-down list.
· Issued At the Authorized User can select from the drop-down list.
· Authorized User must Select a contact name from drop down list
Permit Details
The following information is generated by the system and cannot be updated by an Authorized User.
· Permit Type
· Transaction Type
· Application Status – For a new permit, application status is not submitted status.
Note: The status will be updated to submitted after completing all tabs
· Application Status Date the date will be changed when the application status is updated
· Permit Number (No.) for a new permit, it is blank, and the user will get a permit number after credentials have been issued
Authorized User must update or enter the required information into the following fields.
· *Number (No.) of Permits Required the number of identical permits that will be produced with different permit numbers and will be used in fee calculations and printing.
· If Bilingual format is checked, credentials will be generated in both English and French
· *Authorized User must select the Start Date of the permit
· *Authorized User must select the End Date of the permit
· Authorized User can enter the appropriate comment and then select Add/Update Comment
· If a comment is entered the appropriate access level for the comment from the drop-down list:
· Internal – means only internal resources are authorized to view the comment.
· Public – means the internal and external users are authorized to view the comments.
· Restricted – means only the defined authorized roles can view the comment.
· When the Delete Allowed is Selected the comment can be deleted by another Authorized Users
Authorized User must Select PROCEED to execute the edits and display the verification screen.
Command Line functions:
Proceed – means the system will take the user to the next logical step required for the transaction
Refresh – means the system will return the screen to the original content when the user entered the screen for the first time
Quit – means the user is finished working on this transaction for the time being and the transaction is available for completion by any authorized user at a late time using the “work in progress” feature.
Cancel – means the user has decided to discard all activity on this transaction as if they had never started it. The transaction log will show the transaction activity.
Help – means the help screen will be provided for the current screen and the user may scan the help file for assistance.
To return to an alternate screen while processing a transaction the user can select the appropriate tab along the top of the current screen and the system will asynchronously display the corresponding screen for processing by the user. After fijnishing rfeviewing and/or making changes to the screen the user can select the “Proceed” button to return to the screen they came from General.
The verification screen displays showing the user a consolidated view of the general information. If the user determines some of the information is incorrect, they can select BACK on the Command Line and the system will display the general screen again. The user can make the required changes and select PROCEED.
Select PROCEED on the
Command Line and general information will be saved to the database.

There are several sections on the SVC screen.
The following fields are populated from the Common Client or Account Level, or System generated, and the Authorized User cannot change them.
O/O Account Details
Account No.
Legal Name
Application No.
CVOR
NSC Number
Exemption Code
Permit Details
The following fields are populated from the Common Client or Account Level, or System generated, and the Authorized User cannot change them.
· Transaction Type
· Permit Number (No.) is blank, it is system generated when credentials are issued.
SVC
The Authorized User must record the destination information being requested for the permit(s) and there are a few mandatory fields indicated by a red asterisk (*)
· *Origin
· *Destination
· *Route Details
· *Authorizing the Movement of (EN)
· *Authorizing the Movement of (FR)
Comment – Enter the appropriate comment. These comments are displayed on the SVC enquiry screen to internal users only.
Access Level – Select the appropriate access level for the comment from the dropdown list:
o Internal – means only internal resources are authorized to view the comment.
o Public – means the internal and external users are authorized to view the comments.
o Restricted – means only the defined authorized roles can view the comment.
Delete Allowed – Click this box if the authorized user wants to be able to delete this comment.
Select PROCEED to execute the edits and display the verification screen.
The verification screen displays showing the user a consolidated view of the SVC information. If the user determines some of the information is incorrect, they can select BACK on the Command
Line and the system will display the SVC screen again. The user can make the required changes and select PROCEED.
Select PROCEED on the Command Line and the SVC information is saved to the database. The conditions screen will display.
Command Line functions:
Proceed – means the system will take the user to the next logical step required for the transaction
Refresh – means the system will return the screen to the original content when the user entered the screen for the first time
Quit – means the user is finished working on this transaction for the time being and the transaction is available for completion by any authorized user at a late time using the “work in progress” feature.
Cancel – means the user has decided to discard all activity on this transaction as if they had never started it. The transaction log will show the transaction activity.
Help – means the help screen will be provided for the current screen and the user may scan the help file for assistance.
To return to an alternate screen while processing a transaction the user can select the appropriate tab along the top of the current screen and the system will asynchronously display the corresponding screen for processing by the user. After fijnishing rfeviewing and/or making changes to the screen the user can select the “Proceed” button to return to the screen they came from General.

To get the details of the conditions process, please refer to section 1.4.2.1.3 or for online users, click here.
Conditions
The Authorized User can select Condition Category from the drop-down list, if applicable. Conditions will populate based on the conditions category
o All
o Standard
· If applicable, Standard conditions are populated by default and cannot be changed by the Authorized User.
· Sequence Number (No.)
· Select
· Conditions Category populated as per configuration
§ The Conditions are displayed in both English and French as per configuration Notes populated as per configuration
Non-Standard
The Authorized User can check non-standard conditions if applicable.
o Sequence Number (No.) is populated as per configuration and cannot be changed by the user
Additional Conditions
The Authorized User can check or add additional conditions if applicable.
· Sequence No. - By default, populated as per configuration and cannot be changed by the user.
· To Add a Condition the Authorized User must select the green “+” sign to open a table to enter Condition details
· Authorized User must enter the Condition details in the Condition English field
· If Bilingual format has been selected the details must also be entered in French in the Condition French table
· To remove the Condition the Authorized User must select the red “x” to delete the entry
Select PROCEED to execute the edits and display the verification screen.
The verification screen displays showing the user a consolidated view of the conditions information. If the user determines some of the information is incorrect, they can select BACK on the Command Line and the system will display the conditions screen again. The user can make the required changes and select PROCEED.
Select PROCEED on the Command Line and the conditions information will be saved to the database. The billing Screen displays.

To get the details of the billing process, please refer to section 1.4.2.1.4 or for online users, clickhere.
There are several sections on the Billing Screen.
The following fields are populated from the Common Client or Account Level, or System generated, and the Authorized User cannot change them.
O/O Account Details
Account No.
Legal Name
Application No.
CVOR
NSC Number
Exemption Code
Billing Details
· Transaction Type
· Permit Number (No.) is blank, it is system generated when credentials are issued.
· Billing Date
· Transaction Type
· Transaction Status has been updated to OPEN
Fees Section
By default, the following are populated from the enterprise screen and cannot be changed by the user.
· Prepaid Balance
· Stored Credit Balance
· Manual Adjustment Amount – Only an Authorized User can complete adjustment based on business rules
· Fee Table displays the following application details
o Fee Type
o Number (No.) of Permits Required
o Fee Amount
o Waive – Only an Authorized User can select based on eligibility criteria
Documentation Requirements – this section
allows user to scan, and upload required documents. There are the following
three radio buttons available:
·
Scan
now – allows to scan and upload documents at once
·
Scan
Later – allows to schedule document scan and submission for a later time
·
No
Scan Required – select this option if no documents are required to be uploaded
Certain documents are required for the creation of a New Permit. If the system can check for the document automatically via a system interface, it will mark the document as being System Collected.
· The SVC documents must be scanned, and status updated before the permit can be issued by the Authorized User
· The Authorized User must select the document name; then click the Add link and the document name will be displayed in a list just below the drop down.
· Authorized User can select the appropriate status for that document from the Status drop down list.
o Collected – means the document has been submitted and approved by issuer.
o Not Required – means the document is not required for this transaction.
o Outstanding – means the document has not been submitted and approved yet.
o System Collected - means the system has some interface that provides verification that the documentation requirement has been met.
Attachment Upload
Documents that Authorized User will upload to attach to the permit
· Authorized User can select the PDF files from the Browse link
· To attach the selected file the Authorized User must click Upload to attach the file, if applicable
Delivery Details
The Authorized User must indicate the delivery method for the permit.
· Select the Delivery Method from the drop-down list
o Courier
§ If selected the Authorized User must enter the details of the Courier the Name, Account Number (No.) and Courier Phone Number (No.)
o Mailed
o Pick Up
§ If selected the Authorized User must select the pickup location
o Authorized Users must print permits, so the only Electronic Delivery Channel is print
o Authorized User can enter the appropriate comment that will be viewed on the Account Enquiry Screen by internal users only.
o The Authorized User must select the appropriate access level for the comment from the drop-down list:
§ Internal – means only internal resources are authorized to view the comment.
§ Public – means the internal and external users are authorized to view the comments.
§ Restricted – means only the defined authorized roles can view the comment.
· When the Delete Allowed is Selected the comment can be deleted by another Authorized Users
Command Line functions:
Proceed – means the system will take the user to the next logical step required for the transaction
Refresh – means the system will return the screen to the original content when the user entered the screen for the first time
Quit – means the user is finished working on this transaction for the time being and the transaction is available for completion by any authorized user at a late time using the “work in progress” feature.
Cancel – means the user has decided to discard all activity on this transaction as if they had never started it. The transaction log will show the transaction activity.
Help – means the help screen will be provided for the current screen and the user may scan the help file for assistance.
Select PROCEED to execute the edits and auto issuance criteria. If the auto issuance criteria fail, the application will be submitted to the workflow for review. Once the application has been approved by the authorized user and on “Done” click from the application approval details screen, the system will come back to the billing screen.
Select PROCEED on the Command Line; the billing information will be saved to the database and continue to the validation screen. From the billing validation screen, the authorized user can generate the invoice.
Note: Once the application has been invoiced the only way for an Authorized User to move through screens using the tabs is by selecting Cancel Bill.
Command Line functions:
Proceed – Means the system will proceed to the next logical step in processing the transaction
Add to Cart – means the system will save the invoice information to a cart for future payment along with any other items placed in the cart as a result of subsequent transaction processing
Cancel Bill – means the invoice/bill that was calculated will be cancelled and the transaction will no longer be in “Invoiced” status and will be placed in an “Open” status”
Refresh – means the system will return the screen to the original content when the user entered the screen for the first time
Quit – means the user is finished working on this transaction for the time being and the transaction is available for completion by any authorized user at a late time using the “work in progress” feature.
Invoice – Means the system display the invoice
Draft Permit – means the system will provide a Draft Permit for verification by the user. No permit number is assigned at this point.
Help - means the system will provide a help screen for the current screen and the user can view the help information and scan the help file as required.
Payment Detail Screen – see 1.4.4.6-payment, p 131
Select: Enterprise – Applications – O/O – Permit – SVC - Extended Permitting Dump Semi-Trailers SVC
For external users the O/O Account number will be pre-populated. Internal Users will have to provide the O/O Account Number (No.), Legal Name or Permit Number (No.) in the corresponding field to process a permit application.
When PROCEED is selected on the Command Line at the bottom of the screen.
· A validation of the CVOR status will be performed if O/O Account Number was created with a CVOR.
· If the Account Level status is suspended or inactive, then a message will display telling the user to please contact the Oversize/Overweight Permit section.
Copy From provides the ability to copy data from a previously submitted permit for the purpose of using the data in a new application or request.
Note: Only permits form the account can be copied.
· Authorized User can enter the Account Number (No.) and/or Legal Name and Select Copy From to get a list of available permits items to select
· And then, Select the permit to be copied
· If the Permit Number (No.) is entered the Authorized User can Select Copy From on the Command Line to update the permit information
Note: The information up to the conditions screen for the applicable Permit Type will be displayed.

To get the details of the general process, please refer to section 1.4.2.1.1 or for online users, clickhere.
The following information is populated from the Common Client Enterprise Level or Account Level and cannot be updated by an Authorized User.
O/O Account Details
· Account Number (No.)
· Legal Name
· Application Number (No.) they system will generate the unique number for tracking the application
· CVOR
· Client Status
· NSC Number
· Exemption Code if the Common Client has an Exemption Code it is checked, if expired then Authorized User must enter a valid exemption code
· Physical Address
The Authorized User can update the following fields
· Mailing Address by default, it populates from the Account Level and the authorized user can select any one from the drop-down list.
· Issued At the Authorized User can select from the drop-down list.
· Authorized User must Select a contact name from drop down list
Permit Details
The following information is generated by the system and cannot be updated by an Authorized User.
· Permit Type
· Transaction Type
· Application Status – For a new permit, application status is not submitted status.
Note: The status will be updated to submitted after completing all tabs
· Application Status Date the date will be changed when the application status is updated
· Permit Number (No.) for a new permit, it is blank, and the user will get a permit number after credentials have been issued
Authorized User must update or enter the required information into the following fields.
· *Number (No.) of Permits Required the number of identical permits that will be produced with different permit numbers and will be used in fee calculations and printing.
· If Bilingual format is checked, credentials will be generated in both English and French
· *Authorized User must select the Start Date of the permit
· *Authorized User must select the End Date of the permit
· Authorized User can enter the appropriate comment and then select Add/Update Comment
· If a comment is entered the appropriate access level for the comment from the drop-down list:
o Internal – means only internal resources are authorized to view the comment.
o Public – means the internal and external users are authorized to view the comments.
o Restricted – means only the defined authorized roles can view the comment.
· When the Delete Allowed is Selected the comment can be deleted by another Authorized Users
Authorized User must Select PROCEED to execute the edits and display the verification screen.
Command Line functions:
Proceed – means the system will take the user to the next logical step required for the transaction
Refresh – means the system will return the screen to the original content when the user entered the screen for the first time
Quit – means the user is finished working on this transaction for the time being and the transaction is available for completion by any authorized user at a late time using the “work in progress” feature.
Cancel – means the user has decided to discard all activity on this transaction as if they had never started it. The transaction log will show the transaction activity.
Help – means the help screen will be provided for the current screen and the user may scan the help file for assistance.
To return to an alternate screen while processing a transaction the user can select the appropriate tab along the top of the current screen and the system will asynchronously display the corresponding screen for processing by the user. After fijnishing rfeviewing and/or making changes to the screen the user can select the “Proceed” button to return to the screen they came from General.
The verification screen displays showing the user a consolidated view of the general information. If the user determines some of the information is incorrect, they can select BACK on the Command Line and the system will display the general screen again. The user can make the required changes and select PROCEED.
Select PROCEED on the Command Line and general information will be saved to the database.

There are several sections on the SVC screen.
The following fields are populated from the Common Client or Account Level, or System generated, and the Authorized User cannot change them.
O/O Account Details
Account No.
Legal Name
Application No.
CVOR
NSC Number
Exemption Code
Permit Details
The following fields are populated from the Common Client or Account Level, or System generated, and the Authorized User cannot change them.
· Transaction Type
· Permit Number (No.) is blank, it is system generated when credentials are issued.
SVC
The Authorized User must record the destination information being requested for the permit(s) and there are a few mandatory fields indicated by a red asterisk (*)
· *Vehicle Make
· *Month of Manufacture the month must be entered as a value
e.g., Authorized User must enter 01 for a vehicle manufactured in January.
· *Year of Manufacture
· *Vehicle Identification Number (VIN)
· Trailer Type
· *Origin the start points of the route
· *Destination the end point of the route
· *Route Details the entire route must be entered
· *Authorizing the Movement of (EN)
· *Authorizing the Movement of (FR)
Comment – Enter the appropriate comment. These comments are displayed on the SVC enquiry screen to internal users only.
Access Level – Select the appropriate access level for the comment from the dropdown list:
o Internal – means only internal resources are authorized to view the comment.
o Public – means the internal and external users are authorized to view the comments.
o Restricted – means only the defined authorized roles can view the comment.
Delete Allowed – Click this box if the authorized user wants to be able to delete this comment.
Select PROCEED to execute the edits and display the verification screen.
The verification screen displays showing the user a consolidated view of the SVC information. If the user determines some of the information is incorrect, they can select BACK on the Command and the system will display the SVC screen again. The user can make the required changes and select PROCEED.
Select PROCEED on the Command Line and the SVC information is saved to the database. The conditions screen will display.
Command Line functions:
Proceed – means the system will take the user to the next logical step required for the transaction
Refresh – means the system will return the screen to the original content when the user entered the screen for the first time
Quit – means the user is finished working on this transaction for the time being and the transaction is available for completion by any authorized user at a late time using the “work in progress” feature.
Cancel – means the user has decided to discard all activity on this transaction as if they had never started it. The transaction log will show the transaction activity.
Help – means the help screen will be provided for the current screen and the user may scan the help file for assistance.
To return to an alternate screen while processing a transaction the user can select the appropriate tab along the top of the current screen and the system will asynchronously display the corresponding screen for processing by the user. After fijnishing rfeviewing and/or making changes to the screen the user can select the “Proceed” button to return to the screen they came from General.

To get the details of the conditions process, please refer to section 1.4.2.1.3 or for online users, click here.
Conditions
The Authorized User can select Condition Category from the drop-down list, if applicable. Conditions will populate based on the conditions category
o All
o Standard
· If applicable, Standard conditions are populated by default and cannot be changed by the Authorized User.
· Sequence Number (No.)
· Select
· Conditions Category populated as per configuration
§ The Conditions are displayed in both English and French as per configuration Notes populated as per configuration
Non-Standard
The Authorized User can check non-standard conditions if applicable.
o Sequence Number (No.) is populated as per configuration and cannot be changed by the user
Additional Conditions
The Authorized User can check or add additional conditions if applicable.
· Sequence No. – By default, populated as per configuration and cannot be changed by the user.
· To Add a Condition the Authorized User must select the green “+” sign to open a table to enter Condition details
· Authorized User must enter the Condition details in the Condition English field
· If Bilingual format has been selected the details must also be entered in French in the Condition French table
· To remove the Condition the Authorized User must select the red “x” to delete the entry
Select PROCEED to execute the edits and display the verification screen.
The verification screen displays showing the user a consolidated view of the conditions information. If the user determines some of the information is incorrect, they can select BACK on the Command Line and the system will display the conditions screen again. The user can make the required changes and select PROCEED.
Select PROCEED on the Command Line and the conditions information will be saved to the database. The billing Screen displays.

To get the details of the billing process, please refer to section 1.4.2.1.4 or for online users, clickhere.
There are several sections on the Billing Screen.
The following fields are populated from the Common Client or Account Level, or System generated, and the Authorized User cannot change them.
O/O Account Details
Account No.
Legal Name
Application No.
CVOR
NSC Number
Exemption Code
Billing Details
· Transaction Type
· Permit Number (No.) is blank, it is system generated when credentials are issued.
· Billing Date
· Transaction Type
· Transaction Status has been updated to OPEN
Fees Section
By default, the following are populated from the enterprise screen and cannot be changed by the user.
· Prepaid Balance
· Stored Credit Balance
· Manual Adjustment Amount – Only an Authorized User can complete adjustment based on business rules
· Fee Table displays the following application details
o Fee Type
o Number (No.) of Permits Required
o Fee Amount
o Waive – Only an Authorized User can select based on eligibility criteria
Documentation Requirements – this section
allows user to scan, and upload required documents. There are the following
three radio buttons available:
·
Scan
now – allows to scan and upload documents at once
·
Scan
Later – allows to schedule document scan and submission for a later time
·
No
Scan Required – select this option if no documents are required to be uploaded
Certain documents are required for the creation of a New Permit. If the system can check for the document automatically via a system interface, it will mark the document as being System Collected.
· The SVC documents must be scanned, and status updated before the permit can be issued by the Authorized User
· The Authorized User must select the document name; then click the Add link and the document name will be displayed in a list just below the drop down.
· Authorized User can select the appropriate status for that document from the Status drop down list.
o Collected – means the document has been submitted and approved by issuer.
o Not Required – means the document is not required for this transaction.
o Outstanding – means the document has not been submitted and approved yet.
o System Collected – means the system has some interface that provides verification that the documentation requirement has been met.
Attachment Upload
Documents that Authorized User will upload to attach to the permit
· Authorized User can select the PDF files from the Browse link
· To attach the selected file the Authorized User must click Upload to attach the file, if applicable
Delivery Details
The Authorized User must indicate the delivery method for the permit.
· Select the Delivery Method from the drop-down list
o Courier
§ If selected the Authorized User must enter the details of the Courier the Name, Account Number (No.) and Courier Phone Number (No.)
o Mailed
o Pick Up
§ If selected the Authorized User must select the pickup location
o Electronic Delivery Channel
o Authorized User can enter the appropriate comment that will be viewed on the Account Enquiry Screen by internal users only.
o The Authorized User must select the appropriate access level for the comment from the drop-down list:
§ Internal – means only internal resources are authorized to view the comment.
§ Public – means the internal and external users are authorized to view the comments.
§ Restricted – means only the defined authorized roles can view the comment.
· When the Delete Allowed is Selected the comment can be deleted by another Authorized Users
Command Line functions:
Proceed – means the system will take the user to the next logical step required for the transaction
Refresh – means the system will return the screen to the original content when the user entered the screen for the first time
Quit – means the user is finished working on this transaction for the time being and the transaction is available for completion by any authorized user at a late time using the “work in progress” feature.
Cancel – means the user has decided to discard all activity on this transaction as if they had never started it. The transaction log will show the transaction activity.
Help – means the help screen will be provided for the current screen and the user may scan the help file for assistance.
Select PROCEED to execute the edits and auto issuance criteria. If the auto issuance criteria fail, the application will be submitted to the workflow for review. Once the application has been approved by the authorized user and on “Done” click from the application approval details screen, the system will come back to the billing screen.
Select PROCEED on the Command Line; the billing information will be saved to the database and continue to the validation screen. From the billing validation screen, the authorized user can generate the invoice.
Note: Once the application has been invoiced the only way for an Authorized User to move through screens using the tabs is by selecting Cancel Bill.
Command Line functions:
Proceed – Means the system will proceed to the next logical step in processing the transaction
Add to Cart – means the system will save the invoice information to a cart for future payment along with any other items placed in the cart as a result of subsequent transaction processing
Cancel Bill – means the invoice/bill that was calculated will be cancelled and the transaction will no longer be in “Invoiced” status and will be placed in an “Open” status”
Refresh – means the system will return the screen to the original content when the user entered the screen for the first time
Quit – means the user is finished working on this transaction for the time being and the transaction is available for completion by any authorized user at a late time using the “work in progress” feature.
Invoice – Means the system display the invoice
Draft Permit – means the system will provide a Draft Permit for verification by the user. No permit number is assigned at this point.
Help - means the system will provide a help screen for the current screen and the user can view the help information and scan the help file as required.
Payment Detail Screen – see 1.4.4.6-payment, p 131
Select: Enterprise – Applications – O/O – Permit – SVC - Generic SVC
For external users the O/O Account number will be pre-populated. Internal Users will have to provide the O/O Account Number (No.), Legal Name or Permit Number (No.) in the corresponding field to process a permit application.
When PROCEED is selected on the Command Line at the bottom of the screen.
· A validation of the CVOR status will be performed if O/O Account Number was created with a CVOR.
· If the Account Level status is suspended or inactive, then a message will display telling the user to please contact the Oversize/Overweight Permit section.
Copy From provides the ability to copy data from a previously submitted permit for the purpose of using the data in a new application or request.
Note: Only permits form the account can be copied.
· Authorized User can enter the Account Number (No.) and/or Legal Name and Select Copy From to get a list of available permits items to select
· And then, Select the permit to be copied
· If the Permit Number (No.) is entered the Authorized User can Select Copy From on the Command Line to update the permit information
Note: The information up to the conditions screen for the applicable Permit Type will be displayed.

To get the details for other fields of the general process, please refer to section 1.4.2.1.1 or for online users, clickhere.
There are several sections on the general screen.
The following information is populated from the Common Client Enterprise Level or Account Level and cannot be updated by an Authorized User.
O/O Account Details
· Account Number (No.)
· Legal Name
· Application Number (No.) they system will generate the unique number for tracking the application
· CVOR
· Client Status
· NSC Number
· Exemption Code if the Common Client has an Exemption Code it is checked, if expired then Authorized User must enter a valid exemption code
· Physical Address
The Authorized User can update the following fields
· Mailing Address by default, it populates from the Account Level and the authorized user can select any one from the drop-down list.
· Issued At the Authorized User can select from the drop-down list.
· Authorized User must Select a contact name from drop down list
Permit Details
The following information is generated by the system and cannot be updated by an Authorized User.
· Permit Type
· Transaction Type
· Application Status – For a new permit, application status is not submitted status.
Note: The status will be updated to submitted after completing all tabs
· Application Status Date the date will be changed when the application status is updated
· Permit Number (No.) for a new permit, it is blank, and the user will get a permit number after credentials have been issued
Authorized User must update or enter the required information into the following fields.
· Permit Name is selected from a drop-down list
o Amphibus Tour Bus
o Dofasco
o Equinox
o Fire Crash Truck
o GM Automotive Product
o Manitoulin
o Rock Truck Crossing
o Other
Note: If Other is selected the Authorized User must enter details field
· Select if Permit Request is for an Individual or Fleet permit
Note: If Fleet Permit selected limited to 1 permit.
· *Number (No.) of Permits Required
Note: The system will default to 1 based on combination of Permit Name and if an individual or fleet permit is requested and cannot be changed by Authorized User.
· If Bilingual format is checked, credentials will be generated in both English and French
· *Authorized User must select the Start Date of the permit
· The End Date
· Authorized User can enter the appropriate comment and then select Add/Update Comment
· If a comment is entered the appropriate access level for the comment from the drop-down list:
· Internal – means only internal resources are authorized to view the comment.
· Public – means the internal and external users are authorized to view the comments.
· Restricted – means only the defined authorized roles can view the comment.
· When the Delete Allowed is Selected the comment can be deleted by another Authorized Users
Authorized User must Select PROCEED to execute the edits and display the verification screen.
Command Line functions:
Proceed – means the system will take the user to the next logical step required for the transaction
Refresh – means the system will return the screen to the original content when the user entered the screen for the first time
Quit – means the user is finished working on this transaction for the time being and the transaction is available for completion by any authorized user at a late time using the “work in progress” feature.
Cancel – means the user has decided to discard all activity on this transaction as if they had never started it. The transaction log will show the transaction activity.
Help – means the help screen will be provided for the current screen and the user may scan the help file for assistance.
To return to an alternate screen while processing a transaction the user can select the appropriate tab along the top of the current screen and the system will asynchronously display the corresponding screen for processing by the user. After fijnishing rfeviewing and/or making changes to the screen the user can select the “Proceed” button to return to the screen they came from General.
The verification screen displays showing the user a consolidated view of the general information. If the user determines some of the information is incorrect, they can select BACK on the Command Line and the system will display the general screen again. The user can make the required changes and select PROCEED.
Select PROCEED on the Command Line and general information will be saved to the database.

There are several sections on the SVC screen.
The following fields are populated from the Common Client or Account Level, or System generated, and the Authorized User cannot change them.
O/O Account Details
Account No.
Legal Name
Application No.
CVOR
NSC Number
Exemption Code
Permit Details
The following fields are populated from the Common Client or Account Level, or System generated, and the Authorized User cannot change them.
· Transaction Type
· Permit Number (No.) is blank, it is system generated when credentials are issued.
SVC
The Authorized User must record the dimensions and destination information being requested for the permit(s) and there are a few mandatory fields indicated by a red asterisk (*)
Origin Address
· *Origin details of the load is required including the following:
o Street
o City
o Province/State
· *Destination details of the load is required including the following:
o Street
o City
o Province/State
Load and Equipment Details
· *Load Description
· *Equipment Information
· VIN
· *Plate Number (No.)
· Unit Number (No.)
· *Route Details the entire route information must be recorded
· *Authorizing the movement of (EN)
· *Authorizing the movement of (FR)
Comment – Enter the appropriate comment. These comments are displayed on the SVC enquiry screen to internal users only.
Access Level – Select the appropriate access level for the comment from the dropdown list:
§ Internal – means only internal resources are authorized to view the comment.
§ Public – means the internal and external users are authorized to view the comments.
§ Restricted – means only the defined authorized roles can view the comment.
Delete Allowed – Click this box if the authorized user wants to be able to delete this comment.
Select PROCEED to execute the edits and display the verification screen.
The verification screen displays showing the user a consolidated view of the SVC information. If the user determines some of the information is incorrect, they can select BACK on the Command
Line and the system will display the SVC screen again. The user can make the required changes and select PROCEED.
Select PROCEED on the Command Line and the SVC information is saved to the database. The conditions screen will display.
Command Line functions:
Proceed – means the system will take the user to the next logical step required for the transaction
Refresh – means the system will return the screen to the original content when the user entered the screen for the first time
Quit – means the user is finished working on this transaction for the time being and the transaction is available for completion by any authorized user at a late time using the “work in progress” feature.
Cancel – means the user has decided to discard all activity on this transaction as if they had never started it. The transaction log will show the transaction activity.
Help – means the help screen will be provided for the current screen and the user may scan the help file for assistance.
To return to an alternate screen while processing a transaction the user can select the appropriate tab along the top of the current screen and the system will asynchronously display the corresponding screen for processing by the user. After fijnishing rfeviewing and/or making changes to the screen the user can select the “Proceed” button to return to the screen they came from General.
Select PROCEED to execute the edits and display the verification screen.
The verification screen displays showing the user a consolidated view of the SVC information. If the user determines some of the information is incorrect, they can select BACK on the Command Line and the system will display the SVC screen again. The user can make the required changes and select PROCEED.
Select PROCEED on the Command Line and the SVC information saved to the database. Display conditions screen.

To get the details of the conditions process, please refer to section 1.4.2.1.3 or for online users, click here.
Conditions
The Authorized User can select Condition Category from the drop-down list, if applicable. Conditions will populate based on the conditions category
o All
o Standard
o Non-Standard
o Road Building Machines
· If applicable, Standard conditions are populated by default and cannot be changed by the Authorized User.
· Sequence Number (No.)
· Select
· Conditions Category populated as per configuration
§ The Conditions are displayed in both English and French as per configuration Notes populated as per configuration
Non-Standard
The Authorized User can check non-standard conditions if applicable.
o Sequence Number (No.) is populated as per configuration and cannot be changed by the user
Additional Conditions
The Authorized User can check or add additional conditions if applicable.
· Sequence No. – By default, populated as per configuration and cannot be changed by the user.
· To Add a Condition the Authorized User must select the green “+” sign to open a table to enter Condition details
· Authorized User must enter the Condition details in the Condition English field
· If Bilingual format has been selected the details must also be entered in French in the Condition French table
· To remove the Condition the Authorized User must select the red “x” to delete the entry
Select PROCEED to execute the edits and display the verification screen.
The verification screen displays showing the user a consolidated view of the conditions information. If the user determines some of the information is incorrect, they can select BACK on the Command Line and the system will display the conditions screen again. The user can make the required changes and select PROCEED.
Select PROCEED on the Command Line and the conditions information will be saved to the database. The billing Screen displays.

To get the details of the billing process, please refer to section 1.4.2.1.4 or for online users, clickhere.
The following fields are populated from the Common Client or Account Level, or System generated, and the Authorized User cannot change them.
O/O Account Details
Account No.
Legal Name
Application No.
CVOR
NSC Number
Exemption Code
Billing Details
· Transaction Type
· Permit Number (No.) is blank, it is system generated when credentials are issued.
· Billing Date
· Transaction Type
· Transaction Status has been updated to OPEN
Fees Section
By default, the following are populated from the enterprise screen and cannot be changed by the user.
· Prepaid Balance
· Stored Credit Balance
· Manual Adjustment Amount – Only an Authorized User can complete adjustment based on business rules
· Fee Table displays the following application details
o Fee Type
o Number (No.) of Permits Required
o Fee Amount
o Waive – Only an Authorized User can select based on eligibility criteria
Documentation Requirements – this section
allows user to scan, and upload required documents. There are the following
three radio buttons available:
·
Scan
now – allows to scan and upload documents at once
·
Scan
Later – allows to schedule document scan and submission for a later time
·
No
Scan Required – select this option if no documents are required to be uploaded
Certain documents are required for the creation of a New Permit. If the system can check for the document automatically via a system interface, it will mark the document as being System Collected.
· The SVC documents must be scanned, and status updated before the permit can be issued by the Authorized User
· The Authorized User must select the document name; then click the Add link and the document name will be displayed in a list just below the drop down.
· Authorized User can select the appropriate status for that document from the Status drop down list.
o Collected – means the document has been submitted and approved by issuer.
o Not Required – means the document is not required for this transaction.
o Outstanding – means the document has not been submitted and approved yet.
o System Collected - means the system has some interface that provides verification that the documentation requirement has been met.
Attachment Upload
Documents that Authorized User will upload to attach to the permit
· Authorized User can select the PDF files from the Browse link
· To attach the selected file the Authorized User must click Upload to attach the file, if applicable
Delivery Details
The Authorized User must indicate the delivery method for the permit.
· Select the Delivery Method from the drop-down list
o Courier
§ If selected the Authorized User must enter the details of the Courier the Name, Account Number (No.) and Courier Phone Number (No.)
o Mailed
o Pick Up
§ If selected the Authorized User must select the pickup location
o Authorized Users must print permits, so the only Electronic Delivery Channel is print
o Authorized User can enter the appropriate comment that will be viewed on the Account Enquiry Screen by internal users only.
o The Authorized User must select the appropriate access level for the comment from the drop-down list:
· Internal – means only internal resources are authorized to view the comment.
· Public – means the internal and external users are authorized to view the comments.
· Restricted – means only the defined authorized roles can view the comment.
o When the Delete Allowed is Selected the comment can be deleted by another Authorized Users
Command Line functions:
Proceed – means the system will take the user to the next logical step required for the transaction
Refresh – means the system will return the screen to the original content when the user entered the screen for the first time
Quit – means the user is finished working on this transaction for the time being and the transaction is available for completion by any authorized user at a late time using the “work in progress” feature.
Cancel – means the user has decided to discard all activity on this transaction as if they had never started it. The transaction log will show the transaction activity.
Help – means the help screen will be provided for the current screen and the user may scan the help file for assistance.
Select PROCEED to execute the edits and auto issuance criteria. If the auto issuance criteria fail, the application will be submitted to the workflow for review. Once the application has been approved by the authorized user and on “Done” click from the application approval details screen, the system will come back to the billing screen.
Select PROCEED on the Command Line; the billing information will be saved to the database and continue to the validation screen. From the billing validation screen, the authorized user can generate the invoice.
Note: Once the application has been invoiced the only way for an Authorized User to move through screens using the tabs is by selecting Cancel Bill.
Command Line functions:
Proceed – Means the system will proceed to the next logical step in processing the transaction
Add to Cart – means the system will save the invoice information to a cart for future payment along with any other items placed in the cart as a result of subsequent transaction processing
Cancel Bill – means the invoice/bill that was calculated will be cancelled and the transaction will no longer be in “Invoiced” status and will be placed in an “Open” status”
Refresh – means the system will return the screen to the original content when the user entered the screen for the first time
Quit – means the user is finished working on this transaction for the time being and the transaction is available for completion by any authorized user at a late time using the “work in progress” feature.
Invoice – Means the system display the invoice
Draft Permit – means the system will provide a Draft Permit for verification by the user. No permit number is assigned at this point.
Help - means the system will provide a help screen for the current screen and the user can view the help information and scan the help file as required.
Payment Detail Screen – see 1.4.4.6-payment, p 131
Select: Enterprise – Applications – O/O – Permit – SVC - Go Double Decker Bus SVC
For external users the O/O Account number will be pre-populated. Internal Users will have to provide the O/O Account Number (No.), Legal Name or Permit Number (No.) in the corresponding field to process a permit application.
When PROCEED is selected on the Command Line at the bottom of the screen.
· A validation of the CVOR status will be performed if O/O Account Number was created with a CVOR.
· If the Account Level status is suspended or inactive, then a message will display telling the user to please contact the Oversize/Overweight Permit section.
Copy From provides the ability to copy data from a previously submitted permit for the purpose of using the data in a new application or request.
Note: Only permits form the account can be copied.
· Authorized User can enter the Account Number (No.) and/or Legal Name and Select Copy From to get a list of available permits items to select
· And then, Select the permit to be copied
· If the Permit Number (No.) is entered the Authorized User can Select Copy From on the Command Line to update the permit information
Note: The information up to the conditions screen for the applicable Permit Type will be displayed.

To get the details of the general process, please refer to section 1.4.2.1.1 or for online users, click here.
The following information is populated from the Common Client Enterprise Level or Account Level and cannot be updated by an Authorized User.
O/O Account Details
· Account Number (No.)
· Legal Name
· Application Number (No.) they system will generate the unique number for tracking the application
· CVOR
· Client Status
· NSC Number
· Exemption Code if the Common Client has an Exemption Code it is checked, if expired then Authorized User must enter a valid exemption code
· Physical Address
The Authorized User can update the following fields
· Mailing Address by default, it populates from the Account Level and the authorized user can select any one from the drop-down list.
· Issued At the Authorized User can select from the drop-down list.
· Authorized User must Select a contact name from drop down list
Permit Details
The following information is generated by the system and cannot be updated by an Authorized User.
· Permit Type
· Transaction Type
· Application Status – For a new permit, application status is not submitted status.
Note: The status will be updated to submitted after completing all tabs
· Application Status Date the date will be changed when the application status is updated
· Permit Number (No.) for a new permit, it is blank, and the user will get a permit number after credentials have been issued
Authorized User must update or enter the required information into the following fields.
· *Number (No.) of Permits Required
Note: The system will default to 1 based on combination of Permit Name and if an individual or fleet permit is requested and cannot be changed by Authorized User.
· If Bilingual format is checked, credentials will be generated in both English and French
· *Authorized User must select the Start Date of the permit
· The End Date
· Authorized User can enter the appropriate comment and then select Add/Update Comment
· If a comment is entered the appropriate access level for the comment from the drop-down list:
o Internal – means only internal resources are authorized to view the comment.
o Public – means the internal and external users are authorized to view the comments.
o Restricted – means only the defined authorized roles can view the comment.
· When the Delete Allowed is Selected the comment can be deleted by another Authorized Users
Authorized User must Select PROCEED to execute the edits and display the verification screen.
Command Line functions:
Proceed – means the system will take the user to the next logical step required for the transaction
Refresh – means the system will return the screen to the original content when the user entered the screen for the first time
Quit – means the user is finished working on this transaction for the time being and the transaction is available for completion by any authorized user at a late time using the “work in progress” feature.
Cancel – means the user has decided to discard all activity on this transaction as if they had never started it. The transaction log will show the transaction activity.
Help – means the help screen will be provided for the current screen and the user may scan the help file for assistance.
To return to an alternate screen while processing a transaction the user can select the appropriate tab along the top of the current screen and the system will asynchronously display the corresponding screen for processing by the user. After fijnishing rfeviewing and/or making changes to the screen the user can select the “Proceed” button to return to the screen they came from General.
The verification screen displays showing the user a consolidated view of the general information. If the user determines some of the information is incorrect, they can select BACK on the Command Line and the system will display the general screen again. The user can make the required changes and select PROCEED.
Select PROCEED on the Command Line and general information will be saved to the database.

There are several sections on the SVC screen.
The following fields are populated from the Common Client or Account Level, or System generated, and the Authorized User cannot change them.
O/O Account Details
Account No.
Legal Name
Application No.
CVOR
NSC Number
Exemption Code
Permit Details
The following fields are populated from the Common Client or Account Level, or System generated, and the Authorized User cannot change them.
· Transaction Type
· Permit Number (No.) is blank, it is system generated when credentials are issued.
SVC
The Authorized User must record the dimensions and destination information being requested for the permit(s) and there are a few mandatory fields indicated by a red asterisk (*)
Equipment Identification
· *Unit Number
· *Manufacturer
· *Vehicle Identification Number (VIN)
· *Plate Number
Origin Address
· Origin City
· Origin Province/State
Destination Address
· Origin City
· Origin Province/State
Route Details
*Authorizing the Movement of (EN)
*Authorizing the Movement of (FR)
Comment – Enter the appropriate comment. These comments are displayed on the SVC enquiry screen to internal users only.
Access Level – Select the appropriate access level for the comment from the dropdown list:
o Internal – means only internal resources are authorized to view the comment.
o Public – means the internal and external users are authorized to view the comments.
o Restricted – means only the defined authorized roles can view the comment.
Delete Allowed – Click this box if the authorized user wants to be able to delete this comment.
Select PROCEED to execute the edits and display the verification screen.
The verification screen displays showing the user a consolidated view of the SVC information. If the user determines some of the information is incorrect, they can select BACK on the Command
Line and the system will display the SVC screen again. The user can make the required changes and select PROCEED.
Select PROCEED on the Command Line and the SVC information is saved to the database. The conditions screen will display.
Command Line functions:
Proceed – means the system will take the user to the next logical step required for the transaction
Refresh – means the system will return the screen to the original content when the user entered the screen for the first time
Quit – means the user is finished working on this transaction for the time being and the transaction is available for completion by any authorized user at a late time using the “work in progress” feature.
Cancel – means the user has decided to discard all activity on this transaction as if they had never started it. The transaction log will show the transaction activity.
Help – means the help screen will be provided for the current screen and the user may scan the help file for assistance.
To return to an alternate screen while processing a transaction the user can select the appropriate tab along the top of the current screen and the system will asynchronously display the corresponding screen for processing by the user. After fijnishing rfeviewing and/or making changes to the screen the user can select the “Proceed” button to return to the screen they came from General.
Select PROCEED to execute the edits and display the verification screen.
The verification screen displays showing the user a consolidated view of the SVC information. If the user determines some of the information is incorrect, they can select BACK on the Command Line and the system will display the SVC screen again. The user can make the required changes and select PROCEED.
Select PROCEED on the Command Line and the SVC information saved to the database. Display conditions screen.

To get the details of the conditions process, please refer to section 1.4.2.1.3 or for online users, clickhere.
Conditions
The Authorized User can select Condition Category from the drop-down list, if applicable. Conditions will populate based on the conditions category
o All
o Standard
o Non-Standard
o Road Building Machines
· If applicable, Standard conditions are populated by default and cannot be changed by the Authorized User.
· Sequence Number (No.)
· Select
· Conditions Category populated as per configuration
§ The Conditions are displayed in both English and French as per configuration Notes populated as per configuration
Non-Standard
The Authorized User can check non-standard conditions if applicable.
o Sequence Number (No.) is populated as per configuration and cannot be changed by the user
Additional Conditions
The Authorized User can check or add additional conditions if applicable.
· Sequence No. – By default, populated as per configuration and cannot be changed by the user.
· To Add a Condition the Authorized User must select the green “+” sign to open a table to enter Condition details
· Authorized User must enter the Condition details in the Condition English field
· If Bilingual format has been selected the details must also be entered in French in the Condition French table
· To remove the Condition the Authorized User must select the red “x” to delete the entry
Select PROCEED to execute the edits and display the verification screen.
The verification screen displays showing the user a consolidated view of the conditions information. If the user determines some of the information is incorrect, they can select BACK on the Command Line and the system will display the conditions screen again. The user can make the required changes and select PROCEED.
Select PROCEED on the Command Line and the conditions information will be saved to the database. The billing Screen displays.

To get the details of the billing process, please refer to section 1.4.2.1.4 or for online users, clickhere.
The following fields are populated from the Common Client or Account Level, or System generated, and the Authorized User cannot change them.
O/O Account Details
Account No.
Legal Name
Application No.
CVOR
NSC Number
Exemption Code
Billing Details
· Transaction Type
· Permit Number (No.) is blank, it is system generated when credentials are issued.
· Billing Date
· Transaction Type
· Transaction Status has been updated to OPEN
Fees Section
By default, the following are populated from the enterprise screen and cannot be changed by the user.
· Prepaid Balance
· Stored Credit Balance
· Manual Adjustment Amount – Only an Authorized User can complete adjustment based on business rules
· Fee Table displays the following application details
o Fee Type
o Number (No.) of Permits Required
o Fee Amount
o Waive – Only an Authorized User can select based on eligibility criteria
Documentation
Requirements – this section allows user to scan, and upload required documents.
There are the following three radio buttons available:
·
Scan
now – allows to scan and upload documents at once
·
Scan
Later – allows to schedule document scan and submission for a later time
·
No
Scan Required – select this option if no documents are required to be uploaded
Certain documents are required for the creation of a New Permit. If the system can check for the document automatically via a system interface, it will mark the document as being System Collected.
· The SVC documents must be scanned, and status updated before the permit can be issued by the Authorized User
· The Authorized User must select the document name; then click the Add link and the document name will be displayed in a list just below the drop down.
· Authorized User can select the appropriate status for that document from the Status drop down list.
o Collected – means the document has been submitted and approved by issuer.
o Not Required – means the document is not required for this transaction.
o Outstanding – means the document has not been submitted and approved yet.
o System Collected - means the system has some interface that provides verification that the documentation requirement has been met.
Attachment Upload
Documents that Authorized User will upload to attach to the permit
· Authorized User can select the PDF files from the Browse link
· To attach the selected file the Authorized User must click Upload to attach the file, if applicable
Delivery Details
The Authorized User must indicate the delivery method for the permit.
· Select the Delivery Method from the drop-down list
o Courier
§ If selected the Authorized User must enter the details of the Courier the Name, Account Number (No.) and Courier Phone Number (No.)
o Mailed
o Pick Up
§ If selected the Authorized User must select the pickup location
o Authorized Users must print permits, so the only Electronic Delivery Channel is print
o Authorized User can enter the appropriate comment that will be viewed on the Account Enquiry Screen by internal users only.
o The Authorized User must select the appropriate access level for the comment from the drop-down list:
§ Internal – means only internal resources are authorized to view the comment.
§ Public – means the internal and external users are authorized to view the comments.
§ Restricted – means only the defined authorized roles can view the comment.
o When the Delete Allowed is Selected the comment can be deleted by another Authorized Users
Command Line functions:
Proceed – means the system will take the user to the next logical step required for the transaction
Refresh – means the system will return the screen to the original content when the user entered the screen for the first time
Quit – means the user is finished working on this transaction for the time being and the transaction is available for completion by any authorized user at a late time using the “work in progress” feature.
Cancel – means the user has decided to discard all activity on this transaction as if they had never started it. The transaction log will show the transaction activity.
Help – means the help screen will be provided for the current screen and the user may scan the help file for assistance.
To return to an alternate screen while processing a transaction the user can select the appropriate tab along the top of the current screen and the system will asynchronously display the corresponding screen for processing by the user. After fijnishing rfeviewing and/or making changes to the screen the user can select the “Proceed” button to return to the screen they came from General.
Select PROCEED to execute the edits and auto issuance criteria. If the auto issuance criteria fail, the application will be submitted to the workflow for review. Once the application has been approved by the authorized user and on “Done” click from the application approval details screen, the system will come back to the billing screen.
Select PROCEED on the Command Line; the billing information will be saved to the database and continue to the validation screen. From the billing validation screen, the authorized user can generate the invoice.
Note: Once the application has been invoiced the only way for an Authorized User to move through screens using the tabs is by selecting Cancel Bill.
Command Line functions:
Proceed – Means the system will proceed to the next logical step in processing the transaction
Add to Cart – means the system will save the invoice information to a cart for future payment along with any other items placed in the cart as a result of subsequent transaction processing
Cancel Bill – means the invoice/bill that was calculated will be cancelled and the transaction will no longer be in “Invoiced” status and will be placed in an “Open” status”
Refresh – means the system will return the screen to the original content when the user entered the screen for the first time
Quit – means the user is finished working on this transaction for the time being and the transaction is available for completion by any authorized user at a late time using the “work in progress” feature.
Invoice – Means the system display the invoice
Draft Permit – means the system will provide a Draft Permit for verification by the user. No permit number is assigned at this point.
Help - means the system will provide a help screen for the current screen and the user can view the help information and scan the help file as required.
Payment Detail Screen – see 1.4.4.6-payment, p 131
Select: Enterprise – Applications – O/O – Permit – SVC - Hamilton Steel SVC
For external users the O/O Account number will be pre-populated. Internal Users will have to provide the O/O Account Number (No.), Legal Name or Permit Number (No.) in the corresponding field to process a permit application.
When PROCEED is selected on the Command Line at the bottom of the screen.
· A validation of the CVOR status will be performed if O/O Account Number was created with a CVOR.
· If the Account Level status is suspended or inactive, then a message will display telling the user to please contact the Oversize/Overweight Permit section.
Copy From provides the ability to copy data from a previously submitted permit for the purpose of using the data in a new application or request.
Note: Only permits form the account can be copied.
· Authorized User can enter the Account Number (No.) and/or Legal Name and Select Copy From to get a list of available permits items to select
· And then, Select the permit to be copied
· If the Permit Number (No.) is entered the Authorized User can Select Copy From on the Command Line to update the permit information
Note: The information up to the conditions screen for the applicable Permit Type will be displayed.

To get the details of the general process, please refer to section 1.4.2.1.1 or for online users, click here.
The following information is populated from the Common Client Enterprise Level or Account Level and cannot be updated by an Authorized User.
O/O Account Details
· Account Number (No.)
· Legal Name
· Application Number (No.) they system will generate the unique number for tracking the application
· CVOR
· Client Status
· NSC Number
· Exemption Code if the Common Client has an Exemption Code it is checked, if expired then Authorized User must enter a valid exemption code
· Physical Address
The Authorized User can update the following fields
· Mailing Address by default, it populates from the Account Level and the authorized user can select any one from the drop-down list.
· Issued At the Authorized User can select from the drop-down list.
· Authorized User must Select a contact name from drop down list
Permit Details
The following information is generated by the system and cannot be updated by an Authorized User.
· Permit Type
· Transaction Type
· Application Status - For a new permit, application status is not submitted status.
Note: The status will be updated to submitted after completing all tabs
· Application Status Date the date will be changed when the application status is updated
· Permit Number (No.) for a new permit, it is blank, and the user will get a permit number after credentials have been issued
Authorized User must update or enter the required information into the following fields.
· Select if Permit Request is for an Individual or Fleet permit
Note: If Fleet Permit selected limited to 1 permit.
· *Number (No.) of Permits Required
· If Bilingual format is checked, credentials will be generated in both English and French
· *Authorized User must select the Start Date of the permit
· The End Date
· Authorized User can enter the appropriate comment and then select Add/Update Comment
· If a comment is entered the appropriate access level for the comment from the drop-down list:
o Internal – means only internal resources are authorized to view the comment.
o Public – means the internal and external users are authorized to view the comments.
o Restricted – means only the defined authorized roles can view the comment.
· When the Delete Allowed is Selected the comment can be deleted by another Authorized Users
Authorized User must Select PROCEED to execute the edits and display the verification screen.
Command Line functions:
Proceed – means the system will take the user to the next logical step required for the transaction
Refresh – means the system will return the screen to the original content when the user entered the screen for the first time
Quit – means the user is finished working on this transaction for the time being and the transaction is available for completion by any authorized user at a late time using the “work in progress” feature.
Cancel – means the user has decided to discard all activity on this transaction as if they had never started it. The transaction log will show the transaction activity.
Help – means the help screen will be provided for the current screen and the user may scan the help file for assistance.
To return to an alternate screen while processing a transaction the user can select the appropriate tab along the top of the current screen and the system will asynchronously display the corresponding screen for processing by the user. After fijnishing rfeviewing and/or making changes to the screen the user can select the “Proceed” button to return to the screen they came from General.
The verification screen displays showing the user a consolidated view of the general information. If the user determines some of the information is incorrect, they can select BACK on the Command Line and the system will display the general screen again. The user can make the required changes and select PROCEED.
Select PROCEED on the Command Line and general information will be saved to the database

There are several sections on the SVC screen.
The following fields are populated from the Common Client or Account Level, or System generated, and the Authorized User cannot change them.
O/O Account Details
Account No.
Legal Name
Application No.
CVOR
NSC Number
Exemption Code
Permit Details
The following fields are populated from the Common Client or Account Level, or System generated, and the Authorized User cannot change them.
· Transaction Type
· Permit Number (No.) is blank, it is system generated when credentials are issued.
SVC
The Authorized User must record the dimensions and destination information being requested for the permit(s) and there are a few mandatory fields indicated by a red asterisk (*)
· *Unit Number (#)
· *Tractor Vehicle Identification Number (VIN)
· *Tractor Plate Number (No.)
· Type of Trailer
· *Origin
· *Destination
· *Route Details
· *Authorizing the Movement of (EN)
· *Authorizing the Movement of (FR)
Comment – Enter the appropriate comment. These comments are displayed on the SVC enquiry screen to internal users only.
Access Level – Select the appropriate access level for the comment from the drop-down list:
o Internal – means only internal resources are authorized to view the comment.
o Public – means the internal and external users are authorized to view the comments.
o Restricted – means only the defined authorized roles can view the comment.
Delete Allowed – Click this box if the authorized user wants to be able to delete this comment.
Select PROCEED to execute the edits and display the verification screen.
The verification screen displays showing the user a consolidated view of the SVC information. If the user determines some of the information is incorrect, they can select BACK on the Command Line and the system will display the SVC screen again. The user can make the required changes and select PROCEED.
Select PROCEED on the Command Line and the SVC information saved to the database. Display conditions screen.

To get the details of the conditions process, please refer to section 1.4.2.1.3 or for online users, click here.
Conditions
The Authorized User can select Condition Category from the drop-down list, if applicable. Conditions will populate based on the conditions category
o All
o Standard
o Non-Standard
o Road Building Machines
· If applicable, Standard conditions are populated by default and cannot be changed by the Authorized User.
· Sequence Number (No.)
· Select
· Conditions Category populated as per configuration
§ The Conditions are displayed in both English and French as per configuration Notes populated as per configuration
Non-Standard
The Authorized User can check non-standard conditions if applicable.
o Sequence Number (No.) is populated as per configuration and cannot be changed by the user
Additional Conditions
The Authorized User can check or add additional conditions if applicable.
· Sequence No. – By default, populated as per configuration and cannot be changed by the user.
· To Add a Condition the Authorized User must select the green “+” sign to open a table to enter Condition details
· Authorized User must enter the Condition details in the Condition English field
· If Bilingual format has been selected the details must also be entered in French in the Condition French table
· To remove the Condition the Authorized User must select the red “x” to delete the entry
Select PROCEED to execute the edits and display the verification screen.
The verification screen displays showing the user a consolidated view of the conditions information. If the user determines some of the information is incorrect, they can select BACK on the Command Line and the system will display the conditions screen again. The user can make the required changes and select PROCEED.
Select PROCEED on the Command Line and the conditions information will be saved to the database. The billing Screen displays.

To get the details of the billing process, please refer to section 1.4.2.1.4 or for online users, clickhere.
The following fields are populated from the Common Client or Account Level, or System generated, and the Authorized User cannot change them.
O/O Account Details
Account No.
Legal Name
Application No.
CVOR
NSC Number
Exemption Code
Billing Details
· Transaction Type
· Permit Number (No.) is blank, it is system generated when credentials are issued.
· Billing Date
· Transaction Type
· Transaction Status has been updated to OPEN
Fees Section
By default, the following are populated from the enterprise screen and cannot be changed by the user.
· Prepaid Balance
· Stored Credit Balance
· Manual Adjustment Amount – Only an Authorized User can complete adjustment based on business rules
· Fee Table displays the following application details
o Fee Type
o Number (No.) of Permits Required
o Fee Amount
o Waive – Only an Authorized User can select based on eligibility criteria
Documentation Requirements – this section
allows user to scan, and upload required documents. There are the following
three radio buttons available:
·
Scan
now – allows to scan and upload documents at once
·
Scan
Later – allows to schedule document scan and submission for a later time
·
No
Scan Required – select this option if no documents are required to be uploaded
Certain documents are required for the creation of a New Permit. If the system can check for the document automatically via a system interface, it will mark the document as being System Collected.
· The SVC documents must be scanned, and status updated before the permit can be issued by the Authorized User
· The Authorized User must select the document name; then click the Add link and the document name will be displayed in a list just below the drop down.
· Authorized User can select the appropriate status for that document from the Status drop down list.
o Collected – means the document has been submitted and approved by issuer.
o Not Required – means the document is not required for this transaction.
o Outstanding – means the document has not been submitted and approved yet.
o System Collected - means the system has some interface that provides verification that the documentation requirement has been met.
Attachment Upload
Documents that Authorized User will upload to attach to the permit
· Authorized User can select the PDF files from the Browse link
· To attach the selected file the Authorized User must click Upload to attach the file, if applicable
Delivery Details
The Authorized User must indicate the delivery method for the permit.
· Select the Delivery Method from the drop-down list
o Courier
§ If selected the Authorized User must enter the details of the Courier the Name, Account Number (No.) and Courier Phone Number (No.)
o Mailed
o Pick Up
§ If selected the Authorized User must select the pickup location
o Authorized Users must print permits, so the only Electronic Delivery Channel is print
o Authorized User can enter the appropriate comment that will be viewed on the Account Enquiry Screen by internal users only.
o The Authorized User must select the appropriate access level for the comment from the drop-down list:
§ Internal – means only internal resources are authorized to view the comment.
§ Public – means the internal and external users are authorized to view the comments.
§ Restricted – means only the defined authorized roles can view the comment.
· When the Delete Allowed is Selected the comment can be deleted by another Authorized Users
Command Line functions:
Proceed – means the system will take the user to the next logical step required for the transaction
Refresh – means the system will return the screen to the original content when the user entered the screen for the first time
Quit – means the user is finished working on this transaction for the time being and the transaction is available for completion by any authorized user at a late time using the “work in progress” feature.
Cancel – means the user has decided to discard all activity on this transaction as if they had never started it. The transaction log will show the transaction activity.
Help – means the help screen will be provided for the current screen and the user may scan the help file for assistance.
Select PROCEED to execute the edits and auto issuance criteria. If the auto issuance criteria fail, the application will be submitted to the workflow for review. Once the application has been approved by the authorized user and on “Done” click from the application approval details screen, the system will come back to the billing screen.
Select PROCEED on the Command Line; the billing information will be saved to the database and continue to the validation screen. From the billing validation screen, the authorized user can generate the invoice.
Note: Once the application has been invoiced the only way for an Authorized User to move through screens using the tabs is by selecting Cancel Bill.
Command Line functions:
Proceed – Means the system will proceed to the next logical step in processing the transaction
Add to Cart – means the system will save the invoice information to a cart for future payment along with any other items placed in the cart as a result of subsequent transaction processing
Cancel Bill – means the invoice/bill that was calculated will be cancelled and the transaction will no longer be in “Invoiced” status and will be placed in an “Open” status”
Refresh – means the system will return the screen to the original content when the user entered the screen for the first time
Quit – means the user is finished working on this transaction for the time being and the transaction is available for completion by any authorized user at a late time using the “work in progress” feature.
Invoice – Means the system display the invoice
Draft Permit – means the system will provide a Draft Permit for verification by the user. No permit number is assigned at this point.
Help - means the system will provide a help screen for the current screen and the user can view the help information and scan the help file as required.
Payment Detail Screen – see 1.4.4.6-payment, p 131
Select: Enterprise – Applications – O/O – Permit – SVC - Long Combination Vehicle SVC
For external users the O/O Account number will be pre-populated. Internal Users will have to provide the O/O Account Number (No.), Legal Name or Permit Number (No.) in the corresponding field to process a permit application.
When PROCEED is selected on the Command Line at the bottom of the screen.
· A validation of the CVOR status will be performed if O/O Account Number was created with a CVOR.
· If the Account Level status is suspended or inactive, then a message will display telling the user to please contact the Oversize/Overweight Permit section.
Copy From provides the ability to copy data from a previously submitted permit for the purpose of using the data in a new application or request.
Note: Only permits form the account can be copied.
· Authorized User can enter the Account Number (No.) and/or Legal Name and Select Copy From to get a list of available permits items to select
· And then, Select the permit to be copied
· If the Permit Number (No.) is entered the Authorized User can Select Copy From on the Command Line to update the permit information
Note: The information up to the conditions screen for the applicable Permit Type will be displayed.

There are several sections on the general screen.
To get the details for other fields of the general process, please refer to section 1.4.2.1.1 or for online users, clickhere.
The following information is populated from the Common Client Enterprise Level or Account Level and cannot be updated by an Authorized User.
O/O Account Details
· Account Number (No.)
· Legal Name
· Application Number (No.) they system will generate the unique number for tracking the application
· CVOR
· Client Status
· NSC Number
· Exemption Code if the Common Client has an Exemption Code it is checked, if expired then Authorized User must enter a valid exemption code
· Physical Address
The Authorized User can update the following fields
· Mailing Address by default, it populates from the Account Level and the authorized user can select any one from the drop-down list.
· Issued At the Authorized User can select from the drop-down list.
· Authorized User must Select a contact name from drop down list
Permit Details
The following information is generated by the system and cannot be updated by an Authorized User.
· Permit Type
· Transaction Type
· Application Status – For a new permit, application status is not submitted status.
Note: The status will be updated to submitted after completing all tabs
· Application Status Date the date will be changed when the application status is updated
· Permit Number (No.) for a new permit, it is blank, and the user will get a permit number after credentials have been issued
Authorized User must update or enter the required information into the following fields.
· *Number (No.) of Permits Required
· If Bilingual format is checked, credentials will be generated in both English and French
· *Authorized User must select the Start Date of the permit
·
The End Date
· Authorized User can enter the appropriate comment and then select Add/Update
Carrier’s Primary LCV Contact Person
· *Name
· *Position
· *Phone Number (No.)
· *Cell Phone Number (No.)
· *Fax Number (No.)
·
Comment
· If a comment is entered the appropriate access level for the comment from the drop-down list:
· Internal – means only internal resources are authorized to view the comment.
· Public – means the internal and external users are authorized to view the comments.
· Restricted – means only the defined authorized roles can view the comment.
· When the Delete Allowed is Selected the comment can be deleted by another Authorized Users
Authorized User must Select PROCEED to execute the edits and display the verification screen.
Command Line functions:
Proceed – means the system will take the user to the next logical step required for the transaction
Refresh – means the system will return the screen to the original content when the user entered the screen for the first time
Quit – means the user is finished working on this transaction for the time being and the transaction is available for completion by any authorized user at a late time using the “work in progress” feature.
Cancel – means the user has decided to discard all activity on this transaction as if they had never started it. The transaction log will show the transaction activity.
Help – means the help screen will be provided for the current screen and the user may scan the help file for assistance.
To return to an alternate screen while processing a transaction the user can select the appropriate tab along the top of the current screen and the system will asynchronously display the corresponding screen for processing by the user. After fijnishing rfeviewing and/or making changes to the screen the user can select the “Proceed” button to return to the screen they came from General.
The verification screen displays showing the user a consolidated view of the general information. If the user determines some of the information is incorrect, they can select BACK on the Command Line and the system will display the general screen again. The user can make the required changes and select PROCEED.
Select PROCEED on the Command Line and general information will be saved to the database

The following fields are populated from the Common Client or Account Level, or System generated, and the Authorized User cannot change them.
O/O Account Details
Account No.
Legal Name
Application No.
CVOR
NSC Number
Exemption Code
Permit Details
The following fields are populated from the Common Client or Account Level, or System generated, and the Authorized User cannot change them.
· Transaction Type
· Permit Number (No.) is blank, it is system generated when credentials are issued.
SVC
The Authorized User must record the dimensions and destination information being requested for the permit(s) and there are a few mandatory fields indicated by a red asterisk (*)
· *Origin
· *Destination
· *Route Details
· *Authorizing the Movement of (EN)
· *Authorizing the Movement of (FR)
Comment - Enter the appropriate comment. These comments are displayed on the SVC enquiry screen to internal users only.
Access Level - Select the appropriate access level for the comment from the dropdown list:
o Internal – means only internal resources are authorized to view the comment.
o Public – means the internal and external users are authorized to view the comments.
o Restricted – means only the defined authorized roles can view the comment.
Delete Allowed - Click this box if the authorized user wants to be able to delete this comment.
Select PROCEED to execute the edits and display the verification screen.
The verification screen displays showing the user a consolidated view of the SVC information. If the user determines some of the information is incorrect, they can select BACK on the Command
Line and the system will display the SVC screen again. The user can make the required changes and select PROCEED.
Select PROCEED on the Command Line and the SVC information is saved to the database. The conditions screen will display.
Command Line functions:
Proceed – means the system will take the user to the next logical step required for the transaction
Refresh – means the system will return the screen to the original content when the user entered the screen for the first time
Quit – means the user is finished working on this transaction for the time being and the transaction is available for completion by any authorized user at a late time using the “work in progress” feature.
Cancel – means the user has decided to discard all activity on this transaction as if they had never started it. The transaction log will show the transaction activity.
Help – means the help screen will be provided for the current screen and the user may scan the help file for assistance.
To return to an alternate screen while processing a transaction the user can select the appropriate tab along the top of the current screen and the system will asynchronously display the corresponding screen for processing by the user. After fijnishing rfeviewing and/or making changes to the screen the user can select the “Proceed” button to return to the screen they came from General.
Select PROCEED to execute the edits and display the verification screen.
The verification screen displays showing the user a consolidated view of the SVC information. If the user determines some of the information is incorrect, they can select BACK on the Command Line and the system will display the SVC screen again. The user can make the required changes and select PROCEED.
Select PROCEED on the Command Line and the SVC information saved to the database. Display conditions screen.

To get the details of the conditions process, please refer to section 1.4.2.1.3 or for online users, click here.
Conditions
The Authorized User can select Condition Category from the drop-down list, if applicable. Conditions will populate based on the conditions category
o All
o Standard
o Non-Standard
· If applicable, Standard conditions are populated by default and cannot be changed by the Authorized User.
· Sequence Number (No.)
· Select
· Conditions Category populated as per configuration
§ The Conditions are displayed in both English and French as per configuration Notes populated as per configuration
Non-Standard
The Authorized User can check non-standard conditions if applicable.
o Sequence Number (No.) is populated as per configuration and cannot be changed by the user
Additional Conditions
The Authorized User can check or add additional conditions if applicable.
· Sequence No. - By default, populated as per configuration and cannot be changed by the user.
· To Add a Condition the Authorized User must select the green “+” sign to open a table to enter Condition details
· Authorized User must enter the Condition details in the Condition English field
· If Bilingual format has been selected the details must also be entered in French in the Condition French table
· To remove the Condition the Authorized User must select the red “x” to delete the entry
Select PROCEED to execute the edits and display the verification screen.
The verification screen displays showing the user a consolidated view of the conditions information. If the user determines some of the information is incorrect, they can select BACK on the Command Line and the system will display the conditions screen again. The user can make the required changes and select PROCEED.
Select PROCEED on the Command Line and the conditions information will be saved to the database. The billing Screen displays.

To get the details of the billing process, please refer to section 1.4.2.1.4 or for online users, clickhere.
The following fields are populated from the Common Client or Account Level, or System generated, and the Authorized User cannot change them.
O/O Account Details
Account No.
Legal Name
Application No.
CVOR
NSC Number
Exemption Code
Billing Details
· Transaction Type
· Permit Number (No.) is blank, it is system generated when credentials are issued.
· Billing Date
· Transaction Type
· Transaction Status has been updated to OPEN
Fees Section
By default, the following are populated from the enterprise screen and cannot be changed by the user.
· Prepaid Balance
· Stored Credit Balance
· Manual Adjustment Amount – Only an Authorized User can complete adjustment based on business rules
· Fee Table displays the following application details
o Fee Type
o Number (No.) of Permits Required
o Fee Amount
o Waive – Only an Authorized User can select based on eligibility criteria
Documentation
Requirements – this section allows user to scan, and upload required documents.
There are the following three radio buttons available:
·
Scan
now – allows to scan and upload documents at once
·
Scan
Later – allows to schedule document scan and submission for a later time
·
No
Scan Required – select this option if no documents are required to be uploaded
Certain documents are required for the creation of a New Permit. If the system can check for the document automatically via a system interface, it will mark the document as being System Collected.
· The SVC documents must be scanned, and status updated before the permit can be issued by the Authorized User
· The Authorized User must select the document name; then click the Add link and the document name will be displayed in a list just below the drop down.
· Authorized User can select the appropriate status for that document from the Status drop down list.
o Collected – means the document has been submitted and approved by issuer.
o Not Required – means the document is not required for this transaction.
o Outstanding – means the document has not been submitted and approved yet.
o System Collected - means the system has some interface that provides verification that the documentation requirement has been met.
Attachment Upload
Documents that Authorized User will upload to attach to the permit
· Authorized User can select the PDF files from the Browse link
· To attach the selected file the Authorized User must click Upload to attach the file, if applicable
Delivery Details
The Authorized User must indicate the delivery method for the permit.
· Select the Delivery Method from the drop-down list
o Courier
§ If selected the Authorized User must enter the details of the Courier the Name, Account Number (No.) and Courier Phone Number (No.)
o Mailed
o Pick Up
§ If selected the Authorized User must select the pickup location
o Authorized Users must print permits, so the only Electronic Delivery Channel is print
o Authorized User can enter the appropriate comment that will be viewed on the Account Enquiry Screen by internal users only.
o The Authorized User must select the appropriate access level for the comment from the drop-down list:
§ Internal – means only internal resources are authorized to view the comment.
§ Public – means the internal and external users are authorized to view the comments.
§ Restricted – means only the defined authorized roles can view the comment.
· When the Delete Allowed is Selected the comment can be deleted by another Authorized Users
Command Line functions:
Proceed – means the system will take the user to the next logical step required for the transaction
Refresh – means the system will return the screen to the original content when the user entered the screen for the first time
Quit – means the user is finished working on this transaction for the time being and the transaction is available for completion by any authorized user at a late time using the “work in progress” feature.
Cancel – means the user has decided to discard all activity on this transaction as if they had never started it. The transaction log will show the transaction activity.
Help – means the help screen will be provided for the current screen and the user may scan the help file for assistance.
Select PROCEED to execute the edits and auto issuance criteria. If the auto issuance criteria fail, the application will be submitted to the workflow for review. Once the application has been approved by the authorized user and on “Done” click from the application approval details screen, the system will come back to the billing screen.
Select PROCEED on the Command Line; the billing information will be saved to the database and continue to the validation screen. From the billing validation screen, the authorized user can generate the invoice.
Note: Once the application has been invoiced the only way for an Authorized User to move through screens using the tabs is by selecting Cancel Bill.
Command Line functions:
Proceed – Means the system will proceed to the next logical step in processing the transaction
Add to Cart – means the system will save the invoice information to a cart for future payment along with any other items placed in the cart as a result of subsequent transaction processing
Cancel Bill – means the invoice/bill that was calculated will be cancelled and the transaction will no longer be in “Invoiced” status and will be placed in an “Open” status”
Refresh – means the system will return the screen to the original content when the user entered the screen for the first time
Quit – means the user is finished working on this transaction for the time being and the transaction is available for completion by any authorized user at a late time using the “work in progress” feature.
Invoice – Means the system display the invoice
Draft Permit – means the system will provide a Draft Permit for verification by the user. No permit number is assigned at this point.
Help - means the system will provide a help screen for the current screen and the user can view the help information and scan the help file as required.
Payment Detail Screen – see 1.4.4.6-payment, p 131
Select: Enterprise – Applications – O/O – Permit – SVC - Nolta SVC
For external users the O/O Account number will be pre-populated. Internal Users will have to provide the O/O Account Number (No.), Legal Name or Permit Number (No.) in the corresponding field to process a permit application.
When PROCEED is selected on the Command Line at the bottom of the screen.
· A validation of the CVOR status will be performed if O/O Account Number was created with a CVOR.
· If the Account Level status is suspended or inactive, then a message will display telling the user to please contact the Oversize/Overweight Permit section.
Copy From provides the ability to copy data from a previously submitted permit for the purpose of using the data in a new application or request.
Note: Only permits form the account can be copied.
· Authorized User can enter the Account Number (No.) and/or Legal Name and Select Copy From to get a list of available permits items to select
· And then, Select the permit to be copied
· If the Permit Number (No.) is entered the Authorized User can Select Copy From on the Command Line to update the permit information
Note: The information up to the conditions screen for the applicable Permit Type will be displayed.

To get the details for other fields of the general process, please refer to section 1.4.2.1.1 or for online users, clickhere.
The following information is populated from the Common Client Enterprise Level or Account Level and cannot be updated by an Authorized User.
O/O Account Details
· Account Number (No.)
· Legal Name
· Application Number (No.) they system will generate the unique number for tracking the application
· CVOR
· Client Status
· NSC Number
· Exemption Code if the Common Client has an Exemption Code it is checked, if expired then Authorized User must enter a valid exemption code
· Physical Address
The Authorized User can update the following fields
· Mailing Address by default, it populates from the Account Level and the authorized user can select any one from the drop-down list.
· Issued At the Authorized User can select from the drop-down list.
· Authorized User must Select a contact name from drop down list
Permit Details
The following information is generated by the system and cannot be updated by an Authorized User.
· Permit Type
· Transaction Type
· Application Status - For a new permit, application status is not submitted status.
Note: The status will be updated to submitted after completing all tabs
· Application Status Date the date will be changed when the application status is updated
· Permit Number (No.) for a new permit, it is blank, and the user will get a permit number after credentials have been issued
Authorized User must update or enter the required information into the following fields.
· Select if Permit Request is for an Individual or Fleet permit
Note: If Fleet Permit selected limited to 1 permit.
· *Number (No.) of Permits Required
· If Bilingual format is checked, credentials will be generated in both English and French
· *Authorized User must select the Start Date of the permit
· The End Date
· Authorized User can enter the appropriate comment and then select Add/Update
Comment
· If a comment is entered the appropriate access level for the comment from the drop-down list:
o Internal – means only internal resources are authorized to view the comment.
o Public – means the internal and external users are authorized to view the comments.
o Restricted – means only the defined authorized roles can view the comment.
· When the Delete Allowed is Selected the comment can be deleted by another Authorized Users
Authorized User must Select PROCEED to execute the edits and display the verification screen.
Command Line functions:
Proceed – means the system will take the user to the next logical step required for the transaction
Refresh – means the system will return the screen to the original content when the user entered the screen for the first time
Quit – means the user is finished working on this transaction for the time being and the transaction is available for completion by any authorized user at a late time using the “work in progress” feature.
Cancel – means the user has decided to discard all activity on this transaction as if they had never started it. The transaction log will show the transaction activity.
Help – means the help screen will be provided for the current screen and the user may scan the help file for assistance.
To return to an alternate screen while processing a transaction the user can select the appropriate tab along the top of the current screen and the system will asynchronously display the corresponding screen for processing by the user. After fijnishing rfeviewing and/or making changes to the screen the user can select the “Proceed” button to return to the screen they came from General.
The verification screen displays showing the user a consolidated view of the general information. If the user determines some of the information is incorrect, they can select BACK on the Command Line and the system will display the general screen again. The user can make the required changes and select PROCEED.
Select PROCEED on the Command Line and general information will be saved to the database

The following fields are populated from the Common Client or Account Level, or System generated, and the Authorized User cannot change them.
O/O Account Details
Account No.
Legal Name
Application No.
CVOR
NSC Number
Exemption Code
Permit Details
The following fields are populated from the Common Client or Account Level, or System generated, and the Authorized User cannot change them.
· Transaction Type
· Permit Number (No.) is blank, it is system generated when credentials are issued.
SVC
The Authorized User must record the dimensions and destination information being requested for the permit(s) and there are a few mandatory fields indicated by a red asterisk (*)
Requested Weights – 1st Combination
· 1st Power Unit Plate Number (#)
· 1st Trailer # 1 Plate Number (#)
· 1st Trailer # 2 Plate Number (#)
· 1st Axle
· 1st Spacing
Requested Weights – 2nd Combination
· 2nd Power Unit Plate Number (#) – Same as 1st Combination
· 2nd Trailer # 1 Plate Number (#)
· 2nd Trailer # 2 Plate Number (#)
· 2nd Axle
· 2nd Spacing
· *Origin
· *Destination
· *Route Details
· *Authorizing the Movement of (EN)
· *Authorizing the Movement of (FR)
Comment - Enter the appropriate comment. These comments are displayed on the SVC enquiry screen to internal users only.
Access Level - Select the appropriate access level for the comment from the dropdown list:
§ Internal – means only internal resources are authorized to view the comment.
§ Public – means the internal and external users are authorized to view the comments.
§ Restricted – means only the defined authorized roles can view the comment.
Delete Allowed - Click this box if the authorized user wants to be able to delete this comment.
Select PROCEED to execute the edits and display the verification screen.
The verification screen displays showing the user a consolidated view of the SVC information. If the user determines some of the information is incorrect, they can select BACK on the Command
Line and the system will display the SVC screen again. The user can make the required changes and select PROCEED.
Select PROCEED on the Command Line and the SVC information is saved to the database. The conditions screen will display.
Command Line functions:
Proceed – means the system will take the user to the next logical step required for the transaction
Refresh – means the system will return the screen to the original content when the user entered the screen for the first time
Quit – means the user is finished working on this transaction for the time being and the transaction is available for completion by any authorized user at a late time using the “work in progress” feature.
Cancel – means the user has decided to discard all activity on this transaction as if they had never started it. The transaction log will show the transaction activity.
Help – means the help screen will be provided for the current screen and the user may scan the help file for assistance.
To return to an alternate screen while processing a transaction the user can select the appropriate tab along the top of the current screen and the system will asynchronously display the corresponding screen for processing by the user. After fijnishing rfeviewing and/or making changes to the screen the user can select the “Proceed” button to return to the screen they came from General.
Select PROCEED to execute the edits and display the verification screen.
The verification screen displays showing the user a consolidated view of the SVC information. If the user determines some of the information is incorrect, they can select BACK on the Command Line and the system will display the SVC screen again. The user can make the required changes and select PROCEED.
Select PROCEED on the Command Line and the SVC information saved to the database. Display conditions screen.

To get the details of the conditions process, please refer to section 1.4.2.1.3 or for online users, clickhere.
Conditions
The Authorized User can select Condition Category from the drop-down list, if applicable. Conditions will populate based on the conditions category
o All
o Standard
· If applicable, Standard conditions are populated by default and cannot be changed by the Authorized User.
· Sequence Number (No.)
· Select
· Conditions Category populated as per configuration
§ The Conditions are displayed in both English and French as per configuration Notes populated as per configuration
Non-Standard
The Authorized User can check non-standard conditions if applicable.
o Sequence Number (No.) is populated as per configuration and cannot be changed by the user
Additional Conditions
The Authorized User can check or add additional conditions if applicable.
· Sequence No. – By default, populated as per configuration and cannot be changed by the user.
· To Add a Condition the Authorized User must select the green “+” sign to open a table to enter Condition details
· Authorized User must enter the Condition details in the Condition English field
· If Bilingual format has been selected the details must also be entered in French in the Condition French table
· To remove the Condition the Authorized User must select the red “x” to delete the entry
Select PROCEED to execute the edits and display the verification screen.
The verification screen displays showing the user a consolidated view of the conditions information. If the user determines some of the information is incorrect, they can select BACK on the Command Line and the system will display the conditions screen again. The user can make the required changes and select PROCEED.
Select PROCEED on the Command Line and the conditions information will be saved to the database. The billing Screen displays.

To get the details of the billing process, please refer to section 1.4.2.1.4 or for online users, click here.
The following fields are populated from the Common Client or Account Level, or System generated, and the Authorized User cannot change them.
O/O Account Details
Account No.
Legal Name
Application No.
CVOR
NSC Number
Exemption Code
Billing Details
· Transaction Type
· Permit Number (No.) is blank, it is system generated when credentials are issued.
· Billing Date
· Transaction Type
· Transaction Status has been updated to OPEN
Fees Section
By default, the following are populated from the enterprise screen and cannot be changed by the user.
· Prepaid Balance
· Stored Credit Balance
· Manual Adjustment Amount – Only an Authorized User can complete adjustment based on business rules
· Fee Table displays the following application details
o Fee Type
o Number (No.) of Permits Required
o Fee Amount
o Waive – Only an Authorized User can select based on eligibility criteria
Documentation Requirements – this section
allows user to scan, and upload required documents. There are the following
three radio buttons available:
·
Scan
now – allows to scan and upload documents at once
·
Scan
Later – allows to schedule document scan and submission for a later time
·
No
Scan Required – select this option if no documents are required to be uploaded
Certain documents are required for the creation of a New Permit. If the system can check for the document automatically via a system interface, it will mark the document as being System Collected.
· The SVC documents must be scanned, and status updated before the permit can be issued by the Authorized User
· The Authorized User must select the document name; then click the Add link and the document name will be displayed in a list just below the drop down.
· Authorized User can select the appropriate status for that document from the Status drop down list.
o Collected – means the document has been submitted and approved by issuer.
o Not Required – means the document is not required for this transaction.
o Outstanding – means the document has not been submitted and approved yet.
o System Collected – means the system has some interface that provides verification that the documentation requirement has been met.
Attachment Upload
Documents that Authorized User will upload to attach to the permit
· Authorized User can select the PDF files from the Browse link
· To attach the selected file the Authorized User must click Upload to attach the file, if applicable
Delivery Details
The Authorized User must indicate the delivery method for the permit.
· Select the Delivery Method from the drop-down list
o Courier
§ If selected the Authorized User must enter the details of the Courier the Name, Account Number (No.) and Courier Phone Number (No.)
o Mailed
o Pick Up
§ If selected the Authorized User must select the pickup location
o Authorized Users must print permits, so the only Electronic Delivery Channel is print
o Authorized User can enter the appropriate comment that will be viewed on the Account Enquiry Screen by internal users only.
o The Authorized User must select the appropriate access level for the comment from the drop-down list:
§ Internal – means only internal resources are authorized to view the comment.
§ Public – means the internal and external users are authorized to view the comments.
§ Restricted – means only the defined authorized roles can view the comment.
· When the Delete Allowed is Selected the comment can be deleted by another Authorized Users
Command Line functions:
Proceed – means the system will take the user to the next logical step required for the transaction
Refresh – means the system will return the screen to the original content when the user entered the screen for the first time
Quit – means the user is finished working on this transaction for the time being and the transaction is available for completion by any authorized user at a late time using the “work in progress” feature.
Cancel – means the user has decided to discard all activity on this transaction as if they had never started it. The transaction log will show the transaction activity.
Help – means the help screen will be provided for the current screen and the user may scan the help file for assistance.
Select PROCEED to execute the edits and auto issuance criteria. If the auto issuance criteria fail, the application will be submitted to the workflow for review. Once the application has been approved by the authorized user and on “Done” click from the application approval details screen, the system will come back to the billing screen.
Select PROCEED on the Command Line; the billing information will be saved to the database and continue to the validation screen. From the billing validation screen, the authorized user can generate the invoice.
Note: Once the application has been invoiced the only way for an Authorized User to move through screens using the tabs is by selecting Cancel Bill.
Command Line functions:
Proceed – Means the system will proceed to the next logical step in processing the transaction
Add to Cart – means the system will save the invoice information to a cart for future payment along with any other items placed in the cart as a result of subsequent transaction processing
Cancel Bill – means the invoice/bill that was calculated will be cancelled and the transaction will no longer be in “Invoiced” status and will be placed in an “Open” status”
Refresh – means the system will return the screen to the original content when the user entered the screen for the first time
Quit – means the user is finished working on this transaction for the time being and the transaction is available for completion by any authorized user at a late time using the “work in progress” feature.
Invoice – Means the system display the invoice
Draft Permit – means the system will provide a Draft Permit for verification by the user. No permit number is assigned at this point.
Help - means the system will provide a help screen for the current screen and the user can view the help information and scan the help file as required.
Payment Detail Screen – see 1.4.4.6-payment, p 131
Select: Enterprise – Applications – O/O – Permit – SVC - Public Vehicle SVC
For external users the O/O Account number will be pre-populated. Internal Users will have to provide the O/O Account Number (No.), Legal Name or Permit Number (No.) in the corresponding field to process a permit application.
When PROCEED is selected on the Command Line at the bottom of the screen.
· A validation of the CVOR status will be performed if O/O Account Number was created with a CVOR.
· If the Account Level status is suspended or inactive, then a message will display telling the user to please contact the Oversize/Overweight Permit section.
Copy From provides the ability to copy data from a previously submitted permit for the purpose of using the data in a new application or request.
Note: Only permits form the account can be copied.
· Authorized User can enter the Account Number (No.) and/or Legal Name and Select Copy From to get a list of available permits items to select
· And then, Select the permit to be copied
· If the Permit Number (No.) is entered the Authorized User can Select Copy From on the Command Line to update the permit information
Note: The information up to the conditions screen for the applicable Permit Type will be displayed.

There are several sections on the general screen.
To get the details for other fields of the general process, please refer to section 1.4.2.1.1 or for online users, clickhere.
The following information is populated from the Common Client Enterprise Level or Account Level and cannot be updated by an Authorized User.
O/O Account Details
· Account Number (No.)
· Legal Name
· Application Number (No.) they system will generate the unique number for tracking the application
· CVOR
· Client Status
· NSC Number
· Exemption Code if the Common Client has an Exemption Code it is checked, if expired then Authorized User must enter a valid exemption code
· Physical Address
The Authorized User can update the following fields
· Mailing Address by default, it populates from the Account Level and the authorized user can select any one from the drop-down list.
· Issued At the Authorized User can select from the drop-down list.
· Authorized User must Select a contact name from drop down list
Permit Details
The following information is generated by the system and cannot be updated by an Authorized User.
· Permit Type
· Transaction Type
· Application Status – For a new permit, application status is not submitted status.
Note: The status will be updated to submitted after completing all tabs
· Application Status Date the date will be changed when the application status is updated
· Permit Number (No.) for a new permit, it is blank, and the user will get a permit number after credentials have been issued
Authorized User must update or enter the required information into the following fields.
· *Number (No.) of Permits Required
· If Bilingual format is checked, credentials will be generated in both English and French
· *Authorized User must select the Start Date of the permit
· The End Date
· *Operating License Numbers
· Authorized User can enter the appropriate comment and then select Add/Update
· If a comment is entered the appropriate access level for the comment from the drop-down list:
o Internal – means only internal resources are authorized to view the comment.
o Public – means the internal and external users are authorized to view the comments.
o Restricted – means only the defined authorized roles can view the comment.
· When the Delete Allowed is Selected the comment can be deleted by another Authorized Users
Authorized User must Select PROCEED to execute the edits and display the verification screen.
Command Line functions:
Proceed – means the system will take the user to the next logical step required for the transaction
Refresh – means the system will return the screen to the original content when the user entered the screen for the first time
Quit – means the user is finished working on this transaction for the time being and the transaction is available for completion by any authorized user at a late time using the “work in progress” feature.
Cancel – means the user has decided to discard all activity on this transaction as if they had never started it. The transaction log will show the transaction activity.
Help – means the help screen will be provided for the current screen and the user may scan the help file for assistance.
To return to an alternate screen while processing a transaction the user can select the appropriate tab along the top of the current screen and the system will asynchronously display the corresponding screen for processing by the user. After fijnishing rfeviewing and/or making changes to the screen the user can select the “Proceed” button to return to the screen they came from General.
The verification screen displays showing the user a consolidated view of the general information. If the user determines some of the information is incorrect, they can select BACK on the Command Line and the system will display the general screen again. The user can make the required changes and select PROCEED.
Select PROCEED on the Command Line and general information will be saved to the database

There are several sections on the SVC screen.
The following fields are populated from the Common Client or Account Level, or System generated, and the Authorized User cannot change them.
O/O Account Details
Account No.
Legal Name
Application No.
CVOR
NSC Number
Exemption Code
Permit Details
The following fields are populated from the Common Client or Account Level, or System generated, and the Authorized User cannot change them.
· Transaction Type
· Permit Number (No.) is blank, it is system generated when credentials are issued.
SVC
The Authorized User must record the dimensions and destination information being requested for the permit(s) and there are a few mandatory fields indicated by a red asterisk (*)
Combined Unit
o *Maximum Weight (kg)
o *Maximum Length (m)
o Maximum Height (m)
Trailer Dimensions
o *Weight (kg)
o *Length (m)
o *Height (m)
o *Width (m)
Comment – Enter the appropriate comment. These comments are displayed on the SVC enquiry screen to internal users only.
Access Level – Select the appropriate access level for the comment from the dropdown list:
o Internal – means only internal resources are authorized to view the comment.
o Public – means the internal and external users are authorized to view the comments.
o Restricted – means only the defined authorized roles can view the comment.
Delete Allowed – Click this box if the authorized user wants to be able to delete this comment.
Select PROCEED to execute the edits and display the verification screen.
The verification screen displays showing the user a consolidated view of the SVC information. If the user determines some of the information is incorrect, they can select BACK on the Command
Line and the system will display the SVC screen again. The user can make the required changes and select PROCEED.
Select PROCEED on the Command Line and the SVC information is saved to the database. The conditions screen will display.
Command Line functions:
Proceed – means the system will take the user to the next logical step required for the transaction
Refresh – means the system will return the screen to the original content when the user entered the screen for the first time
Quit – means the user is finished working on this transaction for the time being and the transaction is available for completion by any authorized user at a late time using the “work in progress” feature.
Cancel – means the user has decided to discard all activity on this transaction as if they had never started it. The transaction log will show the transaction activity.
Help – means the help screen will be provided for the current screen and the user may scan the help file for assistance.
To return to an alternate screen while processing a transaction the user can select the appropriate tab along the top of the current screen and the system will asynchronously display the corresponding screen for processing by the user. After fijnishing rfeviewing and/or making changes to the screen the user can select the “Proceed” button to return to the screen they came from General.
Select PROCEED to execute the edits and display the verification screen.
The verification screen displays showing the user a consolidated view of the SVC information. If the user determines some of the information is incorrect, they can select BACK on the Command Line and the system will display the SVC screen again. The user can make the required changes and select PROCEED.
Select PROCEED on the Command Line and the SVC information saved to the database. Display conditions screen.

To get the details of the conditions process, please refer to section 1.4.2.1.3 or for online users, clickhere.
Conditions
The Authorized User can select Condition Category from the drop-down list, if applicable. Conditions will populate based on the conditions category
o All
o Standard
· If applicable, Standard conditions are populated by default and cannot be changed by the Authorized User.
· Sequence Number (No.)
· Select
· Conditions Category populated as per configuration
§ The Conditions are displayed in both English and French as per configuration Notes populated as per configuration
Non-Standard
The Authorized User can check non-standard conditions if applicable.
o Sequence Number (No.) is populated as per configuration and cannot be changed by the user
Additional Conditions
The Authorized User can check or add additional conditions if applicable.
· Sequence No. – By default, populated as per configuration and cannot be changed by the user.
· To Add a Condition the Authorized User must select the green “+” sign to open a table to enter Condition details
· Authorized User must enter the Condition details in the Condition English field
· If Bilingual format has been selected the details must also be entered in French in the Condition French table
· To remove the Condition the Authorized User must select the red “x” to delete the entry
Select PROCEED to execute the edits and display the verification screen.
The verification screen displays showing the user a consolidated view of the conditions information. If the user determines some of the information is incorrect, they can select BACK on the Command Line and the system will display the conditions screen again. The user can make the required changes and select PROCEED.
Select PROCEED on the Command Line and the conditions information will be saved to the database. The billing Screen displays.

To get the details of the billing process, please refer to section 1.4.2.1.4 or for online users, click here.
The following fields are populated from the Common Client or Account Level, or System generated, and the Authorized User cannot change them.
O/O Account Details
Account No.
Legal Name
Application No.
CVOR
NSC Number
Exemption Code
Billing Details
· Transaction Type
· Permit Number (No.) is blank, it is system generated when credentials are issued.
· Billing Date
· Transaction Type
· Transaction Status has been updated to OPEN
Fees Section
By default, the following are populated from the enterprise screen and cannot be changed by the user.
· Prepaid Balance
· Stored Credit Balance
· Manual Adjustment Amount – Only an Authorized User can complete adjustment based on business rules
· Fee Table displays the following application details
o Fee Type
o Number (No.) of Permits Required
o Fee Amount
o Waive – Only an Authorized User can select based on eligibility criteria
Documentation Requirements – this section
allows user to scan, and upload required documents. There are the following
three radio buttons available:
·
Scan
now – allows to scan and upload documents at once
·
Scan
Later – allows to schedule document scan and submission for a later time
·
No
Scan Required – select this option if no documents are required to be uploaded
Certain documents are required for the creation of a New Permit. If the system can check for the document automatically via a system interface, it will mark the document as being System Collected.
· The SVC documents must be scanned, and status updated before the permit can be issued by the Authorized User
· The Authorized User must select the document name; then click the Add link and the document name will be displayed in a list just below the drop down.
· Authorized User can select the appropriate status for that document from the Status drop down list.
o Collected – means the document has been submitted and approved by issuer.
o Not Required – means the document is not required for this transaction.
o Outstanding – means the document has not been submitted and approved yet.
o System Collected - means the system has some interface that provides verification that the documentation requirement has been met.
Attachment Upload
Documents that Authorized User will upload to attach to the permit
· Authorized User can select the PDF files from the Browse link
· To attach the selected file the Authorized User must click Upload to attach the file, if applicable
Delivery Details
The Authorized User must indicate the delivery method for the permit.
· Select the Delivery Method from the drop-down list
o Courier
§ If selected the Authorized User must enter the details of the Courier the Name, Account Number (No.) and Courier Phone Number (No.)
o Mailed
o Pick Up
§ If selected the Authorized User must select the pickup location
o Authorized Users must print permits, so the only Electronic Delivery Channel is print
o Authorized User can enter the appropriate comment that will be viewed on the Account Enquiry Screen by internal users only.
o The Authorized User must select the appropriate access level for the comment from the drop-down list:
§ Internal – means only internal resources are authorized to view the comment.
§ Public – means the internal and external users are authorized to view the comments.
§ Restricted – means only the defined authorized roles can view the comment.
· When the Delete Allowed is Selected the comment can be deleted by another Authorized Users
Command Line functions:
Proceed – means the system will take the user to the next logical step required for the transaction
Refresh – means the system will return the screen to the original content when the user entered the screen for the first time
Quit – means the user is finished working on this transaction for the time being and the transaction is available for completion by any authorized user at a late time using the “work in progress” feature.
Cancel – means the user has decided to discard all activity on this transaction as if they had never started it. The transaction log will show the transaction activity.
Help – means the help screen will be provided for the current screen and the user may scan the help file for assistance.
Select PROCEED to execute the edits and auto issuance criteria. If the auto issuance criteria fail, the application will be submitted to the workflow for review. Once the application has been approved by the authorized user and on “Done” click from the application approval details screen, the system will come back to the billing screen.
Select PROCEED on the Command Line; the billing information will be saved to the database and continue to the validation screen. From the billing validation screen, the authorized user can generate the invoice.
Note: Once the application has been invoiced the only way for an Authorized User to move through screens using the tabs is by selecting Cancel Bill.
Command Line functions:
Proceed – Means the systme will proceed to the next logical step in processing the transaction
Add to Cart – means the system will save the invoice information to a cart for future payment along with any other items placed in the cart as a result of subsequent transaction processing
Cancel Bill – means the invoice/bill that was calculated will be cancelled and the transaction will no longer be in “Invoiced” status and will be placed in an “Open” status”
Refresh – means the system will return the screen to the original content when the user entered the screen for the first time
Quit – means the user is finished working on this transaction for the time being and the transaction is available for completion by any authorized user at a late time using the “work in progress” feature.
Invoice – Means the system display the invoice
Draft Permit – means the system will provide a Draft Permit for verification by the user. No permit number is assigned at this point.
Help - means the system will provide a help screen for the current screen and the user can view the help information and scan the help file as required.
Payment Detail Screen – see 1.4.4.6-payment, p 131
Select: Enterprise – Applications – O/O – Permit – SVC - Tire Pressure Control System SVC
For external users the O/O Account number will be pre-populated. Internal Users will have to provide the O/O Account Number (No.), Legal Name or Permit Number (No.) in the corresponding field to process a permit application.
When PROCEED is selected on the Command Line at the bottom of the screen.
· A validation of the CVOR status will be performed if O/O Account Number was created with a CVOR.
· If the Account Level status is suspended or inactive, then a message will display telling the user to please contact the Oversize/Overweight Permit section.
Copy From provides the ability to copy data from a previously submitted permit for the purpose of using the data in a new application or request.
Note: Only permits form the account can be copied.
· Authorized User can enter the Account Number (No.) and/or Legal Name and Select Copy From to get a list of available permits items to select
· And then, Select the permit to be copied
· If the Permit Number (No.) is entered the Authorized User can Select Copy From on the Command Line to update the permit information
Note: The information up to the conditions screen for the applicable Permit Type will be displayed.

To get the details of the general process, please refer to section 1.4.2.1.1 or for online users, clickhere.
The following information is populated from the Common Client Enterprise Level or Account Level and cannot be updated by an Authorized User.
O/O Account Details
· Account Number (No.)
· Legal Name
· Application Number (No.) they system will generate the unique number for tracking the application
· CVOR
· Client Status
· NSC Number
· Exemption Code if the Common Client has an Exemption Code it is checked, if expired then Authorized User must enter a valid exemption code
· Physical Address
The Authorized User can update the following fields
· Mailing Address by default, it populates from the Account Level and the authorized user can select any one from the drop-down list.
· Issued At the Authorized User can select from the drop-down list.
· Authorized User must Select a contact name from drop down list
Permit Details
The following information is generated by the system and cannot be updated by an Authorized User.
· Permit Type
· Transaction Type
· Application Status – For a new permit, application status is not submitted status.
Note: The status will be updated to submitted after completing all tabs
· Application Status Date the date will be changed when the application status is updated
· Permit Number (No.) for a new permit, it is blank, and the user will get a permit number after credentials have been issued
Authorized User must update or enter the required information into the following fields.
· *Number (No.) of Permits Required
· If Bilingual format is checked, credentials will be generated in both English and French
· *Authorized User must select the Start Date of the permit
· The End Date
· Authorized User can enter the appropriate comment and then select Add/Update
· If a comment is entered the appropriate access level for the comment from the drop-down list:
o Internal – means only internal resources are authorized to view the comment.
o Public – means the internal and external users are authorized to view the comments.
o Restricted – means only the defined authorized roles can view the comment.
· When the Delete Allowed is Selected the comment can be deleted by another Authorized Users
Authorized User must Select PROCEED to execute the edits and display the verification screen.
Command Line functions:
Proceed – means the system will take the user to the next logical step required for the transaction
Refresh – means the system will return the screen to the original content when the user entered the screen for the first time
Quit – means the user is finished working on this transaction for the time being and the transaction is available for completion by any authorized user at a late time using the “work in progress” feature.
Cancel – means the user has decided to discard all activity on this transaction as if they had never started it. The transaction log will show the transaction activity.
Help – means the help screen will be provided for the current screen and the user may scan the help file for assistance.
To return to an alternate screen while processing a transaction the user can select the appropriate tab along the top of the current screen and the system will asynchronously display the corresponding screen for processing by the user. After fijnishing rfeviewing and/or making changes to the screen the user can select the “Proceed” button to return to the screen they came from General.
The verification screen displays showing the user a consolidated view of the general information. If the user determines some of the information is incorrect, they can select BACK on the Command Line and the system will display the general screen again. The user can make the required changes and select PROCEED.
Select PROCEED on the Command Line and general information will be saved to the database

There are several sections on the SVC screen.
The following fields are populated from the Common Client or Account Level, or System generated, and the Authorized User cannot change them.
O/O Account Details
Account No.
Legal Name
Application No.
CVOR
NSC Number
Exemption Code
Permit Details
The following fields are populated from the Common Client or Account Level, or System generated, and the Authorized User cannot change them.
· Transaction Type
· Permit Number (No.) is blank, it is system generated when credentials are issued.
SVC
The Authorized User must record the dimensions and destination information being requested for the permit(s) and there are a few mandatory fields indicated by a red asterisk (*)
· Tractor Unit
· Tractor Unit Vehicle Identification Number (VIN)
· Tractor Unit Plate Number
Trailer Unit – 1st Combination
· 1St Trailer Unit Vehicle Identification Number (VIN)
· 1st Trailer Unit Plate Number
Trailer Unit – 2nd Combination
· 2nd Trailer Unit Vehicle Configuration Number (VIN)
· 2nd Trailer Unit Plate Number
· Origin
· Destination
· Route Details
· Load Type
· *Authorizing the Movement of (EN)
· *Authorizing the Movement of (FR)
Comment – Enter the appropriate comment. These comments are displayed on the SVC enquiry screen to internal users only.
Access Level – Select the appropriate access level for the comment from the dropdown list:
o Internal – means only internal resources are authorized to view the comment.
o Public – means the internal and external users are authorized to view the comments.
o Restricted – means only the defined authorized roles can view the comment.
Delete Allowed – Click this box if the authorized user wants to be able to delete this comment.
Select PROCEED to execute the edits and display the verification screen.
The verification screen displays showing the user a consolidated view of the SVC information. If the user determines some of the information is incorrect, they can select BACK on the Command
Line and the system will display the SVC screen again. The user can make the required changes and select PROCEED.
Select PROCEED on the Command Line and the SVC information is saved to the database. The conditions screen will display.
Command Line functions:
Proceed – means the system will take the user to the next logical step required for the transaction
Refresh – means the system will return the screen to the original content when the user entered the screen for the first time
Quit – means the user is finished working on this transaction for the time being and the transaction is available for completion by any authorized user at a late time using the “work in progress” feature.
Cancel – means the user has decided to discard all activity on this transaction as if they had never started it. The transaction log will show the transaction activity.
Help – means the help screen will be provided for the current screen and the user may scan the help file for assistance.
To return to an alternate screen while processing a transaction the user can select the appropriate tab along the top of the current screen and the system will asynchronously display the corresponding screen for processing by the user. After fijnishing rfeviewing and/or making changes to the screen the user can select the “Proceed” button to return to the screen they came from General.
Select PROCEED to execute the edits and display the verification screen.
The verification screen displays showing the user a consolidated view of the SVC information. If the user determines some of the information is incorrect, they can select BACK on the Command Line and the system will display the SVC screen again. The user can make the required changes and select PROCEED.
Select PROCEED on the Command Line and the SVC information saved to the database. Display conditions screen.

To get the details of the conditions process, please refer to section 1.4.2.1.3 or for online users, clickhere.
Conditions
The Authorized User can select Condition Category from the drop-down list, if applicable. Conditions will populate based on the conditions category
o All
o Standard
· If applicable, Standard conditions are populated by default and cannot be changed by the Authorized User.
· Sequence Number (No.)
· Select
· Conditions Category populated as per configuration
§ The Conditions are displayed in both English and French as per configuration Notes populated as per configuration
Non-Standard
The Authorized User can check non-standard conditions if applicable.
o Sequence Number (No.) is populated as per configuration and cannot be changed by the user
Additional Conditions
The Authorized User can check or add additional conditions if applicable.
· Sequence No. – By default, populated as per configuration and cannot be changed by the user.
· To Add a Condition the Authorized User must select the green “+” sign to open a table to enter Condition details
· Authorized User must enter the Condition details in the Condition English field
· If Bilingual format has been selected the details must also be entered in French in the Condition French table
· To remove the Condition the Authorized User must select the red “x” to delete the entry
Select PROCEED to execute the edits and display the verification screen.
The verification screen displays showing the user a consolidated view of the conditions information. If the user determines some of the information is incorrect, they can select BACK on the Command Line and the system will display the conditions screen again. The user can make the required changes and select PROCEED.
Select PROCEED on the Command Line and the conditions information will be saved to the database. The billing Screen displays.

To get the details of the billing process, please refer to section 1.4.2.1.4 or for online users, clickhere.
The following fields are populated from the Common Client or Account Level, or System generated, and the Authorized User cannot change them.
O/O Account Details
Account No.
Legal Name
Application No.
CVOR
NSC Number
Exemption Code
Billing Details
· Transaction Type
· Permit Number (No.) is blank, it is system generated when credentials are issued.
· Billing Date
· Transaction Type
· Transaction Status has been updated to OPEN
Fees Section
By default, the following are populated from the enterprise screen and cannot be changed by the user.
· Prepaid Balance
· Stored Credit Balance
· Manual Adjustment Amount – Only an Authorized User can complete adjustment based on business rules
· Fee Table displays the following application details
o Fee Type
o Number (No.) of Permits Required
o Fee Amount
o Waive – Only an Authorized User can select based on eligibility criteria
Documentation
Requirements – this section allows user to scan, and upload required documents.
There are the following three radio buttons available:
·
Scan
now – allows to scan and upload documents at once
·
Scan
Later – allows to schedule document scan and submission for a later time
·
No
Scan Required – select this option if no documents are required to be uploaded
Certain documents are required for the creation of a New Permit. If the system can check for the document automatically via a system interface, it will mark the document as being System Collected.
· The SVC documents must be scanned, and status updated before the permit can be issued by the Authorized User
· The Authorized User must select the document name; then click the Add link and the document name will be displayed in a list just below the drop down.
· Authorized User can select the appropriate status for that document from the Status drop down list.
o Collected – means the document has been submitted and approved by issuer.
o Not Required – means the document is not required for this transaction.
o Outstanding – means the document has not been submitted and approved yet.
o System Collected – means the system has some interface that provides verification that the documentation requirement has been met.
Attachment Upload
Documents that Authorized User will upload to attach to the permit
· Authorized User can select the PDF files from the Browse link
· To attach the selected file the Authorized User must click Upload to attach the file, if applicable
Delivery Details
The Authorized User must indicate the delivery method for the permit.
· Select the Delivery Method from the drop-down list
o Courier
§ If selected the Authorized User must enter the details of the Courier the Name, Account Number (No.) and Courier Phone Number (No.)
o Mailed
o Pick Up
§ If selected the Authorized User must select the pickup location
o Authorized Users must print permits, so the only Electronic Delivery Channel is print
o Authorized User can enter the appropriate comment that will be viewed on the Account Enquiry Screen by internal users only.
o The Authorized User must select the appropriate access level for the comment from the drop-down list:
§ Internal – means only internal resources are authorized to view the comment.
§ Public – means the internal and external users are authorized to view the comments.
§ Restricted – means only the defined authorized roles can view the comment.
· When the Delete Allowed is Selected the comment can be deleted by another Authorized Users
Command Line functions:
Proceed – means the system will take the user to the next logical step required for the transaction
Refresh – means the system will return the screen to the original content when the user entered the screen for the first time
Quit – means the user is finished working on this transaction for the time being and the transaction is available for completion by any authorized user at a late time using the “work in progress” feature.
Cancel – means the user has decided to discard all activity on this transaction as if they had never started it. The transaction log will show the transaction activity.
Help – means the help screen will be provided for the current screen and the user may scan the help file for assistance.
Select PROCEED to execute the edits and auto issuance criteria. If the auto issuance criteria fail, the application will be submitted to the workflow for review. Once the application has been approved by the authorized user and on “Done” click from the application approval details screen, the system will come back to the billing screen.
Select PROCEED on the Command Line; the billing information will be saved to the database and continue to the validation screen. From the billing validation screen, the authorized user can generate the invoice.
Note: Once the application has been invoiced the only way for an Authorized User to move through screens using the tabs is by selecting Cancel Bill.
Command Line functions:
Proceed – Means the system will proceed to the next logical step in processing the transaction
Add to Cart – means the system will save the invoice information to a cart for future payment along with any other items placed in the cart as a result of subsequent transaction processing
Cancel Bill – means the invoice/bill that was calculated will be cancelled and the transaction will no longer be in “Invoiced” status and will be placed in an “Open” status”
Refresh – means the system will return the screen to the original content when the user entered the screen for the first time
Quit – means the user is finished working on this transaction for the time being and the transaction is available for completion by any authorized user at a late time using the “work in progress” feature.
Invoice – Means the system display the invoice
Draft Permit – means the system will provide a Draft Permit for verification by the user. No permit number is assigned at this point.
Help - means the system will provide a help screen for the current screen and the user can view the help information and scan the help file as required.
Payment Detail Screen – see 1.4.4.6-payment, p 131
Enterprise – Application – O/O - Permit – Certificate – Disable Vehicle Supplemental Towing Certificates
Disabled vehicle supplemental towing certificates are issued to the carrier that holds a tow truck annual permit that enables them to tow a disabled vehicle that originates from a King’s Highway location to an alternate destination beyond a first suitable exit.
The system must have the ability to issue disabled vehicle supplemental towing certificates. The system must also allow the Authorized Users to upload scanned copies of their used certificates and then to allow the Authorized Users to deactivate them in the system
For external users the O/O Account number will be pre-populated. Internal Users will have to provide the O/O Account Number (No.) or Legal Name in the corresponding field to process a permit application.
When PROCEED is selected on the Command Line at the bottom of the screen.
· A validation of the CVOR status will be performed if O/O Account Number was created with a CVOR.
· If the Account Level status is suspended or inactive, then a message will display telling the user to please contact the Oversize/Overweight Permit section.
· The system will confirm if the Carrier has a valid Annual Tow Truck Permit. An error message will be posted if the Carrier does not have a valid Annual Tow Truck Permit.

To get the details for other fields of the general process, please refer to section 1.4.2.1.1 or for online users, click here.
There are several sections on the general screen.
The following information is populated from the Common Client Enterprise Level or Account Level and cannot be updated by an Authorized User.
O/O Account Details
· Account Number (No.)
· Legal Name
· Application Number (No.) they system will generate the unique number for tracking the application
· CVOR
· Client Status
· NSC Number
· Exemption Code if the Common Client has an Exemption Code it is checked, if expired then Authorized User must enter a valid exemption code
· Physical Address
The Authorized User can update the following fields
· Mailing Address by default, it populates from the Account Level and the authorized user can select any one from the drop-down list.
· Issued At the Authorized User can select from the drop-down list.
· Authorized User must Select a contact name from drop down list
Permit Details
The following information is generated by the system and cannot be updated by an Authorized User.
· Permit Type
· Transaction Type
· Application Status – For a new permit, application status is not submitted status.
Note: The status will be updated to submitted after completing all tabs
· Application Status Date the date will be changed when the application status is updated
· Permit Number (No.) for a new permit, it is blank, and the user will get a permit number after credentials have been issued
Authorized User must update or enter the required information into the following fields.
· *Number (No.) of Permits Required
· If Bilingual format is checked, credentials will be generated in both English and French
· *Authorized User must select the Start Date of the permit
· The End Date
· An Authorized User must enter a valid Annual Permit Number (No.) with a Tow Load Type.
Note: The permit status and expiry date will be populated in corresponding fields.
· Authorized User can enter the appropriate comment and then select Add/Update
· If a comment is entered the appropriate access level for the comment from the drop-down list:
o Internal – means only internal resources are authorized to view the comment.
o Public – means the internal and external users are authorized to view the comments.
o Restricted – means only the defined authorized roles can view the comment.
· When the Delete Allowed is Selected the comment can be deleted by another Authorized Users
· Permit Details
o Annual Permit No.
o Annual Permit Status – The system will populate the annual permit status of that permit number, when PROCEED is selected. NOTE: If the status returned by the system is Suspended, a message will be displayed to the user and the transaction cannot be completed
o Annual Permit Expiry Date – The system will populate the annual permit expiry date of that permit number when PROCEED is selected.
o Start Date – can change the date
Authorized User must Select PROCEED to execute the edits and display the verification screen.
Command Line functions:
Proceed – means the system will take the user to the next logical step required for the transaction
Refresh – means the system will return the screen to the original content when the user entered the screen for the first time
Quit – means the user is finished working on this transaction for the time being and the transaction is available for completion by any authorized user at a late time using the “work in progress” feature.
Cancel – means the user has decided to discard all activity on this transaction as if they had never started it. The transaction log will show the transaction activity.
Help – means the help screen will be provided for the current screen and the user may scan the help file for assistance.
To return to an alternate screen while processing a transaction the user can select the appropriate tab along the top of the current screen and the system will asynchronously display the corresponding screen for processing by the user. After fijnishing rfeviewing and/or making changes to the screen the user can select the “Proceed” button to return to the screen they came from General.
The verification screen displays showing the user a consolidated view of the general information. If the user determines some of the information is incorrect, they can select BACK on the Command Line and the system will display the general screen again. The user can make the required changes and select PROCEED.
Select PROCEED on the Command Line and general information will be saved to the database

To get the details of the billing process, please refer to section 1.4.2.1.4 or for online users, clickhere.
Billing Details
The following fields are populated from the Common Client or Account Level, or System generated, and the Authorized User cannot change them.
O/O Account Details
Account No.
Legal Name
Application No.
CVOR
NSC Number
Exemption Code
Billing Details
· Transaction Type
· Permit Number (No.) is blank, it is system generated when credentials are issued.
· Billing Date
· Transaction Type
· Transaction Status has been updated to OPEN
Fees Section
By default, the following are populated from the enterprise screen and cannot be changed by the user.
· Prepaid Balance
· Stored Credit Balance
· Manual Adjustment Amount – Only an Authorized User can complete adjustment based on business rules
· Fee Table displays the following application details
o Fee Type
o Number (No.) of Permits Required
o Fee Amount
o Waive – Only an Authorized User can select based on eligibility criteria
Documentation Requirements – this section
allows user to scan, and upload required documents. There are the following
three radio buttons available:
·
Scan
now – allows to scan and upload documents at once
·
Scan
Later – allows to schedule document scan and submission for a later time
·
No
Scan Required – select this option if no documents are required to be uploaded
Certain documents are required for the creation of a New Permit. If the system can check for the document automatically via a system interface, it will mark the document as being System Collected.
· If a document is required, the document name will be displayed in the Documentation Requirements Section drop down list.
· The Authorized User must select the document name; then click the Add link and the document name will be displayed in a list just below the drop down.
· Authorized User can select the appropriate status for that document from the Status drop down list.
o Collected – means the document has been submitted and approved by issuer.
o Not Required – means the document is not required for this transaction.
o Outstanding – means the document has not been submitted and approved yet.
o System Collected – means the system has some interface that provides verification that the documentation requirement has been met.
Attachment Upload
Documents that Authorized User will upload to attach to the permit
· Authorized User can select the PDF files from the Browse link
· To attach the selected file the Authorized User must click Upload to attach the file, if applicable
Delivery Details
The Authorized User must indicate the delivery method for the permit.
· Select the Delivery Method from the drop-down list
o Courier
§ If selected the Authorized User must enter the details of the Courier the Name, Account Number (No.) and Courier Phone Number (No.)
o Mailed
o Pick Up
§ If selected the Authorized User must select the pickup location
o The Electronic Delivery Channel must be selected from the drop-down menu
· PDF – View format the default for external users
· Email – The email address will default from the Account level email. The Authorized User can update the field
Note: Updating this field will not update the Account
· Fax – The fax number will default from the Account level. An Authorized User can record a different fax number.
· Note: Updating this field will not update the Account
o The Authorized User must select the appropriate access level for the comment from the drop-down list:
o Internal – means only internal resources are authorized to view the comment.
o Public – means the internal and external users are authorized to view the comments.
o Restricted – means only the defined authorized roles can view the comment.
· When the Delete Allowed is selected the comment can be deleted by another Authorized Users
Note: Overrides require Authorized User to enter User ID.
Command Line functions:
Proceed – means the system will take the user to the next logical step required for the transaction
Refresh – means the system will return the screen to the original content when the user entered the screen for the first time
Quit – means the user is finished working on this transaction for the time being and the transaction is available for completion by any authorized user at a late time using the “work in progress” feature.
Cancel – means the user has decided to discard all activity on this transaction as if they had never started it. The transaction log will show the transaction activity.
Help – means the help screen will be provided for the current screen and the user may scan the help file for assistance.
Select PROCEED to execute the edits and auto issuance criteria. If the auto issuance criteria fail, the application will be submitted to the workflow for review. Once the application has been approved by the authorized user and on “Done” click from the application approval details screen, the system will come back to the billing screen.
Select PROCEED on the Command Line; the billing information will be saved to the database and continue to the validation screen. From the billing validation screen, the authorized user can generate the invoice.
Note: Once the application has been invoiced the only way for an Authorized User to move through screens using the tabs is by selecting Cancel Bill.
Command Line functions:
Proceed – Means the system will proceed to the next logical step in processing the transaction
Add to Cart – means the system will save the invoice information to a cart for future payment along with any other items placed in the cart as a result of subsequent transaction processing
Cancel Bill – means the invoice/bill that was calculated will be cancelled and the transaction will no longer be in “Invoiced” status and will be placed in an “Open” status”
Refresh – means the system will return the screen to the original content when the user entered the screen for the first time
Quit – means the user is finished working on this transaction for the time being and the transaction is available for completion by any authorized user at a late time using the “work in progress” feature.
Invoice – Means the system display the invoice
Draft Permit – means the system will provide a Draft Permit for verification by the user. No permit number is assigned at this point.
Help - means the system will provide a help screen for the current screen and the user can view the help information and scan the help file as required.
Payment Detail Screen – see 1.4.4.6-payment, p 131
Select:
Enterprise – Applications – O/O – Permit – Certificate – Single Trip Batch
Permit (process is the same as the single trip)
For
external users the O/O Account number will be pre-populated. Internal Users
will have to provide the O/O Account Number (No.) or Legal Name or Certificate
Number (No.) in the corresponding field to process a permit application.
When PROCEED is selected on the Command Line at the bottom of the screen.
· A validation of the CVOR status will be performed if O/O Account Number was created with a CVOR.
· If the Account Level status is suspended or inactive, then a message will display telling the user to please contact the Oversize/Overweight Permit section.

The general screen is the
first screen for the single trip permit.
There are several sections on the general screen. To get the details for
the other fields of the general process please refer to Section 1.4.2.1.1 or for
online users, click here
The following information is populated from the Common Client Enterprise Level or Account Level and cannot be updated by an Authorized User.
O/O Account Details
· Account Number (No.)
· Legal Name
· Application Number (No.) they system will generate the unique number for tracking the application
· CVOR
· Client Status
· NSC Number
· Exemption Code if the Common Client has an Exemption Code it is checked, if expired then Authorized User must enter a valid exemption code
· Physical Address
The Authorized User can update the following fields
· Mailing Address by default, it populates from the Account Level and the authorized user can select any one from the drop-down list.
· Issued At the Authorized User can select from the drop-down list.
· Authorized User must Select a contact name from drop down list
Permit Details
The following information is generated by the system and cannot be updated by an Authorized User.
· Permit Type
· Transaction Type
· Application Status – For a new permit, application status is not submitted status.
Note: The status will be updated to submitted after completing all tabs
· Application Status Date the date will be changed when the application status is updated
· Permit Number (No.) for a new permit, it is blank, and the user will get a permit number after credentials have been issued
Authorized User must update or enter the required information into the following fields.
· Number (No.) of Permits Required – the number of identical permits that will be produced with different permit numbers and will be used in fee calculations and printing.
· If Bilingual format is checked, credentials will be generated in both English and French
· Authorized User must select the Start Date of the permit
· The End Date must be entered
· Farm Plated Vehicles- if it is checked, a comment must be entered
· Check if the Weekend Travel Requested box if the permit will travel over the weekend
· Authorized User can enter the appropriate comment and then select Add/Update Comment
· If a comment is entered the appropriate access level for the comment from the drop-down list:
o Internal – means only internal resources are authorized to view the comment.
o Public – means the internal and external users are authorized to view the comments.
o Restricted – means only the defined authorized roles can view the comment.
· When the Delete Allowed is Selected the comment can be deleted by another Authorized Users
Authorized User must Select PROCEED to execute the edits and display the verification screen.
Command Line functions:
Proceed – means the system will take the user to the next logical step required for the transaction
Refresh – means the system will return the screen to the original content when the user entered the screen for the first time
Quit – means the user is finished working on this transaction for the time being and the transaction is available for completion by any authorized user at a late time using the “work in progress” feature.
Cancel – means the user has decided to discard all activity on this transaction as if they had never started it. The transaction log will show the transaction activity.
Help – means the help screen will be provided for the current screen and the user may scan the help file for assistance.
To return to an alternate screen while processing a transaction the user can select the appropriate tab along the top of the current screen and the system will asynchronously display the corresponding screen for processing by the user. After fijnishing rfeviewing and/or making changes to the screen the user can select the “Proceed” button to return to the screen they came from General.
The verification screen displays showing the user a consolidated view of the general information. If the user determines some of the information is incorrect, they can select BACK on the Command Line and the system will display the general screen again. The user can make the required changes and select PROCEED.
Select PROCEED on the Command Line and general information will be saved to the database. The Load and Dimensions Screen displays.
Single Trip Permit Load & Dimensions Screen
The next screen for the single trip permit application collects information specific to the permit pertaining to the load and dimensions. This screen will include all the details required for all load categories.

To get the details of the load and dimensions process, please refer to section 1.4.2.2.2 or for online users, clickhere.
(Process is the same as the single trip)
There are several sections on the Load & Dimensions Screen.
The following fields are populated from the Common Client or Account Level, or System generated, and the Authorized User cannot change them.
O/O Account Details
Account No.
Legal Name
Application No.
CVOR
NSC Number
Exemption Code
Permit Details
The following fields are populated from the Common Client or Account Level, or System generated, and the Authorized User cannot change them.
· Transaction Type
· Permit Number (No.) is blank, it is system generated when credentials are issued.
Load Details
The Authorized User must record the load details being requested for the permit(s)
· Select a Load Description
o Tow
o Carry
o Operate
· The Load Type must be selected from the drop-down menu that is populated based on the selected Load
Note: When the Load Type of Other is selected the Authorized User must record a description in the field labelled Other
· If operate is Selected, the following vehicle information is required:
o Make
o Model No. (Number)
o Serial No. (Number)
· Authorized User must indicate if the load is destined for scrap.
· Record the number of item(s) for selected Load Type, if applicable
· If a Ministry Issued Configuration Number is not providing the Authorized User and then select Find
Dimension Details
The Authorized User must enter the dimensions details of the load within a valid range, as required
o Vehicle (Power Unit) Length (m)
o Trailer Width (m)
o Trailer Length (m)
o Manufacturer’s Rated Capacity of Trailer (kg)
o Load Length (m)
o Load Width (m)
o Load Height (m)
o Load Weight (kg)
o Overall Combined Length (m)
o Overall Width (m)
o Overall Height (m)
o Rear Overhang (If Exceeds 4.65 m)
· Authorized User must indicate if the Gross Weight is within or exceeds HTA weights
· The Authorized User must enter the Bill of Lading Number, if applicable.
Axle Description
If the authorized user selects Exceeds HTA, the Axle description or Ministry Issued Configuration Number, is required.
o Authorized User can enter a valid Ministry Issued Configuration Number to populate the axle information
o If a Ministry Issued Configuration Number is not providing the Authorized User must complete the Axle Description table.
§ Enter the Total Number of Axles and then select apply
§ Enter the Number of Axles on the Power Unit
§ Select the Equipment Type from the drop-down screen
§ Enter the Number of Tires per Axles
§ Enter the Manufacturer Rated Axle Capacity (kg)
§ Enter the Tire Width (mm)
§ Enter the Tire Rating (kg)
§ Enter Requested Weight per Axle (kg)
§ Enter Inter-Axle Spacing (m)
The Authorized User can use the following options in the table
o Repeat – means the information entered for one of the parameters will be repeated for all parameters
o Draw – means the system will make a scale drawing of the tractor and trailer with axle spacings
o Clear – means the system will clear the parameters for subsequent entry of the required field values
· Bridge Formula- pop up window
Registered Gross Vehicle Weight
Authorized Users must record the Registered Gross Vehicle Weight.
For Ontario Carriers registered in Ontario the Registered Gross Vehicle Weight (RGVW) should be recorded, if applicable.
If the Carrier is registered in another jurisdiction (Out of Province Carriers) the Registered Gross Vehicle Weight should be blank the following information is required.
§ Indicated if Ontario is a registered jurisdiction on the IRP apportioned cab card
§ If yes, record the Registered Gross Vehicle Weight (RGVW) for Ontario
§ If not, record the Registered Gross Vehicle Weight (RGVW) of the power unit in the registered jurisdiction
§ Comment - Enter the appropriate comment.
§ Access Level - Select the appropriate access level for the comment from the dropdown list:
· Internal – means only internal resources are authorized to view the comment.
· Public – means the internal and external users are authorized to view the comments.
· Restricted – means only the defined authorized roles can view the comment.
§ Delete Allowed - Click this box if the authorized user wants to be able to delete this comment.
Select PROCEED to execute the edits and display the verification screen.
The verification screen displays showing the user a consolidated view of the load and dimensions information. If the user determines some of the information is incorrect, they can select BACK on the Command Line and the system will display the Load and Dimensions Screen again. The user can make the required changes and select PROCEED.
Select PROCEED on the Command Line and the load and dimensions information will be saved to the database. The Routing screen displays.
The next screen is the Routing screen to capture the route details for routing. There are two options Manual and Assisted routing.
Manual Routing – The Authorized User can enter the address and distance and then select PROCEED to continue.
Note: The system does not validate the address
The following fields are populated from the Common Client or Account Level, or System generated, and the Authorized User cannot change them.
O/O Account Details
Account No.
Legal Name
Application No.
CVOR
NSC Number
Exemption Code
Permit Details
The following fields are populated from the Common Client or Account Level, or System generated, and the Authorized User cannot change them.
· Transaction Type
· Permit Number (No.) is blank, it is system generated when credentials are issued.
Routing Details
Dimension Details
· The following fields are populated from the Common Client or Account Level, or System generated, and the Authorized User cannot change them.
o Overall Width
o Overall Height
o Overall Length
o Overall Weight.
Stops
The Authorized User must record the routing details for the permit(s)
§ Select Route Type from drop down list
· Address
Note: To add additional stops, select Address from the drop-down menu and click add or update the route in the table by using the red “x” to delete points.
· Enter each address from the origin to destination
Note: Abbreviations cannot be used when entering an address (i.e., St, Ave, E, or HWY) the word must be entered in full.
· Total Distance travelled along the Kings Highways must be recorded
· Authorized User must record the Route Details in this section separated by commas.
Example:
Route Details: Sarnia, Highway 402, Ontario/Quebec border
· Authorized User must check the box if travelling outside of the province.
407 ETR
· If the route travels on the 407ETR the Authorized User needs to indicate Yes on the 407ETR tab
· The Authorized User must record the following information, if applicable.
o Transponder Number (No.)
o Tractor Plate Number (No.)
o Trailer Plate Number (No.) 1
o Trailer Plate Number (No.) 2
o Trailer Plate Number (No.) 3
· Select Proceed to execute the edits and display verification screen.
Select PROCEED on the Command Line and the route information will save to the database. The conditions screen displays.
Command Line:
Proceed – means the system will take the user to the next logical step required for the transaction
Back – go to previous screen,
Refresh – means the system will return the screen to the original content when the user entered the screen for the first time
Quit – means the user is finished working on this transaction for the time being and the transaction is available for completion by any authorized user at a late time using the “work in progress” feature.
Cancel – means the user has decided to discard all activity on this transaction as if they had never started it. The transaction log will show the transaction activity.
Help – means the help screen will be provided for the current screen and the user may scan the help file for assistance.
To get the details of the routing process, please refer to section 1.4.2.2.3 or for online users, clickhere.
Assisted Routing
Allows the Authorized User to enter an address or select points on the map to generate a route. The Authorized User has the option to view the map in various formats
o Topographical – This is a map provided by MNR
o O/O Map – This Ontario wide street map presents highway level details and street level data for Ontario, Canada.
o Imagery
The following fields are populated from the Common Client or Account Level, or System generated, and the Authorized User cannot change them.
O/O Account Details
Account No.
Legal Name
Application No.
CVOR
NSC Number
Exemption Code
Permit Details
The following fields are populated from the Common Client or Account Level, or System generated, and the Authorized User cannot change them.
· Transaction Type
· Permit Number (No.) is blank, it is system generated when credentials are issued.
Routing Details
Dimension Details
· The following fields are populated from the Common Client or Account Level, or System generated, and the Authorized User cannot change them.
o Overall Width
o Overall Height
o Overall Length
o Overall Weight
Note: The above fields can be hidden during routing by expanding the view of the map select Expand Map button “[]” on the right of the screen and to view the permit details select “-”.
The Authorized User can select from a few options on the Routing screen.
Routing:
MTO Common Corridor
This allows Authorized User to view and select a designated route from populate by the Ministry of Transportation.
· The Authorized User can view a route on the map by highlighting the desired route in the table.
· To select the route, the Authorized User must highlight the route and then select Load Selected MTO Common Corridor
· Select Close or click on the “x” in the top right to return to the main map
Load Trip
This feature allows Authorized User to load commonly travelled routes on their account.
· The Authorized User can view a route on the map by highlighting the desired route in the table.
· To select the route, the Authorized User must highlight the route and then select Load Selected Route
· The Authorized User can manage the routes saved to the account by highlighting designated route and then selecting Delete Selected Route
· Select Close or click on the “x” in the top right to return to the main map
Routing Option
· The Authorized User can check any route option from the list.
Map Navigation Control Tools:
§ The Zoom In icon increases
the zoom on the map.
§ The Zoom Out icon reduces the
zoom on the map.
§ The Hand icon enables
panning.
§ The Right Arrow icon sign
allows panning right on map.
§ The Left Arrow sign allows panning
left on map.
§ The Magnifying Glass icon is
used to display the default Map.
§ The Stretch screen icon is
used to display Map in full screen.
o – The Minus sign is used to collapse the Stops and Direction panel.
o + The Plus sign is used to expand the Stops and Direction panel.
Add Way Points
§ When selected the Stops and Directions opens to allow Authorized User to enter routing information.
Direction
§ Provides a turn-by-turn direction with the distance highlighted only on the Kings Highway Segment
§ If Route is selected it will provide you with the entire route displayed – from start to end
Via Routes
§ This text box is a mandatory field that defines all roads used in identifying specific route
Waypoints
o This allows the Authorized User to indicate the points along the route.
o Authorized User must highlight one of the following Route Types and then select ADD or select points on the map
§ In/Out Route
· To be selected in the case of Ontario Border Crossing from the following Provinces or States.
o QB – Quebec
o NY – New York
o MI _ Michigan
o MN – Minnesota
o MB – Manitoba
· Authorized User can then select the highway or bridge that will be used to enter or exit Ontario.
§ Intersection
· Format
o Highway 401, Queen Elizabeth Way
o Regional Road 9, Highway 400
o County Road 9m Burrock Avenue
· All the following must be spelled out:
o E.g., Avenue, Street, Road
o Directional Suffix mandatory if it exists in the street name e.g., Burlington Street East
· Tip: To determine the street name, you can add a waypoint directly onto the street. You must be zoomed in very close to ensure that you have places your waypoint on the correct road. You may then remove the road if you do not intend to use it as a waypoint.
§ Latitude/Longitude
· Latitude is a geographical coordinate that specifies the north-south position of a point on the Earth’s surface
· Longitude is a geographical coordinate that specifies the east-west position of a point on the Earth’s surface
· 6 decimal minimum is required for correct usage of this option
o e.g., 43.782615 – 79.287858
o 43.771672 – 79.3213320
§ Address
· A formal address can be entered
· Municipality is required
· Commas are used to separate street address and municipality
Note: Abbreviations cannot be used.
· Format
o 12 Regional Road 9, Peterborough
o 144 County Road, Mississauga
o All the following must be spelled out:
o e.g., Avenue, Street, Road
o Directional Suffix is mandatory if it exists in the street name - Burlington Street East
o
o Tip: To determine the street name, you can add a waypoint directly onto the street. You must be zoomed in very close to ensure that you have places your waypoint on the correct road. You may then remove the road if you do not intend to use it as a waypoint.
o
§ Exit Number
§ In most cases this option applies to King’s Highways
o e.g., Highway 401, Highway 400
· First field requires the Highway, and the second field requires the exit number
o e.g., First field: Highway 401, Second Field 110
o
Note: Waypoints can be deleted by selecting the red “X” or the routing sequence can be updated by using the corresponding green arrows to the right.
· The Authorized User must enter the via route information
o Format
§ Highway 401, Queen Elizabeth Way
§ Regional Road 9, Highway 400
§ County Road 9m Burrock Avenue
o All the following must be spelled out:
§ E.g., Avenue, Street, Road
§ Directional Suffix mandatory if it exists in the street name e.g., Burlington Street East
§ Tip: To determine the street name, you can add a waypoint directly onto the street. You must be zoomed in very close to ensure that you have places your waypoint on the correct road. You may then remove the road if you do not intend to use it as a waypoint
o Authorized User must check the box if travelling outside of the province: specify that it is Border Crossing checkbox.
o Once route details have been entered under the Waypoints tab the Authorized User can select an option from the command line.
§ Check Route
§ Clear
§ Save Route
§ Printable Version
§ Municipality List
o
o Total Distance being travelled along the Kings Highways will be generated automatically by the solution.
o Restrictions and Warnings
§ All restrictions will be displayed in this tab as text mode. You can click the zoom icon to focus in on the geographical location of the restriction.
§ The Authorized User can add a comment in this area and submit for review.
407 ETR
· If the route travels on the 407ETR the Authorized User needs to indicate Yes on the 407ETR tab
· The Authorized User must record Transponder Number and Plate Number
§
§ Authorized User can proceed by selecting one of the commands at the bottom of the screen
o Proceed – Proceed to Permit Conditions Screen
o Back – Back to Load and Dimensions Screen
o Refresh – Return to default start of assisted routing and clear all routing data
o Quit
o Cancel – Cancel the permit application
o Help – Display help for this section
Process is the same as the single trip.

To get the details of the billing process, please refer to section 1.4.2.1.3 or for online users, clickhere.
The following fields are populated from the Common Client or Account Level, or System generated, and the Authorized User cannot change them.
O/O Account Details
Account No.
Legal Name
Application No.
CVOR
NSC Number
Exemption Code
Permit Details
· Transaction Type
· Permit Number (No.) is blank, it is system generated when credentials are issued.
Conditions
The Authorized User can select Condition Category from the drop-down list, if applicable. Conditions will populate based on the conditions category
o All
o Non-Standard
o General
o Mobile Cranes
o Pre-Manufactured Buildings
o Tree Length Logs
o Road Building Machines
o Tow Trucks
· If applicable, Standard conditions are populated by default and cannot be changed by the Authorized User.
· Sequence Number (No.)
· Select
· Conditions Category populated as per configuration
§ The Conditions are displayed in both English and French as per configuration Notes populated as per configuration
Non-Standard
The Authorized User can check non-standard conditions, if applicable.
o Sequence Number (No.) is populated as per configuration and cannot be changed by the user
o The authorized user can select the Condition if applicable.
o Conditions Category populated as per configuration and cannot be changed by the user.
o The Conditions are displayed in both English and French as per configuration
o Notes populated as per configuration and cannot be changed by the user
Additional Conditions
The Authorized User can check or add additional conditions if applicable.
· Sequence No. - By default, populated as per configuration and cannot be changed by the user.
· To Add a Condition the Authorized User must select the green “+” sign to open a table to enter Condition details
· Authorized User must enter the Condition details in the Condition English field
· If Bilingual format has been selected the details must also be entered in French in the Condition French table
· To remove the Condition the Authorized User must select the red “x” to delete the entry
Select PROCEED to execute the edits and display the verification screen.
The verification screen displays showing the user a consolidated view of the conditions information. If the user determines some of the information is incorrect, they can select BACK on the Command Line and the system will display the conditions screen again. The user can make the required changes and select PROCEED.
Select PROCEED on the Command Line and the conditions information will be saved to the database. The billing Screen will be displayed.

To get the details for the other fields in the billing process, please refer to section 1.4.2.1.4 or for online users, click for online users click here.
Billing Details
The following fields are populated from the Common Client or Account Level, or System generated, and the Authorized User cannot change them.
O/O Account Details
Account No.
Legal Name
Application No.
CVOR
NSC Number
Exemption Code
Billing Details
· Transaction Type
· Permit Number (No.) is blank, it is system generated when credentials are issued.
· Billing Date
· Transaction Type
· Transaction Status has been updated to OPEN
The following fields are populated by the system, but the Authorized User can update as required
o Start Date 1
o End Date 1
o Start Date 2
o End Date 2
Fees Section
By default, the following are populated from the enterprise screen and cannot be changed by the user.
· Prepaid Balance
· Stored Credit Balance
· Manual Adjustment Amount – Only an Authorized User can complete adjustment based on business rules
· Fee Table displays the following application details
o Fee Type
o Number (No.) of Permits Required
o Fee Amount
o Waive – Only an Authorized User can select based on eligibility criteria
Documentation Requirements – this section
allows user to scan, and upload required documents. There are the following
three radio buttons available:
·
Scan
now – allows to scan and upload documents at once
·
Scan
Later – allows to schedule document scan and submission for a later time
·
No
Scan Required – select this option if no documents are required to be uploaded
Certain documents are required for the creation of a New Permit. If the system can check for the document automatically via a system interface, it will mark the document as being System Collected.
· If a document is required, the document name will be displayed in the Documentation Requirements Section drop down list.
o OPP Confirmation
o Additional Route Details
o Applicable Utility and Company Approvals
o Bill of Lading
o Load Security Explanation
o Municipal Permits
o Rational for Moving Indivisible Load
o Vehicle Diagram
o Letter of Clearance
o Entrance Permit
o Traffic Management Plan
o Other
· The Authorized User must select the document name; then click the Add link and the document name will be displayed in a list just below the drop down.
· Authorized User can select the appropriate status for that document from the Status drop down list.
o Collected – means the document has been submitted and approved by issuer.
o Not Required – means the document is not required for this transaction.
o Outstanding – means the document has not been submitted and approved yet.
o System Collected - means the system has some interface that provides verification that the documentation requirement has been met.
Attachment Upload
Documents that Authorized User will upload to attach to the permit
· Authorized User can select the PDF files from the Browse link
· To attach the selected file the Authorized User must click Upload to attach the file, if applicable
Delivery Details
The Authorized User must indicate the delivery method for the permit.
· Select the Delivery Method from the drop-down list
o Courier
§ If selected the Authorized User must enter the details of the Courier the Name, Account Number (No.) and Courier Phone Number (No.)
o Mailed
o Pick Up
§ If selected the Authorized User must select the pickup location
o The only option is Print for the Electronic Delivery Channel
o The Authorized User must select the appropriate access level for the comment from the drop-down list:
· Internal – means only internal resources are authorized to view the comment.
· Public – means the internal and external users are authorized to view the comments.
· Restricted – means only the defined authorized roles can view the comment.
· When the Delete Allowed is Selected the comment can be deleted by another Authorized Users
Note: Overrides require Authorized User to enter User ID.
Command Line functions:
Proceed – means the system will take the user to the next logical step required for the transaction
Refresh – means the system will return the screen to the original content when the user entered the screen for the first time
Quit – means the user is finished working on this transaction for the time being and the transaction is available for completion by any authorized user at a late time using the “work in progress” feature.
Cancel – means the user has decided to discard all activity on this transaction as if they had never started it. The transaction log will show the transaction activity.
Help – means the help screen will be provided for the current screen and the user may scan the help file for assistance.
Select PROCEED to execute the edits and auto issuance criteria. If the auto issuance criteria fail, the application will be submitted to the workflow for review. Once the application has been approved by the authorized user and on “Done” click from the application approval details screen, the system will come back to the billing screen.
Select PROCEED on the Command Line; the billing information will be saved to the database and continue to the validation screen. From the billing validation screen, the authorized user can generate the invoice.
Note: Once the application has been invoiced the only way for an Authorized User to move through screens using the tabs is by selecting Cancel Bill.
Command Line functions:
Proceed – Means the system will proceed to the next logical step in processing the transaction
Add to Cart – means the system will save the invoice information to a cart for future payment along with any other items placed in the cart as a result of subsequent transaction processing
Cancel Bill – means the invoice/bill that was calculated will be cancelled and the transaction will no longer be in “Invoiced” status and will be placed in an “Open” status”
Refresh – means the system will return the screen to the original content when the user entered the screen for the first time
Quit – means the user is finished working on this transaction for the time being and the transaction is available for completion by any authorized user at a late time using the “work in progress” feature.
Invoice – Means the system display the invoice
Draft Permit – means the system will provide a Draft Permit for verification by the user. No permit number is assigned at this point.
Help - means the system will provide a help screen for the current screen and the user can view the help information and scan the help file as required.
Payment Detail Screen – see 1.4.4.6-payment, p 131
Select:
Enterprise – Applications – O/O - VCE Request – Conventional VCE Application
Authorized User will have to provide the O/O Account Number (No.) or Legal Name in the corresponding field to process a permit application.
When PROCEED is selected on the Command Line at the bottom of the screen.
· A validation of the CVOR status will be performed if O/O Account Number was created with a CVOR.
· If the Account Level status is suspended or inactive, then a message will display telling the user to please contact the Oversize/Overweight Permit section.
Copy From provides the ability to copy data from a previously submitted permit for the purpose of using the data in a new application or request.
Note: Only permits form the account can be copied.
· Authorized User can enter the Account Number (No.) and/or Legal Name and Select Copy From to get a list of available permits items to select
· And then, Select the permit to be copied
· If the Vehicle Configuration Evaluation (VCE) Number (No.) is entered the Authorized User can Select Copy From on the Command Line to update the permit information
Note: The information up to the conditions screen will be displayed.

The following information is populated from the Common Client Enterprise Level or Account Level and cannot be updated by an Authorized User.
O/O Account Details
· Account Number (No.)
· Legal Name
· Application Number (No.) they system will generate the unique number for tracking the application
· CVOR
· Client Status
· NSC Number
· Exemption Code if the Common Client has an Exemption Code it is checked, if expired then Authorized User must enter a valid exemption code
· Physical Address
The Authorized User can update the following fields
· Mailing Address by default, it populates from the Account Level and the authorized user can select any one from the drop-down list.
· Issued At the Authorized User can select from the drop-down list.
· Authorized User must Select a contact name from drop down list
VCE Request Details
The following information is generated by the system and cannot be updated by an Authorized User.
· VCE Type
· Transaction Type
· Application Status - For a new permit, application status is not submitted status.
Note: The status will be updated to submitted after completing all tabs
· Start date
· The End Date will remain blank
· Application Status Date the date will be changed when the application status is updated
· Ministry Issued Configuration Number (No.) for a new VCE, it is blank, and the user will get a VCE number after credentials
Authorized User must update or enter the required information into the following fields.
· Evaluation Only must be checked if submitting for review
· If Bilingual format is checked, credentials will be generated in French only when selected
· Authorized User can enter the appropriate comment and then select Add/Update
Comment
· If a comment is entered the appropriate access level for the comment from the drop-down list:
o Internal – means only internal resources are authorized to view the comment.
o Public – means the internal and external users are authorized to view the comments.
o Restricted – means only the defined authorized roles can view the comment.
· When the Delete Allowed is Selected the comment can be deleted by another Authorized Users
Select PROCEED to execute the edits and display the verification screen.
The verification screen displays showing the user a consolidated view of the general information. If the user determines some of the information is incorrect, they can select BACK on the Command Line and the system will display the general screen again. The user can make the required changes and select PROCEED.
Select PROCEED on the Command Line and general information will be saved to the database. The Load and Dimensions Screen displays.
Command Line functions:
Proceed – means the system will take the user to the next logical step required for the transaction
Refresh – means the system will return the screen to the original content when the user entered the screen for the first time
Quit – means the user is finished working on this transaction for the time being and the transaction is available for completion by any authorized user at a late time using the “work in progress” feature.
Cancel – means the user has decided to discard all activity on this transaction as if they had never started it. The transaction log will show the transaction activity.
Help – means the help screen will be provided for the current screen and the user may scan the help file for assistance.
To return to an alternate screen while processing a transaction the user can select the appropriate tab along the top of the current screen and the system will asynchronously display the corresponding screen for processing by the user. After fijnishing rfeviewing and/or making changes to the screen the user can select the “Proceed” button to return to the screen they came from General.

There are several sections on the Load and Dimensions Screen.
The following fields are populated from the Common Client or Account Level, or System generated, and the Authorized User cannot change them.
O/O Account Details
Account No.
Legal Name
Application No.
CVOR
NSC Number
Exemption Code
Vehicle Details
· Authorized User must enter the Carrier’s Identification of this vehicle combination, if applicable.
Axle Description
The Authorized User must record the configuration information for the vehicle by completing the following fields, if applicable
· Total Number (No.) of Axles of the vehicle combination must be recorded
· The Number (No.) of Axles of the Power Unit are required
· Identify the Equipment Type from the drop-down list
· Enter the appropriate values in the following fields:
o Number (No.) of Tires per Axles
o Manufacturer Rated Axle Capacity (kg)
o Tire Width (mm)
o Tire Rating (kg)
o Requested Weight per Axle (kg)
§ Normal Load
§ Weight per Reduced Load
· Inter-axle Spacing (m)
· The System will calculate the Total Weight being Requested for
o Comments – Enter the appropriate comment. These comments are displayed on Load and Dimensions Enquiry Screen to internal users only.
§ Access Level – Select the appropriate access level for the comment from the dropdown list:
o Internal – means only internal resources are authorized to view the comment.
o Public – means the internal and external users are authorized to view the comments.
o Restricted – means only the defined authorized roles can view the comment.
§ Delete Allowed -Click check box if the authorized user wants to be able to delete this comment.
Bridge Formula – open a new window – edit information – Calculate then Save/Close
Select PROCEED to execute the edits and display the verification screen.
The Verification Screen displays showing the user a consolidated view of the load and dimensions information. If the user determines some of the information is incorrect, they can select BACK on the Command Line and the system will display the Load and Dimensions Screen again. The user can make the required changes and select PROCEED.
Select PROCEED on the Command Line and the load and dimensions information saved to the database. The conditions Screen displays.

There are several sections on the Conditions Screen.
The following fields are populated from the Common Client or Account Level, or System generated, and the Authorized User cannot change them.
O/O Account Details
Account No.
Legal Name
Application No.
CVOR
NSC Number
Exemption Code
VCE Request Details
· Transaction Type
· Ministry Issued Configuration (VCE) Number
Average Gross Vehicle Weight Ratio (AGVWR) Details
· Normal AGVWR
· Reduced AGVWR.
· Exceptional AGVWR
The Authorized User must record the configuration information for the vehicle by completing the following fields, if applicable
Conditions
· If applicable, Standard conditions are populated by default and cannot be changed by the Authorized User.
· Sequence Number (No.)
· Select the Conditions Category from the drop-down list if applicable. Conditions populated as per configuration and cannot be changed by user
Non-Standard
The Authorized User can check non-standard conditions, if applicable.
o The Authorized User can select the options that apply:
o Normal
o Reduced
o Exceptional
· The Conditions are displayed in both English and French as per configuration and can be updated by Authorized User
· Notes populated as per configuration and cannot be changed by Authorized User
o Sequence Number (No.) is populated as per configuration and cannot be changed by the user
o The authorized user can select the Condition if applicable.
o Conditions Category populated as per configuration and cannot be changed by the user.
o The Conditions are displayed in both English and French as per configuration
o Notes populated as per configuration and cannot be changed by the user
Additional Conditions
The Authorized User can check or add additional conditions if applicable.
· By default, the Sequence Number (No.) populated as per configuration and cannot be changed by the user.
· To Add a Condition the Authorized User must select the green “+” sign to open a table to enter Condition details
· Authorized User must remove the options that do not apply:
· Normal Load
· Reduced Load
· Exceptional Load
· The Authorized User must enter the Condition details in the Condition English field
· If Bilingual format has been selected the details must also be entered in French in the Condition French table
o To remove the Condition the Authorized User must select the red “x” to delete the entry
o Notes – Notes are populated as per configuration and cannot be changed by the user.
Select PROCEED to execute the edits and display the verification screen.
· The verification screen displays showing the user a consolidated view of the conditions information. If the user determines some of the information is incorrect, they can select BACK on the Command Line and the system will display the conditions screen again. The Authorized User can make the required changes and select PROCEED.
Select PROCEED on the Command Line and the conditions information saved to the database. The billing screen displays.

There are several sections on the billing screen.
Billing Details
The following fields are populated from the Common Client or Account Level, or System generated, and the Authorized User cannot change them.
O/O Account Details
Account No.
Legal Name
Application No.
CVOR
NSC Number
Exemption Code
Billing Details
Vehicle Configuration Evaluation (VCE) Type identifies the type of VCE user has requested and cannot be changed by the user.
Ministry Issued Configuration Number for a new VCE request, it is blank, and the user will get a VCE number after credentials have been issued.
Billing Date- By default, it populates automatically and cannot be changed by the user.
Transaction Type the user has requested.
Transaction Status is populated by default and cannot be changed by the user.
Fees Section
By default, the following are populated from the enterprise screen and cannot be changed by the user.
· Prepaid Balance by default, it populates from the Enterprise Level and the user cannot change a prepaid balance at the Billing Screen Level.
· Stored Credit Balance by default, it also populates from the Enterprise Level and the user cannot change a stored credit balance at the Billing Screen Level.
· Manual Adjustment Amount – Only an Authorized User can complete adjustment based on business rules
· Fee Table displays the following application details
o Fee Type
o Number (No.) of Permits Required
o Fee Amount
o Waive – Only an Authorized User can select based on eligibility criteria
Documentation
Requirements – this section allows user to scan, and upload required documents.
There are the following three radio buttons available:
·
Scan
now – allows to scan and upload documents at once
·
Scan
Later – allows to schedule document scan and submission for a later time
·
No
Scan Required – select this option if no documents are required to be uploaded
Certain documents are required for a VCE creation. If the system can check for the document automatically via a system interface, it will mark the document as being “system collected”. Options for the documents include collected, not required, outstanding, and system collected.
o The authorized user can configure this; a document is required or not from the VCE definition screen based on the VCE type. The document is displayed in the document requirements section. If a document is required, then that will display in the grid and the authorized user can select the appropriate status from the dropdown list as listed above. If a document is not required, the authorized user can select a document from the dropdown list and select ADD. The document will populate on the grid.
Attachment Upload
o Browse – Select a PDF file from the list.
o Upload – Uploads a PDF file, if required.
· Scan Documents – The system provides a feature to scan the documents into the system at this point. Click on the Scan Documents link beside the Documentation Requirements label and the scanning process will be opened to scan the document, index it, and store it for future retrieval.
Delivery Details
· DELIVERY METHOD – Select from the dropdown list, if applicable.
§ The authorized user can select Courier as a type of delivery, then a specific courier by Courier.
· Courier Name
· Courier Account No.
· Courier Phone No.
§ The information will be mailed to the requester.
§ If the authorized user selects pick up, the location is required.
· Electronic Delivery Channel
§ The email address will default to the Account Level. The authorized user will be able to update this field. Updating this field will not update the Account Level email.
§ The Fax will default to the Account Level. An authorized user will be able to update this field. Updating this field will not update the Account Level Fax.
§ PDF – View format (default for external user).
o Comment – Enter the appropriate comment. These comments are displayed on the billing enquiry screen to internal users only.
§ Access Level – Select the appropriate access level for the comment from the dropdown list:
· Internal – means only internal resources are authorized to view the comment.
· Public – means the internal and external users are authorized to view the comments.
· Restricted – means only the defined authorized roles can view the comment.
§ Delete Allowed – Click this box if the authorized user wants to be able to delete this comment.
Select PROCEED to execute the edits and display the verification screen.
The verification screen displays showing the user a consolidated view of the billing information. If the user determines some of the information is incorrect, they can select BACK on the Command Line and the system will display the billing screen again. The user can make the required changes and select PROCEED.
Select PROCEED on the Command Line and the billing information will be saved to the database.
Command Line functions:
Proceed – means the system will take the user to the next logical step required for the transaction
Refresh – means the system will return the screen to the original content when the user entered the screen for the first time
Quit – means the user is finished working on this transaction for the time being and the transaction is available for completion by any authorized user at a late time using the “work in progress” feature.
Cancel – means the user has decided to discard all activity on this transaction as if they had never started it. The transaction log will show the transaction activity.
Help – means the help screen will be provided for the current screen and the user may scan the help file for assistance.
Select PROCEED to execute the edits and auto issuance criteria. If the auto issuance criteria fail, the application will be submitted to the workflow for review. Once the application has been approved by the authorized user and on “Done” click from the application approval details screen, the system will come back to the billing screen.
Select PROCEED on the Command Line; the billing information will be saved to the database and continue to the validation screen. From the billing validation screen, the authorized user can generate the invoice.
Note: Once the application has been invoiced the only way for an Authorized User to move through screens using the tabs is by selecting Cancel Bill.
Command Line functions:
Proceed – Means the system will proceed to the next logical step in processing the transaction
Add to Cart – means the system will save the invoice information to a cart for future payment along with any other items placed in the cart as a result of subsequent transaction processing
Cancel Bill – means the invoice/bill that was calculated will be cancelled and the transaction will no longer be in “Invoiced” status and will be placed in an “Open” status”
Refresh – means the system will return the screen to the original content when the user entered the screen for the first time
Quit – means the user is finished working on this transaction for the time being and the transaction is available for completion by any authorized user at a late time using the “work in progress” feature.
Invoice – Means the system display the invoice
Draft VCE – means the system will provide a Draft Permit for verification by the user. No permit number is assigned at this point.
Help - means the system will provide a help screen for the current screen and the user can view the help information and scan the help file as required.
Payment Detail Screen – see 1.4.4.6-payment, p 131

To get the details of the general process, please refer to section 1.4.3.1.1 or for online users, click here.
Authorized User will have to provide the O/O Account Number (No.) or Legal Name in the corresponding field to process a permit application.
When PROCEED is selected on the Command Line at the bottom of the screen.
· A validation of the CVOR status will be performed if O/O Account Number was created with a CVOR.
· If the Account Level status is suspended or inactive, then a message will display telling the user to please contact the Oversize/Overweight Permit section.
Copy From provides the ability to copy data from a previously submitted permit for the purpose of using the data in a new application or request.
Note: Only permits form the account can be copied.
· Authorized User can enter the Account Number (No.) and/or Legal Name and Select Copy From to get a list of available permits items to select
· And then, Select the permit to be copied
· If the Vehicle Configuration Evaluation (VCE) Number (No.) is entered the Authorized User can Select Copy From on the Command Line to update the permit information
Note: The information up to the conditions screen will be displayed.
The following information is populated from the Common Client Enterprise Level or Account Level and cannot be updated by an Authorized User.
O/O Account Details
· Account Number (No.)
· Legal Name
· Application Number (No.) they system will generate the unique number for tracking the application
· CVOR
· Client Status
· NSC Number
· Exemption Code if the Common Client has an Exemption Code it is checked, if expired then Authorized User must enter a valid exemption code
· Physical Address
The Authorized User can update the following fields
· Mailing Address by default, it populates from the Account Level and the authorized user can select any one from the drop-down list.
· Issued At the Authorized User can select from the drop-down list.
· Authorized User must Select a contact name from drop down list
VCE Request Details
The following information is generated by the system and cannot be updated by an Authorized User.
· VCE Type
· Transaction Type
· Application Status - For a new permit, application status is not submitted status.
Note: The status will be updated to submitted after completing all tabs
· Start date
· The End Date will remain blank
· Application Status Date the date will be changed when the application status is updated
· Ministry Issued Configuration Number (No.) for a new VCE, it is blank, and the user will get a VCE number after credentials
Authorized User must update or enter the required information into the following fields.
· Evaluation Only must be checked if submitting for review
· If Bilingual format is checked, credentials will be generated in French only when selected
· Authorized User can enter the appropriate comment and then select Add/Update
Comment
· If a comment is entered the appropriate access level for the comment from the drop-down list:
o Internal – means only internal resources are authorized to view the comment.
o Public – means the internal and external users are authorized to view the comments.
o Restricted – means only the defined authorized roles can view the comment.
· When the Delete Allowed is Selected the comment can be deleted by another Authorized Users
Select PROCEED to execute the edits and display the verification screen.
The verification screen displays showing the user a consolidated view of the general information. If the user determines some of the information is incorrect, they can select BACK on the Command Line and the system will display the general screen again. The user can make the required changes and select PROCEED.
Select PROCEED on the Command Line and general information will be saved to the database. The Load and Dimensions Screen displays.
Command Line functions:
Proceed – means the system will take the user to the next logical step required for the transaction
Refresh – means the system will return the screen to the original content when the user entered the screen for the first time
Quit – means the user is finished working on this transaction for the time being and the transaction is available for completion by any authorized user at a late time using the “work in progress” feature.
Cancel – means the user has decided to discard all activity on this transaction as if they had never started it. The transaction log will show the transaction activity.
Help – means the help screen will be provided for the current screen and the user may scan the help file for assistance.
To return to an alternate screen while processing a transaction the user can select the appropriate tab along the top of the current screen and the system will asynchronously display the corresponding screen for processing by the user. After fijnishing rfeviewing and/or making changes to the screen the user can select the “Proceed” button to return to the screen they came from General.

There are several sections on the Load and Dimensions Screen.
To get the details for other fields of the load and dimensions process, please refer to section 1.4.3.1.2 or for online users, clickhere.
The following fields are populated from the Common Client or Account Level, or System generated, and the Authorized User cannot change them.
O/O Account Details
Account No.
Legal Name
Application No.
CVOR
NSC Number
Exemption Code
Vehicle Details
· Authorized User must enter the following vehicle information:
o Make
o Model
o Serial Number (No.)
o Check Highway Traffic Act (HTA), if vehicle is width is within HTA the width will be populated
o If width exceeds HTA, the Authorized User must record the actual width in metres
o Check Highway Traffic Act (HTA) if length is within HTA the length will be populated
o If length exceeds HTA, the Authorized User must record the actual length of the vehicle in metres
o Enter Existing Annual Permit Number (No.), if applicable
Axle Description
The Authorized User must record the configuration information for the vehicle by completing the following fields, if applicable
· Total Number (No.) of Axles
· Identify the Equipment Type from the drop-down list
· Enter the appropriate values in the following fields:
o Number (No.) of Tires per Axles
o Manufacturer Rated Axle Capacity (kg)
o Tire Width (mm)
o Tire Rating (kg)
o Requested Weight per Axle (kg)
§ Normal Load
§ Weight per Reduced Load
§ Exceptional Load
· Inter-axle Spacing (m)
· The System will calculate the Total Weight being Requested for the vehicle
· When Bridge Formula is selected a pop-up window will open to all Authorized User to calculate formula
If applicable, the Authorized User must check the following items:
· Boom must be removed from the carrier
· All counterweights must be removed from the carrier
· Outrigger beams must be removed from the carrier
· Auxiliary winch must be removed from the carrier
· Boom must be scoped out to
o Enter information
· Crane weights were verified at the MTO scales at Location the date and location must be recorded
On Date – Enter valid date if applicable.
o Comments – Enter the appropriate comment. These comments are displayed on Load and Dimensions Enquiry Screen to internal users only.
§ Access Level – Select the appropriate access level for the comment from the dropdown list:
§ Internal – means only internal resources are authorized to view the comment.
§ Public – means the internal and external users are authorized to view the comments.
§ Restricted – means only the defined authorized roles can view the comment.
§ Delete Allowed -Click check box if the authorized user wants to be able to delete this comment.
§ Bridge Formula – open a new window – edit information – Calculate then Save/Close
Select PROCEED to execute the edits and display the verification screen.
The Verification Screen displays showing the user a consolidated view of the load and dimensions information. If the user determines some of the information is incorrect, they can select BACK on the Command Line and the system will display the Load and Dimensions Screen again. The user can make the required changes and select PROCEED.
Select PROCEED on the Command Line and the load and dimensions information saved to the database. The conditions Screen displays.

To get the details of the conditions process, please refer to section 1.4.3.1.3 or for online users, clickhere.
The following fields are populated from the Common Client or Account Level, or System generated, and the Authorized User cannot change them.
O/O Account Details
Account No.
Legal Name
Application No.
CVOR
NSC Number
Exemption Code
VCE Request Details
· Transaction Type
· Ministry Issued Configuration (VCE) Number
Average Gross Vehicle Weight Ratio (AGVWR) Details
· Normal AGVWR
· Reduced AGVWR.
· Exceptional AGVWR
The Authorized User must record the configuration information for the vehicle by completing the following fields, if applicable
Conditions
· If applicable, Standard conditions are populated by default and cannot be changed by the Authorized User.
· Sequence Number (No.)
· Select the Conditions Category from the drop-down list if applicable. Conditions populated as per configuration and cannot be changed by user
Non-Standard
The Authorized User can check non-standard conditions, if applicable.
o The Authorized User can select the options that apply:
o Normal
o Reduced
o Exceptional
· The Conditions are displayed in both English and French as per configuration and can be updated by Authorized User
· Notes populated as per configuration and cannot be changed by Authorized User
o Sequence Number (No.) is populated as per configuration and cannot be changed by the user
o The authorized user can select the Condition if applicable.
o Conditions Category populated as per configuration and cannot be changed by the user.
o The Conditions are displayed in both English and French as per configuration
o Notes populated as per configuration and cannot be changed by the user
Additional Conditions
The Authorized User can check or add additional conditions if applicable.
· By default, the Sequence Number (No.) populated as per configuration and cannot be changed by the user.
· To Add a Condition the Authorized User must select the green “+” sign to open a table to enter Condition details
· Authorized User must remove the options that do not apply:
· Normal
· Reduced
· Exceptional
· The Authorized User must enter the Condition details in the Condition English field
· If Bilingual format has been selected the details must also be entered in French in the Condition French table
o To remove the Condition the Authorized User must select the red “x” to delete the entry
o Notes – Notes are populated as per configuration and cannot be changed by the user.
Select PROCEED to execute the edits and display the verification screen.
· The verification screen displays showing the user a consolidated view of the conditions information. If the user determines some of the information is incorrect, they can select BACK on the Command Line and the system will display the conditions screen again. The Authorized User can make the required changes and select PROCEED.
Select PROCEED on the Command Line and the conditions information saved to the database. The billing screen displays.

To get the details of the billing process, please refer to section 1.4.3.1.4 or for online users, clickhere.
Billing Details
The following fields are populated from the Common Client or Account Level, or System generated, and the Authorized User cannot change them.
O/O Account Details
Account No.
Legal Name
Application No.
CVOR
NSC Number
Exemption Code
Billing Details
Vehicle Configuration Evaluation (VCE) Type identifies the type of VCE user has requested and cannot be changed by the user.
Ministry Issued Configuration Number for a new VCE request, it is blank, and the user will get a VCE number after credentials have been issued.
Billing Date- By default, it populates automatically and cannot be changed by the user.
Transaction Type the user has requested.
Transaction Status is populated by default and cannot be changed by the user.
Fees Section
By default, the following are populated from the enterprise screen and cannot be changed by the user.
· Prepaid Balance by default, it populates from the Enterprise Level and the user cannot change a prepaid balance at the Billing Screen Level.
· Stored Credit Balance by default, it also populates from the Enterprise Level and the user cannot change a stored credit balance at the Billing Screen Level.
· Manual Adjustment Amount – Only an Authorized User can complete adjustment based on business rules
· Fee Table displays the following application details
o Fee Type
o Number (No.) of Permits Required
o Fee Amount
o Waive – Only an Authorized User can select based on eligibility criteria
§ Comment is required if selected the Authorized User must select Add/Update to record information
Documentation
Requirements – this section allows user to scan, and upload required documents.
There are the following three radio buttons available:
·
Scan
now – allows to scan and upload documents at once
·
Scan
Later – allows to schedule document scan and submission for a later time
·
No
Scan Required – select this option if no documents are required to be uploaded
Certain documents are required for a VCE creation. If the system can check for the document automatically via a system interface, it will mark the document as being “system collected”. Options for the documents include collected, not required, outstanding, and system collected.
o The authorized user can configure this; a document is required or not from the VCE definition screen based on the VCE type. The document is displayed in the document requirements section. If a document is required, then that will display in the grid and the authorized user can select the appropriate status from the dropdown list as listed above. If a document is not required, the authorized user can select a document from the dropdown list and select ADD. The document will populate on the grid.
Attachment Upload
o Browse – Select a PDF file from the list.
o Upload – Uploads a PDF file, if required.
· Scan Documents – The system provides a feature to scan the documents into the system at this point. Click on the Scan Documents link beside the Documentation Requirements label and the scanning process will be opened to scan the document, index it, and store it for future retrieval.
Delivery Details
· DELIVERY METHOD – Select from the dropdown list, if applicable.
§ The authorized user can select Courier as a type of delivery, then a specific courier by Courier.
· Courier Name
· Courier Account No.
· Courier Phone No.
§ The information will be mailed to the requester.
§ If the authorized user selects pick up, the location is required.
·
· Electronic Delivery Channel
§ The email address will default to the Account Level. The authorized user will be able to update this field. Updating this field will not update the Account Level email.
§ The Fax will default to the Account Level. An authorized user will be able to update this field. Updating this field will not update the Account Level Fax.
§ PDF – View format (default for external user).
o Comment – Enter the appropriate comment. These comments are displayed on the billing enquiry screen to internal users only.
§ Access Level – Select the appropriate access level for the comment from the dropdown list:
· Internal – means only internal resources are authorized to view the comment.
· Public – means the internal and external users are authorized to view the comments.
· Restricted – means only the defined authorized roles can view the comment.
§ Delete Allowed – Click this box if the authorized user wants to be able to delete this comment.
Select PROCEED to execute the edits and display the verification screen.
The verification screen displays showing the user a consolidated view of the billing information. If the user determines some of the information is incorrect, they can select BACK on the Command Line and the system will display the billing screen again. The user can make the required changes and select PROCEED.
Select PROCEED on the Command Line and the billing information will be saved to the database.
Command Line functions:
Proceed – means the system will take the user to the next logical step required for the transaction
Refresh – means the system will return the screen to the original content when the user entered the screen for the first time
Quit – means the user is finished working on this transaction for the time being and the transaction is available for completion by any authorized user at a late time using the “work in progress” feature.
Cancel – means the user has decided to discard all activity on this transaction as if they had never started it. The transaction log will show the transaction activity.
Help – means the help screen will be provided for the current screen and the user may scan the help file for assistance.
Select PROCEED to execute the edits and auto issuance criteria. If the auto issuance criteria fail, the application will be submitted to the workflow for review. Once the application has been approved by the authorized user and on “Done” click from the application approval details screen, the system will come back to the billing screen.
Select PROCEED on the Command Line; the billing information will be saved to the database and continue to the validation screen. From the billing validation screen, the authorized user can generate the invoice.
Note: Once the application has been invoiced the only way for an Authorized User to move through screens using the tabs is by selecting Cancel Bill.
Command Line functions:
Proceed – Means the system will proceed to the next logical step in processing the transaction
Add to Cart – means the system will save the invoice information to a cart for future payment along with any other items placed in the cart as a result of subsequent transaction processing
Cancel Bill – means the invoice/bill that was calculated will be cancelled and the transaction will no longer be in “Invoiced” status and will be placed in an “Open” status”
Refresh – means the system will return the screen to the original content when the user entered the screen for the first time
Quit – means the user is finished working on this transaction for the time being and the transaction is available for completion by any authorized user at a late time using the “work in progress” feature.
Invoice – Means the system display the invoice
Draft VCE – means the system will provide a Draft Permit for verification by the user. No permit number is assigned at this point.
Help - means the system will provide a help screen for the current screen and the user can view the help information and scan the help file as required.
Payment Detail Screen – see 1.4.4.6-payment, p 131
Road Building Machine Application General Screen
Authorized User will have to provide the O/O Account Number (No.) or Legal Name in the corresponding field to process a permit application.
When PROCEED is selected on the Command Line at the bottom of the screen.
· A validation of the CVOR status will be performed if O/O Account Number was created with a CVOR.
· If the Account Level status is suspended or inactive, then a message will display telling the user to please contact the Oversize/Overweight Permit section.
Copy From provides the ability to copy data from a previously submitted permit for the purpose of using the data in a new application or request.
Note: Only permits form the account can be copied.
· Authorized User can enter the Account Number (No.) and/or Legal Name and Select Copy From to get a list of available permits items to select
· And then, Select the permit to be copied
· If the Vehicle Configuration Evaluation (VCE) Number (No.) is entered the Authorized User can Select Copy From on the Command Line to update the permit information
Note: The information up to the conditions screen will be displayed.

To get the details of the general process, please refer to section 1.4.3.1.1 or for online users, click here.
The following information is populated from the Common Client Enterprise Level or Account Level and cannot be updated by an Authorized User.
O/O Account Details
· Account Number (No.)
· Legal Name
· Application Number (No.) they system will generate the unique number for tracking the application
· CVOR
· Client Status
· NSC Number
· Exemption Code if the Common Client has an Exemption Code it is checked, if expired then Authorized User must enter a valid exemption code
· Physical Address
The Authorized User can update the following fields
· Mailing Address by default, it populates from the Account Level and the authorized user can select any one from the drop-down list.
· Issued At the Authorized User can select from the drop-down list.
· Authorized User must Select a contact name from drop down list
VCE Request Details
The following information is generated by the system and cannot be updated by an Authorized User.
· VCE Type
· Transaction Type
· Application Status – For a new permit, application status is not submitted status.
Note: The status will be updated to submitted after completing all tabs
· Start date
· The End Date will remain blank
· Application Status Date the date will be changed when the application status is updated
· Ministry Issued Configuration Number (No.) for a new VCE, it is blank, and the user will get a VCE number after credentials
Authorized User must update or enter the required information into the following fields.
· Evaluation Only must be checked if submitting for review
· If Bilingual format is checked, credentials will be generated in French only when selected
· Authorized User can enter the appropriate comment and then select Add/Update
Comment
· If a comment is entered the appropriate access level for the comment from the drop-down list:
o Internal – means only internal resources are authorized to view the comment.
o Public – means the internal and external users are authorized to view the comments.
o Restricted – means only the defined authorized roles can view the comment.
· When the Delete Allowed is Selected the comment can be deleted by another Authorized Users
Select PROCEED to execute the edits and display the verification screen.
The verification screen displays showing the user a consolidated view of the general information. If the user determines some of the information is incorrect, they can select BACK on the Command Line and the system will display the general screen again. The user can make the required changes and select PROCEED.
Select PROCEED on the Command Line and general information will be saved to the database. The Load and Dimensions Screen displays.
Command Line functions:
Proceed – means the system will take the user to the next logical step required for the transaction
Refresh – means the system will return the screen to the original content when the user entered the screen for the first time
Quit – means the user is finished working on this transaction for the time being and the transaction is available for completion by any authorized user at a late time using the “work in progress” feature.
Cancel – means the user has decided to discard all activity on this transaction as if they had never started it. The transaction log will show the transaction activity.
Help – means the help screen will be provided for the current screen and the user may scan the help file for assistance.
To return to an alternate screen while processing a transaction the user can select the appropriate tab along the top of the current screen and the system will asynchronously display the corresponding screen for processing by the user. After fijnishing rfeviewing and/or making changes to the screen the user can select the “Proceed” button to return to the screen they came from General.

There are several sections on the Load and Dimensions Screen.
To get the details of the load and dimensions process, please refer to section 1.4.3.1.2 or for online users, clickhere.
The following fields are populated from the Common Client or Account Level, or System generated, and the Authorized User cannot change them.
O/O Account Details
Account No.
Legal Name
Application No.
CVOR
NSC Number
Exemption Code
Vehicle Details
· Authorized User must enter the following vehicle information:
o Make
o Model
o Serial Number (No.)
o Check Highway Traffic Act (HTA), if vehicle is width is within HTA the width will be populated
o If width exceeds HTA, the Authorized User must record the actual width in metres
o Check Highway Traffic Act (HTA) if length is within HTA the length will be populated
o If length exceeds HTA, the Authorized User must record the actual length of the vehicle in metres
o Enter Existing Annual Permit Number (No.), if applicable
Axle Description
The Authorized User must record the configuration information for the vehicle by completing the following fields, if applicable
· Total Number (No.) of Axles
· Identify the Equipment Type from the drop-down list
· Enter the appropriate values in the following fields:
o Number (No.) of Tires per Axles
o Manufacturer Rated Axle Capacity (kg)
o Tire Width (mm)
o Tire Rating (kg)
o Requested Weight per Axle (kg)
§ Normal Load
§ Weight per Reduced Load
§ Exceptional Load
· Inter-axle Spacing (m)
· The System will calculate the Total Weight being Requested for the vehicle
· When Bridge Formula is selected a pop-up window will open to all Authorized User to calculate formula
If applicable, the Authorized User must check the following items:
· Boom must be removed from the carrier
· All counterweights must be removed from the carrier
· Outrigger beams must be removed from the carrier
· Auxiliary winch must be removed from the carrier
· Boom must be scoped out to
o Enter information
· Crane weights were verified at the MTO scales at Location the date and location must be recorded
On Date – Enter valid date if applicable.
o Comments – Enter the appropriate comment. These comments are displayed on Load and Dimensions Enquiry Screen to internal users only.
§ Access Level – Select the appropriate access level for the comment from the dropdown list:
§ Internal – means only internal resources are authorized to view the comment.
§ Public – means the internal and external users are authorized to view the comments.
§ Restricted – means only the defined authorized roles can view the comment.
§ Delete Allowed -Click check box if the authorized user wants to be able to delete this comment.
o Bridge Formula – open a new window – edit information – Calculate then Save/Close
Select PROCEED to execute the edits and display the verification screen.
The Verification Screen displays showing the user a consolidated view of the load and dimensions information. If the user determines some of the information is incorrect, they can select BACK on the Command Line and the system will display the Load and Dimensions Screen again. The user can make the required changes and select PROCEED.
Select PROCEED on the Command Line and the load and dimensions information saved to the database. The conditions Screen displays.

To get the details of the conditions process, please refer to section 1.4.3.1.3 or for online users, clickhere.
The following fields are populated from the Common Client or Account Level, or System generated, and the Authorized User cannot change them.
O/O Account Details
Account No.
Legal Name
Application No.
CVOR
NSC Number
Exemption Code
VCE Request Details
· Transaction Type
· Ministry Issued Configuration (VCE) Number
Average Gross Vehicle Weight Ratio (AGVWR) Details
· Normal AGVWR
· Reduced AGVWR.
· Exceptional AGVWR
The Authorized User must record the configuration information for the vehicle by completing the following fields, if applicable
Conditions
· If applicable, Standard conditions are populated by default and cannot be changed by the Authorized User.
· Sequence Number (No.)
· Select the Conditions Category from the drop-down list if applicable. Conditions populated as per configuration and cannot be changed by user
Non-Standard
The Authorized User can check non-standard conditions, if applicable.
o The Authorized User can select the options that apply:
o Normal
o Reduced
o Exceptional
· The Conditions are displayed in both English and French as per configuration and can be updated by Authorized User
· Notes populated as per configuration and cannot be changed by Authorized User
o Sequence Number (No.) is populated as per configuration and cannot be changed by the user
o The authorized user can select the Condition if applicable.
o Conditions Category populated as per configuration and cannot be changed by the user.
o The Conditions are displayed in both English and French as per configuration
o Notes populated as per configuration and cannot be changed by the user
Additional Conditions
The Authorized User can check or add additional conditions if applicable.
· By default, the Sequence Number (No.) populated as per configuration and cannot be changed by the user.
· To Add a Condition the Authorized User must select the green “+” sign to open a table to enter Condition details
· Authorized User must remove the options that do not apply:
· Normal
· Reduced
· Exceptional
· The Authorized User must enter the Condition details in the Condition English field
· If Bilingual format has been selected the details must also be entered in French in the Condition French table
o To remove the Condition the Authorized User must select the red “x” to delete the entry
o Notes – Notes are populated as per configuration and cannot be changed by the user.
Select PROCEED to execute the edits and display the verification screen.
· The verification screen displays showing the user a consolidated view of the condition’s information. If the user determines some of the information is incorrect, they can select BACK on the Command Line and the system will display the conditions screen again. The Authorized User can make the required changes and select PROCEED.
Select PROCEED on the Command Line and the conditions information saved to the database. The billing screen displays.

To get the details of the billing process, please refer to section 1.4.3.1.4 or for online users, clickhere.
Billing Details
The following fields are populated from the Common Client or Account Level, or System generated, and the Authorized User cannot change them.
O/O Account Details
Account No.
Legal Name
Application No.
CVOR
NSC Number
Exemption Code
Billing Details
Vehicle Configuration Evaluation (VCE) Type identifies the type of VCE user has requested and cannot be changed by the user.
Ministry Issued Configuration Number for a new VCE request, it is blank, and the user will get a VCE number after credentials have been issued.
Billing Date- By default, it populates automatically and cannot be changed by the user.
Transaction Type the user has requested.
Transaction Status is populated by default and cannot be changed by the user.
Fees Section
By default, the following are populated from the enterprise screen and cannot be changed by the user.
· Prepaid Balance by default, it populates from the Enterprise Level and the user cannot change a prepaid balance at the Billing Screen Level.
· Stored Credit Balance by default, it also populates from the Enterprise Level and the user cannot change a stored credit balance at the Billing Screen Level.
· Manual Adjustment Amount – Only an Authorized User can complete adjustment based on business rules
· Fee Table displays the following application details
o Fee Type
o Number (No.) of Permits Required
o Fee Amount
o Waive – Only an Authorized User can select based on eligibility criteria
Documentation
Requirements – this section allows user to scan, and upload required documents.
There are the following three radio buttons available:
·
Scan
now – allows to scan and upload documents at once
·
Scan
Later – allows to schedule document scan and submission for a later time
·
No
Scan Required – select this option if no documents are required to be uploaded
Certain documents are required for a VCE creation. If the system can check for the document automatically via a system interface, it will mark the document as being “system collected”. Options for the documents include collected, not required, outstanding, and system collected.
o The authorized user can configure this; a document is required or not from the VCE definition screen based on the VCE type. The document is displayed in the document requirements section. If a document is required, then that will display in the grid and the authorized user can select the appropriate status from the dropdown list as listed above. If a document is not required, the authorized user can select a document from the dropdown list and select ADD. The document will populate on the grid.
Attachment Upload
o Browse – Select a PDF file from the list.
o Upload – Uploads a PDF file, if required.
· Scan Documents – The system provides a feature to scan the documents into the system at this point. Click on the Scan Documents link beside the Documentation Requirements label and the scanning process will be opened to scan the document, index it, and store it for future retrieval.
Delivery Details
· DELIVERY METHOD – Select from the dropdown list, if applicable.
§ The authorized user can select Courier as a type of delivery, then a specific courier by Courier.
· Courier Name
· Courier Account No.
· Courier Phone No.
§ The information will be mailed to the requester.
§ If the authorized user selects pick up, the location is required.
·
· Electronic Delivery Channel
§ The email address will default to the Account Level. The authorized user will be able to update this field. Updating this field will not update the Account Level email.
§ The Fax will default to the Account Level. An authorized user will be able to update this field. Updating this field will not update the Account Level Fax.
§ PDF – View format (default for external user).
o Comment – Enter the appropriate comment. These comments are displayed on the billing enquiry screen to internal users only.
§ Access Level – Select the appropriate access level for the comment from the dropdown list:
· Internal – means only internal resources are authorized to view the comment.
· Public – means the internal and external users are authorized to view the comments.
· Restricted – means only the defined authorized roles can view the comment.
§ Delete Allowed – Click this box if the authorized user wants to be able to delete this comment.
Select PROCEED to execute the edits and display the verification screen.
The verification screen displays showing the user a consolidated view of the billing information. If the user determines some of the information is incorrect, they can select BACK on the Command Line and the system will display the billing screen again. The user can make the required changes and select PROCEED.
Select PROCEED on the Command Line and the billing information will be saved to the database.
Command Line functions:
Proceed – means the system will take the user to the next logical step required for the transaction
Refresh – means the system will return the screen to the original content when the user entered the screen for the first time
Quit – means the user is finished working on this transaction for the time being and the transaction is available for completion by any authorized user at a late time using the “work in progress” feature.
Cancel – means the user has decided to discard all activity on this transaction as if they had never started it. The transaction log will show the transaction activity.
Help – means the help screen will be provided for the current screen and the user may scan the help file for assistance.
Select PROCEED to execute the edits and auto issuance criteria. If the auto issuance criteria fail, the application will be submitted to the workflow for review. Once the application has been approved by the authorized user and on “Done” click from the application approval details screen, the system will come back to the billing screen.
Select PROCEED on the Command Line; the billing information will be saved to the database and continue to the validation screen. From the billing validation screen, the authorized user can generate the invoice.
Note: Once the application has been invoiced the only way for an Authorized User to move through screens using the tabs is by selecting Cancel Bill.
Command Line functions:
Proceed – Means the system will proceed to the next logical step in processing the transaction
Add to Cart – means the system will save the invoice information to a cart for future payment along with any other items placed in the cart as a result of subsequent transaction processing
Cancel Bill – means the invoice/bill that was calculated will be cancelled and the transaction will no longer be in “Invoiced” status and will be placed in an “Open” status”
Refresh – means the system will return the screen to the original content when the user entered the screen for the first time
Quit – means the user is finished working on this transaction for the time being and the transaction is available for completion by any authorized user at a late time using the “work in progress” feature.
Invoice – Means the system display the invoice
Draft VCE – means the system will provide a Draft Permit for verification by the user. No permit number is assigned at this point.
Help - means the system will provide a help screen for the current screen and the user can view the help information and scan the help file as required.
Payment Detail Screen – see 1.4.4.6-payment, p 131
Self-Propelled VCE Application General Screen
Authorized User will have to provide the O/O Account Number (No.) or Legal Name in the corresponding field to process a permit application.
When PROCEED is selected on the Command Line at the bottom of the screen.
· A validation of the CVOR status will be performed if O/O Account Number was created with a CVOR.
· If the Account Level status is suspended or inactive, then a message will display telling the user to please contact the Oversize/Overweight Permit section.
· Copy From provides the ability to copy data from a previously submitted permit for the purpose of using the data in a new application or request.
· Note: Only permits form the account can be copied.
· Authorized User can enter the Account Number (No.) and/or Legal Name and Select Copy From to get a list of available permits items to select
· And then, Select the permit to be copied
· If the Vehicle Configuration Evaluation (VCE) Number (No.) is entered the Authorized User can Select Copy From on the Command Line to update the permit information. Note that the Copy From button will allow fetching details from all permit types.
Note: The information up to the conditions screen will be displayed.

To get the details of the general process, please refer to section 1.4.3.1.1 or for online users, click here.
The following information is populated from the Common Client Enterprise Level or Account Level and cannot be updated by an Authorized User.
· O/O Account Details
· Account Number (No.)
· Legal Name
· Application Number (No.) they system will generate the unique number for tracking the application
· CVOR
· NSC Number
· Exemption Code if the Common Client has an Exemption Code it is checked, if expired then Authorized User must enter a valid exemption code
· Physical Address
The Authorized User can update the following fields
· Mailing Address by default, it populates from the Account Level and the authorized user can select any one from the drop-down list.
· Issued at the Authorized User can select from the drop-down list.
· Authorized User must Select a contact name from drop down list
VCE Request Details
The following information is generated by the system and cannot be updated by an Authorized User.
· VCE Type
· Transaction Type
· Application Status - For a new permit, application status is not submitted status.
o Note: The status will be updated to submitted after completing all tabs
· Start date
· The End Date will remain blank
· Application Status Date the date will be changed when the application status is updated
· Ministry Issued Configuration Number (No.) for a new VCE, it is blank, and the user will get a VCE number after credentials
Authorized User must update or enter the required information into the following fields.
· Evaluation Only must be checked if submitting for review
· If Bilingual format is checked, credentials will be generated in French only when selected
· Authorized User can enter the appropriate comment and then select Add/Update
Comment
· If a comment is entered the appropriate access level for the comment from the drop-down list:
o Internal – means only internal resources are authorized to view the comment.
o Public – means the internal and external users are authorized to view the comments.
o Restricted – means only the defined authorized roles can view the comment.
· When the Delete Allowed is Selected the comment can be deleted by another Authorized Users
Select PROCEED to execute the edits and display the verification screen.
The verification screen displays showing the user a consolidated view of the general information. If the user determines some of the information is incorrect, they can select BACK on the Command Line and the system will display the general screen again. The user can make the required changes and select PROCEED.
Select PROCEED on the Command Line and general information will be saved to the database. The Load and Dimensions Screen displays.
Command Line functions:
· Proceed – means the system will take the user to the next logical step required for the transaction
· Refresh – means the system will return the screen to the original content when the user entered the screen for the first time
· Quit – means the user is finished working on this transaction for the time being and the transaction is available for completion by any authorized user at a late time using the “work in progress” feature.
· Cancel – means the user has decided to discard all activity on this transaction as if they had never started it. The transaction log will show the transaction activity.
· Help – means the help screen will be provided for the current screen and the user may scan the help file for assistance.
To return to an alternate screen while processing a transaction the user can select the appropriate tab along the top of the current screen and the system will asynchronously display the corresponding screen for processing by the user. After reviewing and/or making changes to the screen the user can select the “Proceed” button to return to the screen they came from General.

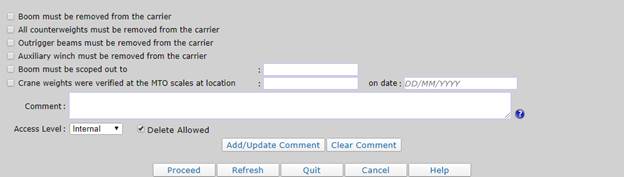
There are several sections on the Load and Dimensions Screen.
To get the details of the load and dimensions process, please refer to section 1.4.3.1.2 or for online users, click here.
The following fields are populated from the Common Client or Account Level, or System generated, and the Authorized User cannot change them.
O/O Account Details
· Account No.
· Legal Name
· Application No.
· CVOR
· NSC Number
· Exemption Code
Vehicle Details
· Authorized User must enter the following vehicle information:
o Make
o Model
o Serial Number (No.)
o Check Highway Traffic Act (HTA), if vehicle is width is within HTA the width will be populated
o If width exceeds HTA, the Authorized User must record the actual width in meters
o Check Highway Traffic Act (HTA) if length is within HTA the length will be populated
o If length exceeds HTA, the Authorized User must record the actual length of the vehicle in meters
o Enter Existing Annual Permit Number (No.), if applicable
Axle Description
The Authorized User must record the configuration information for the vehicle by completing the following fields, if applicable
· Total Number (No.) of Axles
· Identify the Equipment Type from the drop-down list
· Enter the appropriate values in the following fields:
o Number (No.) of Tires per Axles
o Manufacturer Rated Axle Capacity (kg)
o Tire Width (mm)
o Tire Rating (kg)
o Requested Weight per Axle (kg)
§ Normal Load
§ Weight per Reduced Load
§ Exceptional Load
· Inter-axle Spacing (m)
The System will calculate the Total Weight being Requested for the vehicle. When Bridge Formula is selected a pop-up window will open to all Authorized User to calculate formula
· If applicable, the Authorized User must check the following items:
· Boom must be removed from the carrier
· All counterweights must be removed from the carrier
· Outrigger beams must be removed from the carrier
· Auxiliary winch must be removed from the carrier
· Boom must be scoped out to
o Enter information
· Crane weights were verified at the MTO scales at Location the date and location must be recorded
· On Date - Enter valid date if applicable.
· Comments - Enter the appropriate comment. These comments are displayed on Load and Dimensions Enquiry Screen to internal users only.
o Access Level - Select the appropriate access level for the comment from the dropdown list:
§ Internal – means only internal resources are authorized to view the comment.
§ Public – means the internal and external users are authorized to view the comments.
§ Restricted – means only the defined authorized roles can view the comment.
§ Delete Allowed -Click check box if the authorized user wants to be able to delete this comment.
· Bridge Formula – open a new window – edit information – Calculate then Save/Close
Select PROCEED to execute the edits and display the verification screen.
The Verification Screen displays showing the user a consolidated view of the load and dimensions information. If the user determines some of the information is incorrect, they can select BACK on the Command Line and the system will display the Load and Dimensions Screen again. The user can make the required changes and select PROCEED.
Select PROCEED on the Command Line and the load and dimensions information saved to the database. The conditions Screen displays.

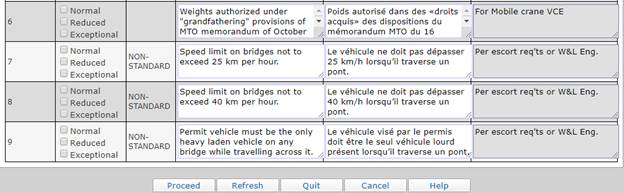
To get the details of the conditions process, please refer to section 1.4.3.1.3 or for online users, click here.
The following fields are populated from the Common Client or Account Level or system-generated, and the Authorized User cannot change them.
O/O Account Details
· Account No.
· Legal Name
· Application No.
· CVOR
· NSC Number
· Exemption Code
VCE Request Details
· Transaction Type
· Ministry Issued Configuration (VCE) Number
Average Gross Vehicle Weight Ratio (AGVWR) Details
· Normal AGVWR
· Reduced AGVWR.
· Exceptional AGVWR
The Authorized User must record the configuration information for the vehicle by completing the following fields, if applicable
Conditions
· If applicable, Standard conditions are populated by default and cannot be changed by the Authorized User.
· Sequence Number (No.)
· Select the Conditions Category from the drop-down list if applicable. Conditions populated as per configuration and cannot be changed by user
Non-Standard
· The Authorized User can check non-standard conditions, if applicable.
· The Authorized User can select the options that apply:
o Normal
o Reduced
o Exceptional
§ The Conditions are displayed in both English and French as per configuration and can be updated by Authorized User
§ Notes populated as per configuration and cannot be changed by Authorized User
· Sequence Number (No.) is populated as per configuration and cannot be changed by the user
· The authorized user can select the Condition if applicable.
· Conditions Category populated as per configuration and cannot be changed by the user.
· The Conditions are displayed in both English and French as per configuration
· Notes populated as per configuration and cannot be changed by the user
Additional Conditions
The Authorized User can check or add additional conditions if applicable.
By default, the Sequence Number (No.) populated as per configuration and cannot be changed by the user.
· To Add a Condition the Authorized User must select the green “+” sign to open a table to enter Condition details
· Authorized User must remove the options that do not apply:
o Normal
o Reduced
o Exceptional
· The Authorized User must enter the Condition details in the Condition English field
· If Bilingual format has been selected the details must also be entered in French in the Condition French table
· To remove the Condition the Authorized User must select the red “x” to delete the entry
· Notes - Notes are populated as per configuration and cannot be changed by the user.
Select PROCEED to execute the edits and display the verification screen.
The verification screen displays showing the user a consolidated view
of the condition’s information. If the user determines some of the information is incorrect, they can select BACK on the Command Line and the system will display the conditions screen again. The
Authorized User can make the required changes and select PROCEED.
Select PROCEED on the Command Line and the conditions information saved to the database. The billing screen displays.

To get the details of the billing process, please refer to section 1.4.3.1.4 or for online users, click here.
Billing Details
The following fields are populated from the Common Client or Account Level, or System generated, and the Authorized User cannot change them.
O/O Account Details
· Account No.
· Legal Name
· Application No.
· CVOR
· NSC Number
· Exemption Code
Billing Details
· Vehicle Configuration Evaluation (VCE) Type identifies the type of VCE user has requested and cannot be changed by the user.
· Ministry Issued Configuration Number for a new VCE request, it is blank, and the user will get a VCE number after credentials have been issued.
· Billing Date- By default, it populates automatically and cannot be changed by the user.
· Transaction Type the user has requested.
· Transaction Status is populated by default and cannot be changed by the user.
Fees Section
By default, the following are populated from the enterprise screen and cannot be changed by the user.
· Prepaid Balance by default, it populates from the Enterprise Level and the user cannot change a prepaid balance at the Billing Screen Level.
· Stored Credit Balance by default, it also populates from the Enterprise Level and the user cannot change a stored credit balance at the Billing Screen Level.
· Manual Adjustment Amount – Only an Authorized User can complete adjustment based on business rules
· Fee Table displays the following application details
o Fee Type
o Number (No.) of Permits Required
o Fee Amount
o Waive – Only an Authorized User can select based on eligibility criteria
Documentation Requirements – this section
allows user to scan, and upload required documents. There are the following
three radio buttons available:
·
Scan
now – allows to scan and upload documents at once
·
Scan
Later – allows to schedule document scan and submission for a later time
·
No
Scan Required – select this option if no documents are required to be uploaded
Certain documents are required for a VCE creation. If the system can check for the document automatically via a system interface, it will mark the document as being “system collected”. Options for the documents include collected, not required, outstanding, and system collected.
·
The
authorized user can configure this; a document is required or not from the VCE
definition screen based on the VCE type.
The document is displayed in the document requirements section. If a document is required, then that will
display in the grid and the authorized user can select the appropriate status
from the dropdown list as listed above.
If a document is not required, the authorized user can select a document
from the dropdown list and select ADD.
The document will populate on the grid.
Attachment Upload
· Browse - Select a PDF file from the list.
· Upload - Uploads a PDF file, if required.
· Scan Documents - The system provides a feature to scan the documents into the system at this point. Click on the Scan Documents link beside the Documentation Requirements label and the scanning process will be opened to scan the document, index it, and store it for future retrieval.
Delivery Details
DELIVERY METHOD - Select from the dropdown list, if applicable.
The authorized user can select Courier as a type of delivery, then a specific courier by Courier.
Courier Name
Courier Account No.
Courier Phone No.
The information will be mailed to the requester.
If the authorized user selects pick up, the location is required.
Electronic Delivery Channel
· The email address will default to the Account Level. The authorized user will be able to update this field. Updating this field will not update the Account Level email.
· The Fax will default to the Account Level. An authorized user will be able to update this field. Updating this field will not update the Account Level Fax.
· PDF - View format (default for external user).
Comment - Enter the appropriate comment. These comments are displayed on the billing enquiry screen to internal users only.
· Access Level - Select the appropriate access level for the comment from the dropdown list:
· Internal – means only internal resources are authorized to view the comment.
· Public – means the internal and external users are authorized to view the comments.
· Restricted – means only the defined authorized roles can view the comment.
· Delete Allowed - Click this box if the authorized user wants to be able to delete this comment.
Select PROCEED to execute the edits and display the verification screen.
The verification screen displays showing the user a consolidated view of the billing information. If the user determines some of the information is incorrect, they can select BACK on the Command Line and the system will display the billing screen again. The user can make the required changes and select PROCEED.
Select PROCEED on the Command Line and the billing information will be saved to the database.
Command Line functions:
· Proceed – means the system will take the user to the next logical step required for the transaction
· Refresh – means the system will return the screen to the original content when the user entered the screen for the first time
· Quit – means the user is finished working on this transaction for the time being and the transaction is available for completion by any authorized user at a late time using the “work in progress” feature.
· Cancel – means the user has decided to discard all activity on this transaction as if they had never started it. The transaction log will show the transaction activity.
· Help – means the help screen will be provided for the current screen and the user may scan the help file for assistance.
Select PROCEED to execute the edits and auto issuance criteria. If the auto issuance criteria fail, the application will be submitted to the workflow for review. Once the application has been approved by the authorized user and on “Done” click from the application approval details screen, the system will come back to the billing screen.
Select PROCEED on the Command Line; the billing information will be saved to the database and continue to the validation screen. From the billing validation screen, the authorized user can generate the invoice.
Note: Once the application has been invoiced the only way for an Authorized User to move through screens using the tabs is by selecting Cancel Bill.
Command Line functions:
· Proceed – Means the system will proceed to the next logical step in processing the transaction
· Add to Cart – means the system will save the invoice information to a cart for future payment along with any other items placed in the cart as a result of subsequent transaction processing
· Cancel Bill – means the invoice/bill that was calculated will be cancelled and the transaction will no longer be in “Invoiced” status and will be placed in an “Open” status”
· Refresh – means the system will return the screen to the original content when the user entered the screen for the first time
· Quit – means the user is finished working on this transaction for the time being and the transaction is available for completion by any authorized user at a late time using the “work in progress” feature.
· Invoice – Means the system display the invoice
· Draft VCE – means the system will provide a Draft Permit for verification by the user. No permit number is assigned at this point.
· Help - means the system will provide a help screen for the current screen and the user can view the help information and scan the help file as required.
Payment Detail Screen – see 1.4.4.6-payment, p 131.
Select: Enterprise – Applications - O/O – ADMIN - Permit Definition
Simple rules will be implemented using tables and manipulation of the rules will be done using a permit configurability interface. However certain rules will be implemented using XML. The System will design considering the flexibility and performance. As part of permit configurability new permit types can be defined. Complex checks/scenarios will need to be handled through XML definitions.
Select the PERMIT DEFINITION tab from the ADMIN menu and the permit definition general screen will be displayed.
There are several sections on the general screen.
· General Information
· Permit Information
o Permit Category – The Authorized User must select from the drop-down list. By default, Annual is selected. This affects the permit definition screens and where the permit will show on the menus.
§ Annual
§ Certificate
§ Project
§ Single
§ SVC
§ VCE
o The Permit Type is populated based on the Permit Category from the drop-down list. By default, NEW is selected, and list changes as per permit category selection.
Note: If NEW is selected, then it will create new configuration and if any existing type is selected from the drop-down list, then it will update the existing configuration.
o Permit Code is generated by the system and cannot be changed.
o The Authorized User can enter a Permit Description.
o By default, first time configuration and the Permit Status are active and cannot be changed by Authorized User.
o The Authorized User must enter a permit name in English.
o Permit Name (FR) must be entered in French by the Authorized User
o An Authorized User enters the Duration interval and duration of a permit. Both fields are mandatory a number must be recorded and one of the following must be selected:
§ Day(s)
§ Fixed End Month
§ None – never expire or calculated by PRIO (cannot be configured from Permit Definition)
§ Month(s)
§ Year(s)
o The Authorized User can enter an Effective Date for when the permit and certificate will be effective for use.
o An Expiry Date can be entered to indicate when the permit or certificate will expire.
· Transaction - The Authorized User must check the transactions that are allowed:
o Allow Cancel
o Allow Replace
§ If selected the Authorized User must indicate the number of times a user can replace a permit or certificate
o No. of Replacements
o Allow Hold
o If selected the Authorized User must specify the time that a permit can be put on hold.
§ Day(s)
§ Year(s)
o The Authorized User must indicate the number of times a permit or certificate can be put on hold.
o Allow Renewal
o Allow Amendment
o Number (No.) of Amendments
§ If selected the Authorized User must indicate the number of times a user can amend a permit or certificate.
· Permit Parameters - The Authorized User must indicate the Permit Parameters for the permit/certificate.
· Allow the Authorized User to enter a Vehicle Configuration Evaluation (VCE) for the permit/certificate.
· Allow Identical Permits/Certificates to be issued.
· If selected, the Authorized User must record the Maximum Number (No.) of Permits/Certificates that can be issued.
· Allow Fleet Permit to be issued for the permit/certificate.
o Note: If it is checked, a fleet permit can be issued for the application versus issuing a permit per individual vehicle. The fees should be for the entire fleet.
· Issuance Information - The Authorized User must check the criteria for Issuance Information:
o If selected application is eligible for Auto Issuance.
o Always to Head Office – When selected the permit/certificate will be submitted for internal review.
o Always to Thunder Bay – The permit/certificate will be submitted to the North Bay for review.
o If Auto Issuance Renewal, is checked, the renewal application will be auto issued.
o Apply Online allows a Web User to apply for the permit/certificate online.
o Auto Issuance Replacement the renewal of the permit/certificate can be processed online.
· Process Flow - The Authorized User must select the screens that will be displayed during the application process.
o If it is checked, the Load and Dimensions Screen will display for the application.
§ Load and Dimension – The system will default to display this screen based on the Permit Category selected by the Authorized User
§ Routing – If it is checked, the routing screen will be displayed as part of the permit/certificate application.
§ SVC – If it is checked, the Special Vehicle Configuration screen will be displayed as part of the permit/certificate application.
§ Note: Flows of the screen will be the same for an SVC permit – SVC, Conditions and Billing.
Application Form – The Authorized User can upload an application form that will be given to clients. The application form will not be used by PRIO.
Note: The form is uploaded here for record purposes. It must be a PDF file.
Permit Credential Template – The Authorized User can create a Credentials Template such as an invoice, permit, or certificate for the permit/certificate. A template can be created using Crystal Reports. To display the Permit Credentials Template in the drop-down list for selection. Templates are published at the Enterprise Level by navigating to the following menu Admin>>Correspondence>>Create Template (Section 1.2.5.13).
Printing on Secure Paper – If selected by the Authorized User the permit/certificate will be printed on secure paper.
Printing on Secure Paper for Amendment – If selected by the Authorized User the permit/certificate will be printed on secure paper.

Document Collection
The Authorized User must indicate if any supporting documents need to be collected as part of the application process for the permit/certificate. Multiple documents can be selected for the permit/certificate.
§ Document Name is selected from the drop-down list, if applicable.
Note: To add new documents to the drop down list the code table must be updated by i3 Verticals.
· Mandatory, if the document is required, as part of the application the Authorized User must check the box.
· The Authorized User must select ADD to update the field.
Once a document is added to update the mandatory flag do the following:
· Select the “Document Code”,
· Update the information.
· Select Update to update the document in the document grid.
· To revert to original requirement, select Clear
To delete a document requirement, do the following:
· Check the Delete Checkbox (on the right)
· Select the red “X” at the bottom of the document grid

Load Details will be displayed for Annual, Single and Project permit/certificate.
· To ADD Load Requirements the Authorized User must select items from the drop-down list populated based on the Permit Category selected at the top of the screen.
o Select a Load Category
o Select a Sub Category
o Select a Load Type
o Select an Equipment Type
· Auto Issuance is checked in conjunction with the Issuance Information field called Auto Issuance.
· Enter the Authorizing the Movement of (EN) – English description of the Load for printing on the permit.
· Enter the Authorizing the Movement of (FR) – French description of the Load for printing on the permit.
The Authorized User can select option(s) for the Load Dimensions for Width, Height, Length and Weight by indicating the fields that will be available on the application.
§ Fillable, allows the Authorized User to enter dimensions as part of the application.
§ Highway Traffic Act
§ For Load Width ONLY the following can be indicated Two Lane (m) and
Multi-Lane (m)
§ For Load Height the Maximum Height (m) can be indicated in this section.
§ For Load Length the Maximum Length (m) can be indicated in this section.
§ For Load Weight the following can be selected Highway Traffic Act or
Standard Annual or Special Weights
· To update a Load Requirement, do the following:
o Select the Load Category from the grid – the select Load Category will populate the entry area.
o When revisions have been completed the Authorized User must select Update to add the Load Requirement in the grid.
· To delete a Load Requirement, do the following:
o Check the delete checkbox in the Load grid (to the right) for the Load Category.
o Select the red “X” at the bottom of the Load grid.
Special Fields
This section defines how field will be displayed on the selected application screen for the permit/certificate. The Authorized User can identify what screen the field will be displayed as well as the section of the screen where is will be placed.
The Authorized User must select the following information from a dropdown list:
o Screen Name
o Screen Section
o Field Name English
o Field Name French
An Authorized User can select the Field Type from a dropdown list to create various formats to collection information by such as check box, dropdown list, group, label, and text.
· Group – Create a group then add field types
e.g., The Authorized User can enter the following information as required when each item is selected the Field Type as Group the Field Description would be the Group Name
· Checkbox – Add to Group by selecting the group from the Table/Group dropdown menu
· Dropdown – Add to Group by selecting the group from the Table/Group dropdown menu
Note: A comma must separate Items
· Label – Add to Group by selecting the group from the Table/Group dropdown menu
· Text – Add to Group by selecting the group from the Table/Group dropdown menu
To add a Special Field, do the following:
o Screen Name - Select the screen name from the drop down where the special field will display.
o Screen Section - Select the screen section from the drop down where the special field will be displayed.
o Field Name English - Enter the special field name in English.
o Field Name French - Enter the special field name in French.
o Field Description - Enter then special field description.
o Field Type - Select the type of field to display on screen.
o Table/Group – Used to group special fields for display on the screen during the application process. All items in the group should have the same group reference when displayed in the grid.
o Status - Select the status from the drop-down list.
o Row - Select the row from the drop-down list. This controls how the special fields will display to the screen during the application process.
o Column - Select the applicable column from the drop-down list. PRIO input screen are separated into three columns. The column selection defines the column the special field will display in during the application process. Used in conjunction with the Row.
For Advanced options the Authorized User can do the following:
· Required - Select if the special field is mandatory to enter during the application process.
· Data Type - Select the data type for the special field from the drop-down list.
· Is Multiline - Check if the entry area for the special field is multi line. If not checked the special field entry area with a single line. Only available for text fields.
· Minimum Value - Enter the minimum value for the special field.
· Maximum Value - Enter the maximum value for the special field.
· Maximum Length – Enter the maximum length for the special field. This field controls the maximum number of characters that will be allowed on the application screen for the special field.
· Select Add to add the special field to the grid.
To update a Special Field, do the following:
§ Select the Field Name from the Special Field grid.
§ When information has been revised the Authorized User must select Update to capture Information in the grid.
To delete a Special Field, do the following:
§ Check the delete checkbox in the Special Field grid (to the right) for the Special Field.
§ Select the red “X” at the bottom of the Special Field grid.

Select PROCEED on the Command Lineand the application information will be saved to the database and the Fees &Logic Checks screen will display.
Select Complete Definition on the Command Line and all application information will be saved to the database.
There are several sections on the Fees & Logic Checks Screen.
The Authorized User must indicate the fees for the permit/certificate by completing the following:
Fees:
· Fee Operation – Select the applicable fee operation from the drop-down list.
o Dynamic,
Note: An Authorized User must indicate the Fee Amount/Fee Logic
o Fixed
· Fee Category – Select the applicable fee category from the drop-down list.
o Permit Fee
o Taxes
· Fees – Select the applicable fee type from the drop-down list to identify the type of fee being charged
· Effective Date – Date on which the fees will be effective.
· Expiry Date – Date on which the fees will expire.
· Fee Amount / Fee Logic – Enter the fee amount to be charged.
· To add another fee, click on the green “+” at the bottom of the Fee grid
· To delete a fee:
o Select the delete checkbox on the right of the grid for the fee to be deleted.
o Select the red “X” at the bottom of the Fee grid.
Permit Logic checks
§ Edit Rule – If configured and logic check is valid, either a warning or hard stop will be displayed on the screen during processing.
· Hard Stop – Displays error message as a hard stop.
· Warning – Displays error message as a warning.
o There are two types of Edits:
§ Forwarding Rule – If configured and logic check is valid, the application will be forwarded to a review/approval queue.
§ Forward to Head Office – Assign to Head Office for review.
§ Forward to Issuer – Assign to Issuer for review.
o To add an Edit to the Permit Logic Checks grid, the user will select “Add Edit” and set/enter the fields below.
o To add a Forwarding Rule to the Permit Logic Checks grid, the user will select Add Forwarding and set/enter the fields below.
§ Status – Select the applicable status from the drop-down list.
§ Condition English – Enter the condition wording in English.
§ Condition French – Enter the condition wording in French.
§ Edit Rule – Enter the rule which will be used in the application processing to either forward the application as required or display either the hard stop or warning.
§ Screen Name – Select the application screen name from the drop-down list where the logic check will be performed.
o
To delete either a Forwarding Rule or Edit
(Warning/Stop):
§ Select the “Delete”
checkbox on the right side of the Edit Logic Check and select DELETE.

Select PROCEED on the Command Line and the application information will be saved to the database and the conditions screen will be displayed.
Select Complete Definition on the Command Line and all application information will be saved to the database.
There is only one section for an Authorized User add Conditions to the Conditions Screen.
An Authorized User must click the green “+” sign
· Add Variable– Click on the condition, select the applicable variable from the drop down, select Add Variable to add in variable into the condition.
· Attached Condition– Add a tag that will indicate the condition has a reference to another condition. During application processing, both conditions will have to be selected by the user. (Change the “0” to the number of the condition desired)
· Order No. – Enter the order the conditions should appear, if applicable
· Condition Category- Enter the applicable category it is a free form. During the permit processing the user can select based on the Condition Category. Standard will always come on the condition screen when processing the permit application.
· Condition English – Enter the condition wording in English.
· Condition French – Enter the condition wording in French.
· Notes – Enter the applicable note for the condition.
· Category – Select the applicable category from the drop-down list. Defines which tab the condition will appear in during permit processing.
· Always – If it is checked, then the condition will always apply. Condition will be selected automatically during permit processing.
· Rule – Enter the rule for the condition that will decide when the condition applies. Same as Fees and Logic Checks screen. Either Edit or Add Rule. Some Edit rules cannot be changed on some of the existing Permit Definitions due to the complexity.

Select Load Conditions on the Command Line and a list will display with pre-defined conditions that are available in the system for selection.
Select Complete Definition on the Command Line and all application information will be saved to the database.
Select: Enterprise – Applications – OO – Admin – Permit maintenance – Update Permit/VCE
The Authorized User can update information the status of the Permit/VCE,
An Authorized User can search for the permit by entering the Account Number, Legal Name, Permit/VCE Number (No.), Permit Year and/or selecting Permit/VCE Type from the dropdown list.
When PROCEED is selected on the Command Line at the bottom of the screen.
· A validation of the CVOR status will be performed if O/O Account Number was created with a CVOR.
· If the Account Level status is suspended or inactive, then a message will display telling the user to please contact the Oversize/Overweight Permit section.

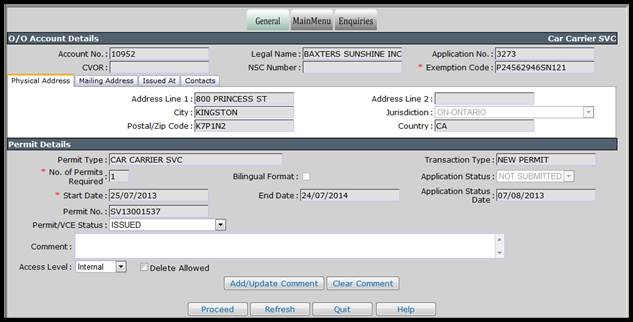
General Screen
· The authorized user can only modify the following details:
o Select the PERMIT/VCE Status from the drop-down list.
o Note: If the authorized user modifies the PERMIT/VCE status, a comment is required.
o Comment – Enter the appropriate comment. These comments are displayed on the account enquiry screen to internal users only.
§ Access Level – Select the appropriate access level for the comment from the dropdown list:
· Internal – means only internal resources are authorized to view the comment.
· Public – means the internal and external users are authorized to view the comments.
· Restricted – means only the defined authorized roles can view the comment.
§ Delete Allowed – Click this box if the authorized user wants to be able to delete this comment.
· Select PROCEED to execute the edits and display the validation screen.
· The verification screen displays showing the user a consolidated view of the general information. If the user determines some of the information is incorrect, they can select BACK on the Command Line and the system will display the general screen again. The user can make the required changes and select PROCEED.
· Select PROCEED on the Command Line and the PERMIT/VCE status will be updated on database.
· Command Line
o Proceed – means the system will take the user to the next logical step required for the transaction.
o Refresh – means the system will return the screen to the original content when the user entered the screen for the first time.
o Quit – means the user is finished working on this transaction for the time being and the transaction is available for completion by any authorized user at a late time using the “work in progress” feature.
o Help – means the help screen will be provided for the current screen and the user may scan the help file for assistance.
Select: Enterprise – Applications – OO – Admin – Permit maintenance – Validate Used Towing Certificates
· The Authorized User can validate a Used Towing Certificate by performing the following steps:
o Enter the Account Number (No.), Certificate Number (No.), Application Number (No.), Request From and To Date and/or selecting the Certificate Status – Deactivated, Request to Deactivate or Issued.
· Select PROCEED on the Command Line to generate a list of Used Towing Certificates that can be Validated.
· Command Line
o Proceed – means the system will take the user to the next logical step required for the transaction.
o Refresh – means the system will return the screen to the original content when the user entered the screen for the first time.
o Quit – means the user is finished working on this transaction for the time being and the transaction is available for completion by any authorized user at a late time using the “work in progress” feature.
o Help – means the help screen will be provided for the current screen and the user may scan the help file for assistance.

· Select any one record by selecting the SELECT link to the left of the Account Number (No.) to continue transaction processing.

· The Authorized User will have a scan and upload the document select Document Upload.
· Select Proceed to mark the selected certificate status as DEACTIVATE.
Select: Enterprise – Applications – OO - Admin – Permit Maintenance - Used Single Trip Batch Certificates
· The Authorized User can validate a Used Single Trip Batch Certificate by performing the following steps:
o Enter the Account Number (No.), Certificate Number (No.), Application Number (No.), Request From and To Date and/or selecting the Certificate Status – Deactivated, Request to Deactivate or Issued.
· Select PROCEED on the Command Line to generate a list of Single Trip Batch Certificates that can be Validated.
· Command Line
o Proceed – means the system will take the user to the next logical step required for the transaction.
o Refresh – means the system will return the screen to the original content when the user entered the screen for the first time.
o Quit – means the user is finished working on this transaction for the time being and the transaction is available for completion by any authorized user at a late time using the “work in progress” feature.
o Help – means the help screen will be provided for the current screen and the user may scan the help file for assistance.

· Select any one record by selecting the SELECT link to the left of the account no. to continue transaction processing.
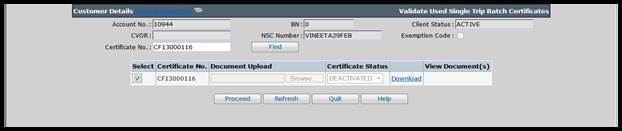
· The Authorized User will have a scan and upload the document select Browse in the Document Upload section to attach a file.
· Select Proceed to mark the selected certificate status as DEACTIVATE.
Multiple reports are accessible through the PRIO O/O application. To access the reports, select the ADMIN/REPORT tab from the O/O menu. The following reports are available:
· Escorted Loads by Type
· Monitoring Workflow
· Transactions Revenue
· Permit Production and Revenue
· Temporary Restriction Report
· Daily Permit Production and Revenue
Navigation
Select: Services - O/O - ADMIN – Report – Escorted Loads by Type
To generate a report on the escorted loads by type the Authorized User can enter the following information to set search parameters.
·
From
Travel Date
·
To
Travel Date
·
Legal
Name
·
Origin
·
Destination.
·
Escort
Category from the drop-down list.
o
Ontario
Provincial Public Escort
o
Pole
Cars
o
Private
Escort
·
The
Authorized User can select the method the report will be delivered by
indicating in the Electronic Delivery Channel from the drop-down list.
o
PDF
o
Print
o
Email
·
The
Authorized User must select PROCEED to generate a report.
·
Command
Line functions:
o
Proceed
– means the system will take the user to the next logical step required for the
transaction.
o
Refresh
– means the system will return the screen to the original content when the user
entered the screen for the first time.
o
Quit –
means the user is finished working on this transaction for the time being and
the transaction is available for completion by any authorized user at a late
time using the “work in progress” feature.

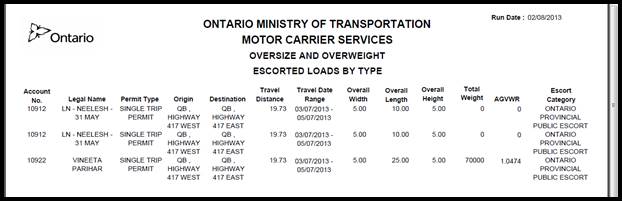
Navigation
Select: Services - O/O - ADMIN – Report – Monitoring Workflow
The Authorized Issuer can generate a report to monitor workflow for a selected location.
To generate the Monitoring Workflow Report, the Authorized User must enter the mandatory information marked with red asterisk “*”. You can enter other details as well to refine the search. Enter the following details:
·
Issued
Location
·
Permit
Type
·
Permit
Issuers Region Name
·
Permit
Issuer Name
·
Report
Type
·
Last
Updated Date
·
Payment
Start and End Date - Mandatory
·
Electronic
Delivery Channel
o
PDF to
view on screen.
o
Email
if selected a filed will be populated to enter email address. A message will be
posted to confirm email was sent successfully.
o
Excel
to produce report in excel spreadsheet.
·
Select
PROCEED on the Command Line to generate report.
·
Command
Line functions:
o
Proceed
– means the system will take the user to the next logical step required for the
transaction.
o
Refresh
– means the system will return the screen to the original content when the user
entered the screen for the first time.
o
Quit –
means the user is finished working on this transaction for the time being and
the transaction is available for completion by any authorized user at a late
time using the “work in progress” feature.
o
Help –
means the help screen will be provided for the current screen and the user may
scan the help file for assistance.


Select: Services - O/O - ADMIN – Report – Transactions Revenue
To generate the transactions revenue report, the Authorized User must enter the search parameters. All fields marked with red asterisks are mandatory to generate the report. The Authorized User must enter the mandatory fields and enter other details to refine the search.
· Account No.
· Permit Type – Select the permit type from the drop-down.
· Issued Location – Select the location available from the drop-down.
· Payment Start and End Date - Mandatory
· Service Provider Client ID/Name - Select a Service Provider from a dropdown menu.
·
Email Electronic
Delivery Channel
o PDF to view on screen.
o Email if selected a filed will be populated to enter email address. A message will be posted to confirm the email was sent successfully.
o
CSV
o
Excel
to produce report in excel spreadsheet.
· Select PROCEED on the Command Line to generate report.
· Command Line functions:
o Proceed – means the system will take the user to the next logical step required for the transaction.
o Refresh – means the system will return the screen to the original content when the user entered the screen for the first time.
o Quit – means the user is finished working on this transaction for the time being and the transaction is available for completion by any authorized user at a late time using the “work in progress” feature.
o Help – means the help screen will be provided for the current screen and the user may scan the help file for assistance.


Select: Services - O/O - ADMIN – Report – Permit Production and Revenue
To generate the permit production and revenue report, the Authorized User must enter the mandatory information marked with red asterisk “*”. You can enter other details as well to refine the search. Enter the following details:
·
Report
Type – Select an appropriate type for the report.
o
Permit
Production Detail
o
Permit
Production Summary
o
Permit
Production Revenue Summary
·
Permit
Category
o
All
o
Annual
o
Certificate
o
Project
o
Single
o
SVC
·
Transaction
Type
o
New
Permit
o
Amendment
o
Cancel
o
Hold
o
Replacement
o
Renewal
·
Office
ID – Select the appropriate office Id from the drop-down.
·
Workgroup
- Select the appropriate workgroup available from the drop-down.
·
User
·
From
Date and To Date - Mandatory
·
Email
Electronic Delivery Channel
o
Excel
to produce report in excel spreadsheet.
·
Select
PROCEED on the Command Line to generate report in excel format into your
system.
·
Command
Line functions:
o
Proceed
– means the system will take the user to the next logical step required for the
transaction.
o
Refresh
– means the system will return the screen to the original content when the user
entered the screen for the first time.
o
Quit –
means the user is finished working on this transaction for the time being and
the transaction is available for completion by any authorized user at a late
time using the “work in progress” feature.
o
Help –
means the help screen will be provided for the current screen and the user may
scan the help file for assistance.


Select: Services – O/O – ADMIN – Ledger Report
O/O Ledger Reports will provide transaction information on a daily or range of dates for a given office and an overall summary. The reports will be used to verify PRIO transactions on the office deposit as well as providing additional breakdowns to O/O offices financial.
To access the daily ledger reports for O/O, the Authorized User must select Ledger Report from the Admin tab on the O/O menu. The reports include:
· Daily Ledger
o
Summary
information for each user and office as well as a grand total.
o
Transactions
that resulted in a negative net due (refunds) are recorded separately.
· Daily Details Report
o
Provides
detailed information by user within an office.
o
Transactions
that resulted in a negative net due (refunds) are recorded separately.
· Summary Daily Receipt Report
o
Allows
the user to select a range of dates.
· Web Summary Report
o
Transactions
that were paid by external web users.

Daily Ledger Report
The Authorized User can generate a summary of funds collected on a selected business day by user or for the entire office.
· The Authorized User must select Daily Ledger in Report Type field.
· Select a Service Location from the drop-down list.
· A Payment Date must be entered.
· Electronic Delivery Channel must be selected from the dropdown list.
o PDF to view on screen.
o Email if selected a filed will be populated to enter email address. A message will be posted to confirm the email was sent successfully.
· Select PROCEED on the Command Line to generate report.
· Command Line functions:
o Proceed – means the system will take the user to the next logical step required for the transaction.
o Refresh – means the system will return the screen to the original content when the user entered the screen for the first time.
o Quit – means the user is finished working on this transaction for the time being and the transaction is available for completion by any authorized user at a late time using the “work in progress” feature.
o Help – means the help screen will be provided for the current screen and the user may scan the help file for assistance.


Daily Details Report
This report provides detailed information by user within an office.
· The Authorized User must select Daily Details in Report Type field.
· Select a Service Location from the drop-down list.
· A Payment Date must be entered.
· Electronic Delivery Channel must be selected from the dropdown list.
o PDF to view on screen.
o Email if selected a filed will be populated to enter email address. A message will be posted to confirm email was sent successfully.
· Select PROCEED on the Command Line to generate report.
· Command Line functions:
o Proceed – means the system will take the user to the next logical step required for the transaction.
o Refresh – means the system will return the screen to the original content when the user entered the screen for the first time.
o Quit – means the user is finished working on this transaction for the time being and the transaction is available for completion by any authorized user at a late time using the “work in progress” feature.
o Help – means the help screen will be provided for the current screen and the user may scan the help file for assistance.


Summary Daily Receipt Report
This report provides a summary of the daily receipts.
· The Authorized User must select Summary of Daily Receipt in Report Type field.
· Select a Service Location from the drop-down list.
· An Authorized User must indicate the From Date and To Date of the report.
· Electronic Delivery Channel must be selected from the dropdown list.
o PDF to view on screen.
o Email if selected a filed will be populated to enter email address. A message will be posted to confirm the email was sent successfully.
· Select PROCEED on the Command Line to generate report.
· Command Line functions:
o Proceed – means the system will take the user to the next logical step required for the transaction.
o Refresh – means the system will return the screen to the original content when the user entered the screen for the first time.
o Quit – means the user is finished working on this transaction for the time being and the transaction is available for completion by any authorized user at a late time using the “work in progress” feature.
o Help – means the help screen will be provided for the current screen and the user may scan the help file for assistance.

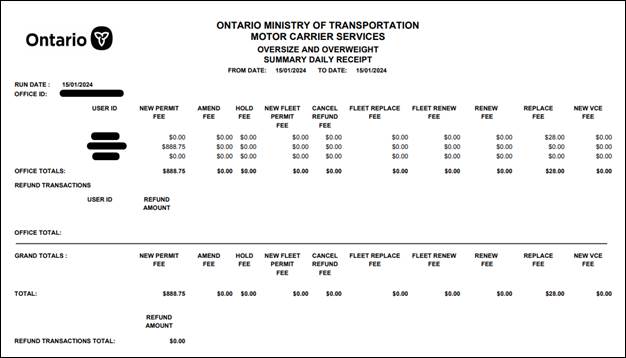
Web Summary Report
This report provides an overview of all the paid and unpaid web transactions.
· The Authorized User must select Web Summary in Report Type field.
· Select a Service Location from the drop-down list.
· An Authorized User must indicate the From Date and To Date of the report.
· Electronic Delivery Channel must be selected from the dropdown list.
o PDF to view on screen.
o Email if selected a filed will be populated to enter email address. A message will be posted to confirm the email was sent successfully.
· Select PROCEED on the Command Line to generate report.
· Command Line functions:
o Proceed – means the system will take the user to the next logical step required for the transaction.
o Refresh – means the system will return the screen to the original content when the user entered the screen for the first time.
o Quit – means the user is finished working on this transaction for the time being and the transaction is available for completion by any authorized user at a late time using the “work in progress” feature.
o Help – means the help screen will be provided for the current screen and the user may scan the help file for assistance.


Select: Enterprise – Applications - O/O - ADMIN – Batch Process
The Authorized User interface for all batch processes consists of the
following processes:
· Submit a batch process to execute.
· Perform enquiries about the status of the execution.
· View logs
· View Reports/Results
The Expired Permits batch
process will be used as an example.
·
The Authorized User must submit
a job for execution by completing the following steps:
·
Select the Batch Process from
the drop-down list.
o Expired Permits
o Hold Queue
o Restriction Notification
o Renewal Notice
o Stale Dated Permit Applications
o Upcoming Restriction Expiration Notification
Enter the required parameters.
· For Expired Permits, Date and Operation Mode (note: not all the batch processes have an Operation Mode option).
· Select Proceed to submit the job for execution.
Note: Message will be posted to confirm process was completed successfully.
The Authorized User must Select Batch Enquiry to see the status of the job.

Application type defaults to O/O and cannot be changed by Authorize User.
Select the Batch Code from the drop down
list.
o Expired Permits
o Hold Queue
o Restriction Notification
o Renewal Notice
o Stale Dated Permit Applications
o Upcoming Restriction Expiration Notification
·
Enter the
Run From Date.
·
Enter the
Run To Date.
·
The
Authorized User can refine search by entering information or selecting from the
dropdown menu for the following fields:
·
Status
o
Complete
o
Error
o
Processing
o
Stopped
·
IP
adress
·
Created
User ID
·
Select
Proceed to display the results.
Command line
Proceed
Refresh
Quit
· Select VIEW link to the right of the batch job to review the log information.

Display of the log information.

To return to the Main Batch processing screen the Authorized User must select Back.
The Authorized User can review the logs for completed jobs for selected Batch Process.
·
Select
the desried Batch Process from the dropdown menu
·
If View
Log is selected the mandatory parameters do not have to be entered.
·
Select
the View link to the right of each log to display.
· Delete the old logs by selecting the delete checkbox and Delete Reports.

The Authorized User can review the logs for completed jobs for selected Batch Process.
·
Select
the desried Batch Process from the dropdown menu
·
If
View Reports is selected the mandatory parameters do not have to be entered.
·
Select
the View link to the right of each report to display.

This process will expire any permit that is currently in an Issued status and has expired in the past (i.e., less than the given date).
· The Authorized User must select Expired Permits from the dropdown list in the Select Batch Process field.
· Enter the Date.
· Select the appropriate Operation Mode from the drop-down list.
o Report – This mode will create a report only and does not update the status of permit.
o Update – This mode will create report and update the status of permit to expire.
· Select PROCEED to run the expired permits process.
This Batch Process is only available for Single Trip permits.
When an Authorized User applies for a permit, the system automatically checks the start date of travel and if start date is beyond the threshold value then the system will move the application automatically to the hold queue.
This process will make the permit application ready to review from the Hold status when the application threshold value is reached.
To perform this function, do the following:
· Select Hold Queue from the dropdown list in the Batch Process field
· Select PROCEED to run the Hold queue process.

This Batch Process will review the Restriction entered/updated during the day and the issued active permits that are affected by the restriction then sends email notificationto the Carrier.
The Authorized User must select Restriction Notification from the dropdown list in the Select Batch Process field.
· Enter the Date.
· The Operation Mode is defaulted to Update and cannot be changed by Authorized User.
Select PROCEED to run the Restriction Notification process.

This Batch Process will generate the renewal notices for the carrier. If the carrier has email address available, then system will send the notification to them. Carriers without email address, the renewal notice form will be mailed to the primary mailing address. Job can be scheduled.
The Authorized User must select Renewal Notice in the dropdown list int eh Select Batch Process. The appropriate numeric value must be entered for the requested Month, e.g., January – 1
The Year of expiry must be entered to complete the process.
· Select Proceed to run the Renewal Notice process.

An Authorized User can run a Batch Process that will identify permit applications which need to be stale dated.
· The Authorized User must select Stale Dated Permit Applications from the dropdown list in the Select Batch Process field.
· Enter the Date.
· Select the appropriate Operation Mode from the drop-down list.
o Report - This mode will create a report only and does not update the status of permit.
o Update - This mode will create report and update the status of permit to expire.
· Select PROCEED to run the Stale Date Permit Application process.

This Batch Process will notify the Authorized User that the entered the Restriction is about to expire. For Restrictions that will expire within 5 days, the system will send a notification to the Authorized User who entered the Restriction into the system and also send a carbon copy (cc) of the email to the group email.
The Authorized User must select Restriction Notification from the dropdown list in the Select Batch Process field.
· Enter the Date.
· The Operation Mode defaults to Update and cannot be changed by Authorized User.
Select PROCEED to run the Restriction Expiration Notification process.

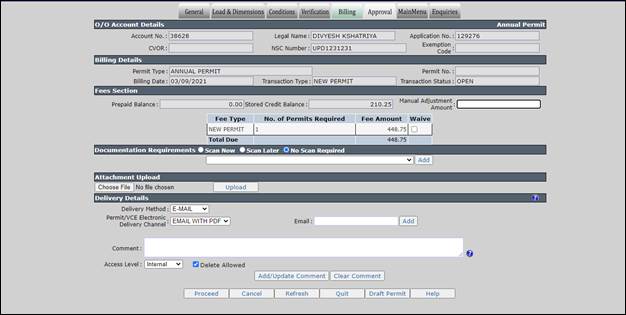
From the billing validation screen, click Proceed to go to the Cart Payment processing screen. The system will check to ensure the Cash Drawer is open before you can make a payment. Refer to Section 1.2.3.1.1 Payment Collection to make the payment.
Documentation Requirements – this section allows user to scan, and upload required documents. There are the following three radio buttons available:
· Scan now – allows to scan and upload documents at once
· Scan Later – allows to schedule document scan and submission for a later time
· No Scan Required – select this option if no documents are required to be uploaded
Select the appropriate document from the drop-down beneath the documentation requirement section and click the corresponding ADD button. The added document displays in a grid underneath. Update one of the following statuses for the document, as applicable:
· Collected
· Outstanding
· Not Required
· System Collected
When the user proceeds from this screen, the system opens a document interface in a child window, allowing to scan and upload required documents.

Close the document interface window once all the documents are uploaded. The system redirects user to the next screen.

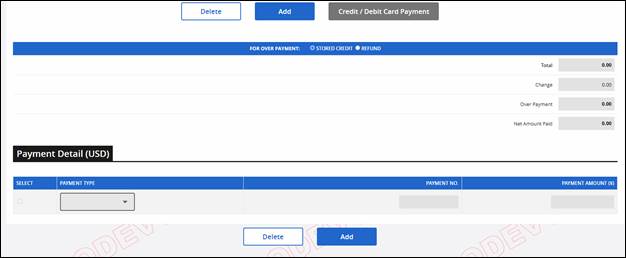
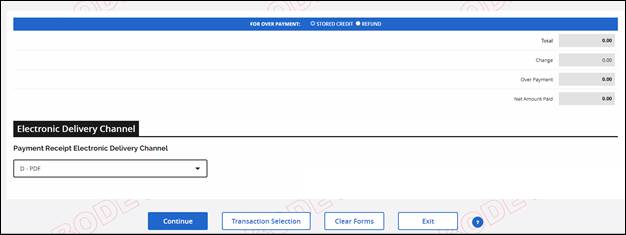
When the Authorized User is processing a payment with a Debit or Credit Card, select Debit Card or Credit Card form the Payment Type drop down and the Credit/Debit Card Payment button will enable.
Click the Debit/Credit Card Payment button to process the payment. The system opens the Pos Pad interface. Enter the required details and complete the payment. Once the payment is done, the system redirects user to Payment screen populating the paid amount.
Note: Multiple credit cards cannot be used to process a payment.
In case of cheque payment, the Authorized User must record the cheque number in the Payment Number (No.) field for all cheques and certified payments.
If the user is making an over payment, a pop-up window will inform the Authorized User and ask if they want to proceed.
Once the Authorized User successfully completes the payment process the payment receipt will be displayed in a pop-up window. The Authorized User can print, download, save or cancel the PDF receipt.
The following screen will indicate the status of the credential issuance and display any errors that occurred during the process.

Select: Enterprise – Applications – O/O – Transaction – Cancellation
To cancel payment from application level, perform the following steps:
The Authorized User must enter the search criteria to select the appropriate permit/VCE.
Enter any of the following fields to locate the permit/VCE:
· Account No.
· Legal Name
· Permit/VCE Number (No.)
· Permit Year
· Permit/VCE Type from the dropdown list
· Expiry From Date
· Expiry To Date
· Select PROCEED to display available payment records for cancellation.

The system displays the search results in a grid based on the input parameters. Click the Select link against the preferred record to cancel the payment.
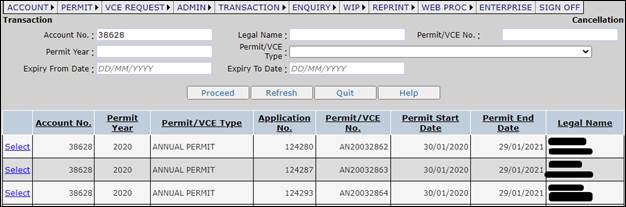
Same day cancellation must be processed at the Enterprise Level.
Note: The RMS batch process must be executed before cancelling a previous day payment record.
Documentation Requirement – The Authorized User can add all required documents or update the Status from the dropdown list
Select PROCEED to process the payment cancellation.
Select: Enterprise – Applications – O/O – ADMIN – Rule Management – Workflow
An Authorized User can manage workflow by configuring Queue Assignments and Workgroups.
The Queue Assignment allows the Authorized User to assign roles to the respective Queue types. To complete this process the Authorized User must follow these steps:
· .
o Select the Queue Type from the dropdown list
§ Annual
§ VCE Request
§ Single Trip
§ Single Trip Super load
§ Project
§ Certificate
Note: Fields will populate based on Queue Type selected by the Authorized User.
The Default Workgroup is to whom the application will be assigned.
Note: Default will change based on Queue Type selected by the Authorized User
· Queue Hold Days – If the application is received in advance of the designated Queue Hold thresholds the system will place the application in Hold status.
· To assign Workgroups to the Queue the Authorized User must highlight the Workgroup in the Unassigned section and then select the “>” arrow to transfer the Workgroup to Assigned.
· The Authorized User can move Workgroup from Assigned to Unassigned by highlighting the group and then selecting the “<” arrow.

The Workgroup identifies who can assign work to the group. To complete this process the Authorized User must follow these steps:
· Select the Workgroup from the dropdown list
· The Authorized User can select if the Workgroup:
o Can Approve/Reject applications
o Can See All Tasks from Any Queue
o Can Only See Tasks which are Assigned to their Workgroup
o Can Only See Tasks which are Assigned to Them
· An Authorized User can record the Workgroup’s email address and should not record an individual’s address in this field.
Workgroups to whom the current workgroup can assign a queue
· To assign Workgroups the Authorized User must highlight the Workgroup in the Unassigned section and then select the “>” arrow to transfer the Workgroup to Assigned.
· The Authorized User can move Workgroup from Assigned to Unassigned by highlighting the group and then selecting the “<” arrow.

Select PROCEED on the Command Line and the workflow information saved to the database and return to O/O Main Menu screen.

Select: O/O – ADMIN- MTO
Common Corridor – Create MTO Common Corridor
This
screen provides the functionality to create, delete and enquire the MTO common
corridor.Theauthorized user has to come to the O/O Main Menu
screen which displays the Admin Tab, Click on the Admin tab and it will display
a list of menus. Click on MTO Common
Corridor. This will display sub menus as
shown below.

To
create the MTO Common corridor, the authorized user begins
at the O/O Main Menu screen which displays the Admin Tab. Click on the Admin Tab and it will display
the MTO Common Corridor. Click on MTO
Common Corridor, it will have sub menus to create the MTO common corridor.
This
screen provides the functionality to create an envelope. An authorized user can create the pre-defined routes
in the system for carrier and internal user usage. If there are frequently used
routes, they can be saved as an MTO common corridor.
(also see assisted routing)

To
delete an MTO common corridor, the authorized user has to
begin at the O/O Main Menu screen whichdisplays the Admin Tab, click on Admin
Tab; it will display MTO Common Corridor.
Click on MTO Common Corridor, it will have sub menu Delete MTO Common
Corridor, click on it.
This screen provides the functionality to delete an
existing envelope.

For an MTO common corridor enquiry, the authorized user
has to begin at the O/O Main Menu screen whichdisplays the Admin Tab. Click on
the Admin Tab, it will display the MTO Common Corridor. Click on the MTO Common Corridor, it will
have a sub menu MTO Common Corridor Enquiry, click on it.
The following screen provides the functionality to view
an existing envelope.

This module provides the functionality to do all
Restrictions. The authorized user has to
come to the O/O Main Menu screen which displays the Admin Tab. Click on the Admin Tab and it will display a
list of menus. Click on the Restriction menu.
In the restriction menu,
there are sub menus as follows.
Restriction Management
Temporary Restriction
Report
Restriction Enquiry

ADMIN – Restriction – Restriction Management
The authorized user (administrator), can perform the
following operations on restriction management:
Add Restriction/Warning
Update Restriction/Warning
Delete Restriction/Warning
To add, update or delete the temporary restrictions,
user needs to select restriction management from the sub menu


An authorized user can
add a restriction the following ways.
Selecting
a Point, drawing a Line or Polygon on Highway / Road.
Searching
by Exit Marker, Intersection and Latitude/Longitude.
The authorized user can add/update/delete different
types of restriction/warnings such as restricted width, height, length, weight
and complete closure. Manual review is a
field, which if set, then the system will solve the route but send that permit
for approval.
The authorized user can set the restriction effective
date, expiry date; add comments to the reason and restriction message, and
enter contact information to fields.
The highway name, region, direction, total lanes are
repopulated while adding a restriction.
If the highway name is not populated, the authorized user has to enter
it manually.
The authorized user can view all the restrictions
available in the system through a list of restrictions. By selecting a particular restriction from
the List of Restrictions grid, the map will be zoomed to that particular
restriction and will populate the details. The authorized usercan update or
delete the temporary restriction.
On hovering over any restrictions symbols on the map,
the user can see the popup window with details of that particular restriction.
To
view the restriction report, the authorized user has to begin at the O/O Main Menu
screen whichdisplays the Admin Tab. Click on the Admin tab and it
will display a list of menus.
Clickontemporary restriction report.

From this screen the user can generate the temporary
restriction report based on the filter criteria.
Select Proceed and it will display the temporary
restrictions on the screen.
Select Generate and it will generate the temporary
restriction report in PDF format.
For
a restriction enquiry, the authorized user has to come to the O/O Main Menu
screen which displays the Admin Tab. Click on the Admin Tab and it will display
a list of menus. Click on restriction
enquiry.

This screen provides the functionality to view all
restrictions. A list of restriction grid
will have the search criteria to filter the restrictions. By
selecting a particular restriction from the grid, the map will be zoomed to
that particular restriction and will populate the details.
On this screen, the authorized user can only view the
temporary restrictions, and cannot add / edit /delete the temporary
restrictions.
Select: Enterprise – Applications – O/O – Transaction
The following transactions are available as per the configuration:
· Renewal
· Amendment
· Replacement
· Hold
· Cancellation
The Renewal transaction flow will be the same as a new transaction.
To process a transaction, the Authorized User must enter or select at least one of the following:
Account No.
· Legal Name
· Permit/VCE No.
· Permit Year
· Permit/VCE Type from the drop-down list.
· Expiry From Date.
· Expiry To Date.
· Select PROCEED to display the general screen.
When PROCEED is selected on the Command Line at the bottom of the screen.

A CVOR status check will be performed if an O/O account number was created with a CVOR.
If the Account Level status
is suspended or inactive, then a message will display as please contact the
oversize/overweight permit section. The permit must be renewed before it
expires. If renewing, and the permit was amended, the user has to do a new
permit with copy from. The authorized user can issue the identical permits. The permit renewal will be assigned a new permit number. A Renewal
fee will be charged as per the configuration. Renewal auto issuance will be as
per the configuration.
Based on the “Permit Type”, PRIO will determine the renewal process flow.
The Renewal transaction
flow will be same as a new transaction:
Account Search >> General >> Load and Dimensions >> Permit Conditions >> Billing >> Payment >> Credentials
· Permits are to be renewed prior to the end date as stated on the permit.
· Dates are incremented by one year from the previous year
Note: if configuration is not auto issued – Work in Progress screen – Authorized User must approve the application to proceed
Renewal General Screen
To get the
details of the Annual General screen, please refer to Section 1.4.2.1.1 or for
online-authorized users click here. For renewal only, the following can be
changed:
· The Authorized User can select the Address and contact from the dropdown screen
· Number of Permits Required can identify how many identical permits should be renewed
· Select if a bilingual permit is required.
The verification screen displays showing the user a consolidated view of the general information. If the user determines some of the information is incorrect, they can select BACK on the Command Line and the system will display the general screen again. The user can make the required changes and select PROCEED.
Select PROCEED on the Command Line and general information will be saved to the database. The Load and Dimensions Screen will be displayed.

Load & Dimensions
To get the details of the Annual Load And Dimension screen please refer to Section 1.4.2.1.2 or for online-authorized users click here.
The Authorized User cannot change any information on the Load and Dimension screen during the renewal process.
The verification screen displays showing the user a consolidated view of the general information.
Select PROCEED on the Command Line and Load and Dimensions information will be saved to the database. The Conditions Screen will be displayed.

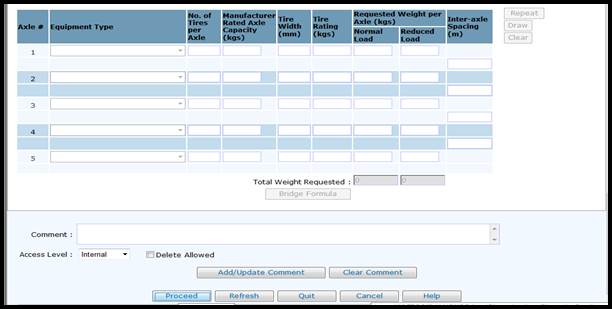
Permit Conditions
To get the details of the Annual Permit Condition screen please refer to Section refer to Section1.4.2.1.3 or for online-authorized users click here.
During the renewal process the current Standard and Non-Standard conditions will be populated on the permit to capture any revisions to wording that was introduced over the last year. The “Additional” conditions would be brought forward from the previous year.

Billing
To get the details of the Annual Permit Billing screen please refer to Section 1.4.2.1.4 or for online-authorized users click here.

The following fields are populated from the Common Client or Account Level, or System generated, and the Authorized User cannot change them.
O/O Account Details
Account No.
Legal Name
Application No.
CVOR
NSC Number
Exemption Code
Billing Details
· Transaction Type
· Permit Number (No.) is blank, it is system generated when credentials are issued.
· Billing Date
· Transaction Type
· Transaction Status has been updated to OPEN
o
Fees Section
By default, the following are populated from the enterprise screen and cannot be changed by the user.
· Prepaid Balance
· Stored Credit Balance
· Manual Adjustment Amount – Only an Authorized User can complete adjustment based on business rules
· Fee Table displays the following application details
o Fee Type
o Number (No.) of Permits Required
o Fee Amount
o Waive – Only an Authorized User can select based on eligibility criteria
Documentation Requirements
Certain documents are required for the creation of a New Permit. If the system can check for the document automatically via a system interface, it will mark the document as being System Collected.
· If documents are required based on the permit type, the document name will be displayed in the Documentation Requirements Section drop down list
· The Authorized User must select the document name; then click the Add link and the document name will be displayed in a list just below the drop down.
· Authorized User can select the appropriate status for that document from the Status drop down list.
o Collected – means the document has been submitted and approved by issuer.
o Not Required – means the document is not required for this transaction.
o Outstanding – means the document has not been submitted and approved yet.
o System Collected – means the system has some interface that provides verification that the documentation requirement has been met.
Attachment Upload
Documents that Authorized User will upload to attach to the permit
o Browse – Select a PDF file from the Browse link.
o Upload – Uploads a PDF file if required.
· Authorized User can select the PDF files from the Browse link
· To attach the selected file the Authorized User must click Upload to attach the file, if applicable
Delivery Details
The Authorized User must indicate the delivery method for the permit.
· Select the Delivery Method from the drop-down list
o Courier
§ If selected the Authorized User must enter the details of the Courier the Name, Account Number (No.) and Courier Phone Number (No.)
o Mailed
o Pick Up
§ If selected the Authorized User must select the pickup location
o Authorized Users must print annual permits, so the only Electronic Delivery Channel is print
o Authorized User can enter the appropriate comment that will be viewed on the Account Enquiry Screen by internal users only.
o The Authorized User must select the appropriate access level for the comment from the drop-down list:
§ Internal – means only internal resources are authorized to view the comment.
§ Public – means the internal and external users are authorized to view the comments.
§ Restricted – means only the defined authorized roles can view the comment.
· When the Delete Allowed is Selected the comment can be deleted by another Authorized Users
Command Line functions:
Proceed – means the system will take the user to the next logical step required for the transaction
Refresh – means the system will return the screen to the original content when the user entered the screen for the first time
Quit – means the user is finished working on this transaction for the time being and the transaction is available for completion by any authorized user at a late time using the “work in progress” feature.
Cancel – means the user has decided to discard all activity on this transaction as if they had never started it. The transaction log will show the transaction activity.
Help – means the help screen will be provided for the current screen and the user may scan the help file for assistance.
Select PROCEED to execute the edits and auto issuance criteria. If the auto issuance criteria fail, the application will be submitted to the workflow for review. Once the application has been approved by the authorized user and on “Done” click from the application approval details screen, the system will come back to the billing screen.
Select PROCEED on the Command Line; the billing information will be saved to the database and continue to the validation screen. From the billing validation screen, the authorized user can generate the invoice.
Note: Once the application has been invoiced the only way for an Authorized User to move through screens using the tabs is by selecting Cancel Bill.
Command Line functions:
Proceed – Means the system will proceed to the next logical step in processing the transaction
Add to Cart – means the system will save the invoice information to a cart for future payment along with any other items placed in the cart as a result of subsequent transaction processing
Cancel Bill – means the invoice/bill that was calculated will be cancelled and the transaction will no longer be in “Invoiced” status and will be placed in an “Open” status”
Refresh – means the system will return the screen to the original content when the user entered the screen for the first time
Quit – means the user is finished working on this transaction for the time being and the transaction is available for completion by any authorized user at a late time using the “work in progress” feature.
Invoice – Means the system display the invoice
Draft VCE – means the system will provide a Draft Permit for verification by the user. No permit number is assigned at this point.
Help - means the system will provide a help screen for the current screen and the user can view the help information and scan the help file as required.
Payment Detail Screen – see 1.4.4.6-payment, p 131
1.3.5.1.2 Project Permit Renewal
Select: Enterprise – Applications – O/O – Transaction – Renewal
The Renewal transaction flow will be same as a new transaction:
Account Search >>
General >> Load & Dimensions >> Route >> Conditions
>> Billing >> Payment >> Credentials
The Authorized User must confirm the Project Permit is valid prior to processing the renewal application. Timeframe of the renewal may differ from the original as it is subject to contract documents submitted in conjunction with the application. A Project permit can be issued for up to 6 months. The Authorized User can process a renewal transaction by performing the following steps.
To process a replacement transaction, the Authorized User must enter or select at least one of the following:
· Account No.
· Legal Name
· Permit/VCE No.
· Permit Year
· Permit/VCE Type from the drop-down list.
· Expiry From Date.
· Expiry To Date.
· Select PROCEED to display the general screen.
The Authorized User must enter the Account No. or Legal Name in the corresponding field.
When PROCEED is selected on the Command Line at the bottom of the screen. A CVOR status check will be performed if an O/O account number was created with a CVOR.
If the Account Level status is suspended or inactive, then a message
will display as please contact the oversize/overweight permit section. The permit
must be renewed before it expires. If renewing, and the permit was amended, the
user has to do a new permit with copy from. The authorized user can issue the
identical permits. The permit renewal will be
assigned a new permit number. A Renewal fee will be charged as per the
configuration. Renewal auto issuance will be as per the configuration.
Based on the “Permit Type”, PRIO will determine the renewal process flow.
Renewal
General Screen
To get the details of the General screen please refer to
Sectionrefer to Section 1.4.2.3.1 or for online-authorized users click here.
For renewal only the following can be changed:
· The Authorized User can select the Address and contact from the dropdown screen
· Number of Permits Required can identify how many identical permits should be renewed
· Select if a bilingual permit is required.
The verification screen displays showing the user a consolidated view of the general information. If the user determines some of the information is incorrect, they can select BACK on the Command Line and the system will display the general screen again. The user can make the required changes and select PROCEED.
Select PROCEED on the Command Line and general information will be saved to the database. The Load and Dimensions Screen will be displayed.

Load & Dimensions
To get the details of the Load And Dimension screen please refer to Sectionrefer to Section1.4.2.3.2 or for online-authorized users click here.
The Authorized User cannot change any information on the Load and Dimension screen during the renewal process.
The verification screen displays showing the user a consolidated view of the general information.
Select PROCEED on the Command Line and Load and Dimensions information will be saved to the database. The Conditions Screen will be displayed.

Routing
To get the details of the Routing screen please refer to Sectionrefer to Section1.4.2.3.3 or for online-authorized users click here.
The Authorized User must verify route(s) during renewal process.

Permit Conditions
To get the details of the Permit Condition screen please refer to Sectionrefer to Section1.4.2.3.4 or for online-authorized users click here.
During the renewal process the current Standard and Non-Standard conditions will be populated on the permit to capture any revisions to wording that was introduced over the last year. The “Additional” conditions would be brought forward from the previous year.
Billing
To get the details of the Permit Billing screen please refer to Sectionrefer to Section1.4.2.3.5 or for online-authorized users click here.

The following fields are populated from the Common Client or Account Level, or System generated, and the Authorized User cannot change them.
O/O Account Details
Account No.
Legal Name
Application No.
CVOR
NSC Number
Exemption Code
Billing Details
· Transaction Type
· Permit Number (No.) is blank, it is system generated when credentials are issued.
· Billing Date
· Transaction Type
· Transaction Status has been updated to OPEN
o
Fees Section
By default, the following are populated from the enterprise screen and cannot be changed by the user.
· Prepaid Balance
· Stored Credit Balance
· Manual Adjustment Amount – Only an Authorized User can complete adjustment based on business rules
· Fee Table displays the following application details
o Fee Type
o Number (No.) of Permits Required
o Fee Amount
o Waive – Only an Authorized User can select based on eligibility criteria
Documentation Requirements
Certain documents are required for the creation of a New Permit. If the system can check for the document automatically via a system interface, it will mark the document as being System Collected.
· If documents are required based on the permit type, the document name will be displayed in the Documentation Requirements Section drop down list
· The Authorized User must select the document name; then click the Add link and the document name will be displayed in a list just below the drop down.
· Authorized User can select the appropriate status for that document from the Status drop down list.
o Collected – means the document has been submitted and approved by issuer.
o Not Required – means the document is not required for this transaction.
o Outstanding – means the document has not been submitted and approved yet.
o System Collected – means the system has some interface that provides verification that the documentation requirement has been met.
Attachment Upload
Documents that Authorized User will upload to attach to the permit
o Browse – Select a PDF file from the Browse link.
o Upload – Uploads a PDF file if required.
· Authorized User can select the PDF files from the Browse link
· To attach the selected file the Authorized User must click Upload to attach the file, if applicable
Delivery Details
The Authorized User must indicate the delivery method for the permit.
· Select the Delivery Method from the drop-down list
o Courier
§ If selected the Authorized User must enter the details of the Courier the Name, Account Number (No.) and Courier Phone Number (No.)
o Mailed
o Pick Up
§ If selected the Authorized User must select the pickup location
o Authorized Users must print annual permits, so the only Electronic Delivery Channel is print
o Authorized User can enter the appropriate comment that will be viewed on the Account Enquiry Screen by internal users only.
o The Authorized User must select the appropriate access level for the comment from the drop-down list:
§ Internal – means only internal resources are authorized to view the comment.
§ Public – means the internal and external users are authorized to view the comments.
§ Restricted – means only the defined authorized roles can view the comment.
· When the Delete Allowed is Selected the comment can be deleted by another Authorized Users
Command Line functions:
Proceed – means the system will take the user to the next logical step required for the transaction
Refresh – means the system will return the screen to the original content when the user entered the screen for the first time
Quit – means the user is finished working on this transaction for the time being and the transaction is available for completion by any authorized user at a late time using the “work in progress” feature.
Cancel – means the user has decided to discard all activity on this transaction as if they had never started it. The transaction log will show the transaction activity.
Help – means the help screen will be provided for the current screen and the user may scan the help file for assistance.
Select PROCEED to execute the edits and auto issuance criteria. If the auto issuance criteria fail, the application will be submitted to the workflow for review. Once the application has been approved by the authorized user and on “Done” click from the application approval details screen, the system will come back to the billing screen.
Select PROCEED on the Command Line; the billing information will be saved to the database and continue to the validation screen. From the billing validation screen, the authorized user can generate the invoice.
Note: Once the application has been invoiced the only way for an Authorized User to move through screens using the tabs is by selecting Cancel Bill.
Command Line functions:
Proceed – Means the system will proceed to the next logical step in processing the transaction
Add to Cart – means the system will save the invoice information to a cart for future payment along with any other items placed in the cart as a result of subsequent transaction processing
Cancel Bill – means the invoice/bill that was calculated will be cancelled and the transaction will no longer be in “Invoiced” status and will be placed in an “Open” status”
Refresh – means the system will return the screen to the original content when the user entered the screen for the first time
Quit – means the user is finished working on this transaction for the time being and the transaction is available for completion by any authorized user at a late time using the “work in progress” feature.
Invoice – Means the system display the invoice
Draft Permit – means the system will provide a Draft Permit for verification by the user. No permit number is assigned at this point.
Help - means the system will provide a help screen for the current screen and the user can view the help information and scan the help file as required.
Payment Detail Screen – see 1.4.4.6-payment, p 131
Select: Enterprise – Applications – O/O – Transaction – Renewal
The Renewal transaction flow will be same as a new
transaction:
Account Search >>
General >> SVC >> Conditions >> Billing >> Payment
>> Credentials
The Authorized
User must confirm if the SVC permit is eligible for renewal. Permits are to be
renewed prior to the end date as stated on the permit.
To process a replacement transaction, the Authorized User must enter or select at least one of the following:
Account No.
· Legal Name
· Permit/VCE No.
· Permit Year
· Permit/VCE Type from the drop-down list.
· Expiry From Date.
· Expiry To Date.
· Select PROCEED to display the general screen.
When PROCEED is selected on the Command Line at the bottom of the screen.
A CVOR status check will be performed if an O/O account number was created with a CVOR.
If the Account Level status is suspended or inactive, then a message
will display as please contact the oversize/overweight permit section. The permit
must be renewed before it expires. If renewing, and the permit was amended, the
user has to do a new permit with copy from. The authorized user can issue the
identical permits. The permit renewal will be
assigned a new permit number. A Renewal fee will be charged as per the
configuration. Renewal auto issuance will be as per the configuration.
Based on the “Permit Type”, PRIO will determine the renewal process flow.
Renewal
General Screen
To get the details of the General screen please refer to
Section 1.4.2.4.4.1 or for online-Authorized Users click here.
For renewal only the following can be changed:

SVC
To get the details of a Generic SVC screen please refer to Section 1.4.2.4.4.2 or for online-Authorized Users click here.
The Authorized User cannot change any information on the SVC screen during the renewal process.
The verification screen displays showing the user a consolidated view of the SVC information.
Select PROCEED on the Command Line and Load and Dimensions information will be saved to the database. The Conditions Screen will be displayed.

Permit Conditions
To get the details of the Permit Condition screen please refer to Sectionrefer to Section1.4.2.4.4.3 or for online-authorized users click here.
Current Standard and Non-Standard conditions will be populated on the permit to capture any revisions to wording that was introduced over the last year. The “Additional” conditions would be brought forward from the previous year.
Billing
To get the details of the Permit Billing screen please refer to Sectionrefer to Section1.4.2.4.4.4 or for online-authorized users click here.
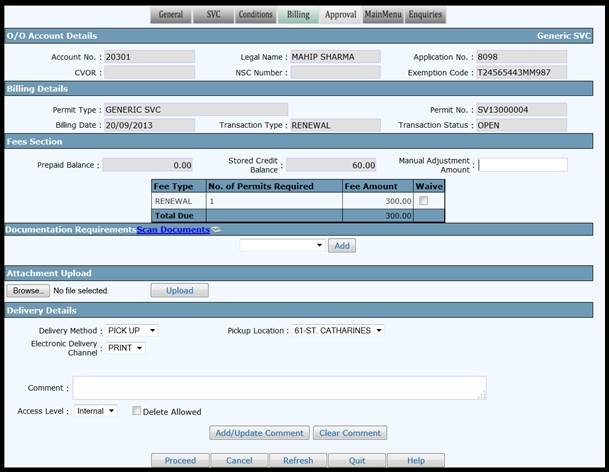
The following fields are populated from the Common Client or Account Level, or System generated, and the Authorized User cannot change them.
O/O Account Details
Account No.
Legal Name
Application No.
CVOR
NSC Number
Exemption Code
Billing Details
· Transaction Type
· Permit Number (No.) is blank, it is system generated when credentials are issued.
· Billing Date
· Transaction Type
· Transaction Status has been updated to OPEN
o
Fees Section
By default, the following are populated from the enterprise screen and cannot be changed by the user.
· Prepaid Balance
· Stored Credit Balance
· Manual Adjustment Amount – Only an Authorized User can complete adjustment based on business rules
· Fee Table displays the following application details
o Fee Type
o Number (No.) of Permits Required
o Fee Amount
o Waive – Only an Authorized User can select based on eligibility criteria
Documentation Requirements
Certain documents are required for the creation of a New Permit. If the system can check for the document automatically via a system interface, it will mark the document as being System Collected.
· If documents are required based on the permit type, the document name will be displayed in the Documentation Requirements Section drop down list
· The Authorized User must select the document name; then click the Add link and the document name will be displayed in a list just below the drop down.
· Authorized User can select the appropriate status for that document from the Status drop down list.
o Collected – means the document has been submitted and approved by issuer.
o Not Required – means the document is not required for this transaction.
o Outstanding – means the document has not been submitted and approved yet.
o System Collected – means the system has some interface that provides verification that the documentation requirement has been met.
Attachment Upload
Documents that Authorized User will upload to attach to the permit
o Browse – Select a PDF file from the Browse link.
o Upload – Uploads a PDF file if required.
· Authorized User can select the PDF files from the Browse link
· To attach the selected file the Authorized User must click Upload to attach the file, if applicable
Delivery Details
The Authorized User must indicate the delivery method for the permit.
· Select the Delivery Method from the drop-down list
o Courier
§ If selected the Authorized User must enter the details of the Courier the Name, Account Number (No.) and Courier Phone Number (No.)
o Mailed
o Pick Up
§ If selected the Authorized User must select the pickup location
o Authorized Users must print annual permits, so the only Electronic Delivery Channel is print
o Authorized User can enter the appropriate comment that will be viewed on the Account Enquiry Screen by internal users only.
o The Authorized User must select the appropriate access level for the comment from the drop-down list:
§ Internal – means only internal resources are authorized to view the comment.
§ Public – means the internal and external users are authorized to view the comments.
§ Restricted – means only the defined authorized roles can view the comment.
o When the Delete Allowed is Selected the comment can be deleted by another Authorized Users
Command Line functions:
Proceed – means the system will take the user to the next logical step required for the transaction
Refresh – means the system will return the screen to the original content when the user entered the screen for the first time
Quit – means the user is finished working on this transaction for the time being and the transaction is available for completion by any authorized user at a late time using the “work in progress” feature.
Cancel – means the user has decided to discard all activity on this transaction as if they had never started it. The transaction log will show the transaction activity.
Help – means the help screen will be provided for the current screen and the user may scan the help file for assistance.
Select PROCEED to execute the edits and auto issuance criteria. If the auto issuance criteria fail, the application will be submitted to the workflow for review. Once the application has been approved by the authorized user and on “Done” click from the application approval details screen, the system will come back to the billing screen.
Select PROCEED on the Command Line; the billing information will be saved to the database and continue to the validation screen. From the billing validation screen, the authorized user can generate the invoice.
Note: Once the application has been invoiced the only way for an Authorized User to move through screens using the tabs is by selecting Cancel Bill.
Command Line functions:
Proceed – Means the system will proceed to the next logical step in processing the transaction
Add to Cart – means the system will save the invoice information to a cart for future payment along with any other items placed in the cart as a result of subsequent transaction processing
Cancel Bill – means the invoice/bill that was calculated will be cancelled and the transaction will no longer be in “Invoiced” status and will be placed in an “Open” status”
Refresh – means the system will return the screen to the original content when the user entered the screen for the first time
Quit – means the user is finished working on this transaction for the time being and the transaction is available for completion by any authorized user at a late time using the “work in progress” feature.
Invoice – Means the system display the invoice
Draft Permit – means the system will provide a Draft Permit for verification by the user. No permit number is assigned at this point.
Help - means the system will provide a help screen for the current screen and the user can view the help information and scan the help file as required.
Payment Detail Screen – see 1.4.4.6-payment, p 131
Select: Enterprise – Applications – O/O – Transaction – Amendment
When an amendment is required to an approved permit a valid permit number must be provided to the Authorized User. Only the amendments will be captured on the permit.
The Amendment transaction
flow will be same as a new transaction:
Account Search >> General >> Load and Dimensions >> Permit Conditions >> Billing >> Payment >>Credentials
When an amendment is required to an approved permit. The valid permit number is required. The permit will go to the Annual work queue. Only the amendments will be captured on the permit.
The Authorized User will have the ability to override to complete multiple amendments. All override activities will be tracked. The request for an amended permit must be submitted while the original permit is still valid. An amended permit keeps the same original permit number. An amendment fee will be charged as per the configuration.
To process a transaction, the Authorized User must enter or select at least one of the following:
Account No.
· Legal Name
· Permit/VCE No.
· Permit Year
· Permit/VCE Type from the drop-down list.
· Expiry From Date.
· Expiry To Date.
Select PROCEED to display the general screen
· A CVOR status check will be performed if an O/O account number was created with a CVOR.
·
If the Account Level status is
suspended or inactive, then a message will display as please contact the
oversize/overweight permit section.
· A CVOR status check will be performed if an O/O account number was created with a CVOR.
If the Account Level status is suspended or inactive, then a message
will display as please contact the oversize/overweight permit section. The permit
must be renewed before it expires. If renewing, a permit that was amended, the user
must process the permit as a new permit using the “COPY FROM” feature. The
authorized user can issue the identical permits. The permit
renewal will be assigned a new permit number. A Renewal fee will be charged as
per the configuration. Renewal auto issuance will be as per the configuration.
Note: If more than one permit is selected based on the criteria entered, a selection list will display.
General Screen
To get the details of the General screen please refer to Sectionrefer to Section1.4.2.1.1 or for online-authorized users click here. For amendment only the following can be changed:
· The Authorized User can select the Address and contact from the dropdown screen
· Number of Permits Required can identify how many identical permits should be renewed
· Select if a bilingual permit is required.
The verification screen displays showing the user a consolidated view of the general information. If the user determines some of the information is incorrect, they can select BACK on the Command Line and the system will display the general screen again. The user can make the required changes and select PROCEED.
Select PROCEED on the Command Line and general information will be saved to the database. The Load and Dimensions Screen will be displayed.

Load & Dimensions
To get the details of the Load And Dimension screen please refer to Section refer to Section 1.4.2.1.2 or for online-authorized users click here.
For amendment only the following can be changed:
Authorized Users must scroll down to Load Details section to Select the permit from the Authorizing the Movement table to auto populate the load details
· Add/remove piece of equipment within the given load category or change load i.e., Update weight requirements from special weights to HTA and/ or vice versa.
Select Update to save changes to the load details
Note: If Selecting Special Weights, the Axle Description must be completed, if a Ministry Issued Configuration Number (VCE) is provided the fields will auto populate.
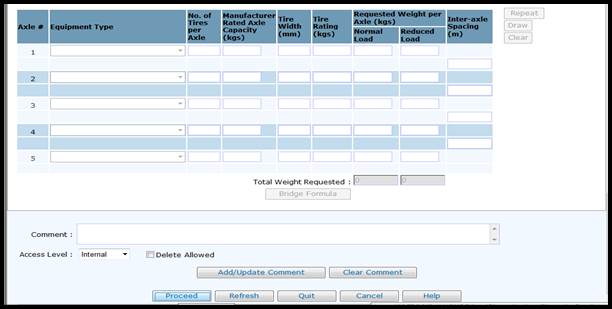
Permit Conditions
To get the details of the Permit Condition screen please refer to Sectionrefer to Section1.4.2.1.3 or for online-authorized users click here.
Current Standard and Non-Standard conditions will be populated on the permit to capture any revisions to wording that was introduced over the last year. The “Additional” conditions would be brought forward from the previous year.
The Amendment Listing displays Conditions for amendment in this field.
·
Billing
To get the details of the Permit Billing screen please refer to Sectionrefer to Section1.4.2.1.4 or for online-authorized users click here.
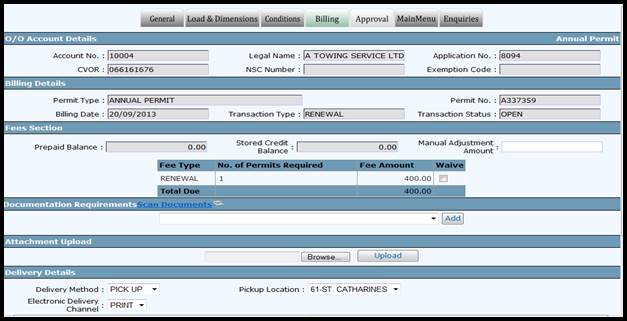
The following fields are populated from the Common Client or Account Level, or System generated, and the Authorized User cannot change them.
O/O Account Details
Account No.
Legal Name
Application No.
CVOR
NSC Number
Exemption Code
Billing Details
· Transaction Type
· Permit Number (No.) is blank, it is system generated when credentials are issued.
· Billing Date
· Transaction Type
· Transaction Status has been updated to OPEN
o
Fees Section
By default, the following are populated from the enterprise screen and cannot be changed by the user.
· Prepaid Balance
· Stored Credit Balance
· Manual Adjustment Amount – Only an Authorized User can complete adjustment based on business rules
· Fee Table displays the following application details
o Fee Type
o Number (No.) of Permits Required
o Fee Amount
o Waive – Only an Authorized User can select based on eligibility criteria
Documentation Requirements
Certain documents are required for the creation of a New Permit. If the system can check for the document automatically via a system interface, it will mark the document as being System Collected.
· If documents are required based on the permit type, the document name will be displayed in the Documentation Requirements Section drop down list
· The Authorized User must select the document name; then click the Add link and the document name will be displayed in a list just below the drop down.
· Authorized User can select the appropriate status for that document from the Status drop down list.
o Collected – means the document has been submitted and approved by issuer.
o Not Required – means the document is not required for this transaction.
o Outstanding – means the document has not been submitted and approved yet.
o System Collected - means the system has some interface that provides verification that the documentation requirement has been met.
Attachment Upload
Documents that Authorized User will upload to attach to the permit
o Browse - Select a PDF file from the Browse link.
o Upload - Uploads a PDF file if required.
· Authorized User can select the PDF files from the Browse link
· To attach the selected file the Authorized User must click Upload to attach the file, if applicable
Delivery Details
The Authorized User must indicate the delivery method for the permit.
· Select the Delivery Method from the drop-down list
o Courier
§ If selected the Authorized User must enter the details of the Courier the Name, Account Number (No.) and Courier Phone Number (No.)
o Mailed
o Pick Up
§ If selected the Authorized User must select the pickup location
o Authorized Users must print annual permits, so the only Electronic Delivery Channel is print
o Authorized User can enter the appropriate comment that will be viewed on the Account Enquiry Screen by internal users only.
o The Authorized User must select the appropriate access level for the comment from the drop-down list:
§ Internal – means only internal resources are authorized to view the comment.
§ Public – means the internal and external users are authorized to view the comments.
§ Restricted – means only the defined authorized roles can view the comment.
· When the Delete Allowed is Selected the comment can be deleted by another Authorized Users
Command Line functions:
Proceed – means the system will take the user to the next logical step required for the transaction
Refresh – means the system will return the screen to the original content when the user entered the screen for the first time
Quit – means the user is finished working on this transaction for the time being and the transaction is available for completion by any authorized user at a late time using the “work in progress” feature.
Cancel – means the user has decided to discard all activity on this transaction as if they had never started it. The transaction log will show the transaction activity.
Help – means the help screen will be provided for the current screen and the user may scan the help file for assistance.
Select PROCEED to execute the edits and auto issuance criteria. If the auto issuance criteria fail, the application will be submitted to the workflow for review. Once the application has been approved by the authorized user and on “Done” click from the application approval details screen, the system will come back to the billing screen.
Select PROCEED on the Command Line; the billing information will be saved to the database and continue to the validation screen. From the billing validation screen, the authorized user can generate the invoice.
Note: Once the application has been invoiced the only way for an Authorized User to move through screens using the tabs is by selecting Cancel Bill.
The Amendment transaction
flow will be same as a new transaction:
Account Search >> General >> Load and Dimensions >> Route >> Conditions >> Billing >> Payment >> Credentials
When an amendment is required to an approved permit. The valid permit number is required.
To amend a permit, the Authorized User must enter or select at least one of the following:
Account No.
· Legal Name
· Permit/VCE No.
· Permit Year
· Permit/VCE Type from the drop-down list.
· Expiry From Date.
· Expiry To Date.
Select PROCEED to display the general screen
· A CVOR status check will be performed if an O/O account number was created with a CVOR.
·
If the Account Level status is
suspended or inactive, then a message will display as please contact the
oversize/overweight permit section.
A CVOR status check will be performed if an O/O account number was created with a CVOR.
If the Account Level status is suspended or inactive, then a message
will display as please contact the oversize/overweight permit section. The permit
must be renewed before it expires. If renewing, a permit that was amended, the user
must process as a new permit using the “COPY FROM” feature. The authorized user
can issue the identical permits. The permit renewal will
be assigned a new permit number. A Renewal fee will be charged as per the
configuration. Renewal auto issuance will be as per the configuration.
General Screen
To get the details of the General screen please refer to Sectionrefer to Section 1.4.2.2.1 or for online-authorized users click here.
For amendment only the following can be changed:
· The Authorized User can select the Address and contact from the dropdown screen
· Number of Permits Required can identify how many identical permits should be renewed
· Select if a bilingual permit is required.
The verification screen displays showing the user a consolidated view of the general information. If the user determines some of the information is incorrect, they can select BACK on the Command Line and the system will display the general screen again. The user can make the required changes and select PROCEED.
Select PROCEED on the Command Line and general information will be saved to the database. The Load and Dimensions Screen will be displayed
Load & Dimensions
To get the details of the Load And Dimension screen please refer to Sectionrefer to Section 1.4.2.2.2 or for online-authorized users click here.
To capture the updates to the Load and Dimension details the Authorized User must selcect PROCEED
Routing
To get the details of the Routing screen please refer to Sectionrefer to Section 1.4.2.2.3 or for online-authorized users click here.
The Authorized User can update the routing details as required.
Select PROCEED to move to the Conditions screen.
Permit Conditions
To get the
details of the Permit Condition screen please refer to Sectionrefer to Section
1.4.2.2.4 or for online-authorized users click here.
During the
amendment process conditions are updated as follows:
Current Standard and Non-Standard conditions will be populated on the permit to capture any revisions to wording that was introduced over the last year. The “Additional” conditions would be brought forward from the previous year.
The Amendment Listing displays Conditions for amendment in this field.
Billing
To get the details of the Permit Billing screen please refer to Sectionrefer to Section 1.4.2.2.5 or for online-authorized users click here.
The following fields are populated from the Common Client or Account Level, or System generated, and the Authorized User cannot change them.
O/O Account Details
Account No.
Legal Name
Application No.
CVOR
NSC Number
Exemption Code
Billing Details
· Transaction Type
· Permit Number (No.) is blank, it is system generated when credentials are issued.
· Billing Date
· Transaction Type
· Transaction Status has been updated to OPEN
o
Fees Section
By default, the following are populated from the enterprise screen and cannot be changed by the user.
· Prepaid Balance
· Stored Credit Balance
· Manual Adjustment Amount – Only an Authorized User can complete adjustment based on business rules
· Fee Table displays the following application details
o Fee Type
o Number (No.) of Permits Required
o Fee Amount
o Waive – Only an Authorized User can select based on eligibility criteria
Documentation Requirements
Certain documents are required for the creation of a New Permit. If the system can check for the document automatically via a system interface, it will mark the document as being System Collected.
· If documents are required based on the permit type, the document name will be displayed in the Documentation Requirements Section drop down list
· The Authorized User must select the document name; then click the Add link and the document name will be displayed in a list just below the drop down.
· Authorized User can select the appropriate status for that document from the Status drop down list.
o Collected – means the document has been submitted and approved by issuer.
o Not Required – means the document is not required for this transaction.
o Outstanding – means the document has not been submitted and approved yet.
o System Collected - means the system has some interface that provides verification that the documentation requirement has been met.
Attachment Upload
Documents that Authorized User will upload to attach to the permit
o Browse - Select a PDF file from the Browse link.
o Upload - Uploads a PDF file if required.
· Authorized User can select the PDF files from the Browse link
· To attach the selected file the Authorized User must click Upload to attach the file, if applicable
Delivery Details
The Authorized User must indicate the delivery method for the permit.
· Select the Delivery Method from the drop-down list
o Courier
§ If selected the Authorized User must enter the details of the Courier the Name, Account Number (No.) and Courier Phone Number (No.)
o Mailed
o Pick Up
§ If selected the Authorized User must select the pickup location
o Authorized Users must print annual permits, so the only Electronic Delivery Channel is print
o Authorized User can enter the appropriate comment that will be viewed on the Account Enquiry Screen by internal users only.
o The Authorized User must select the appropriate access level for the comment from the drop-down list:
§ Internal – means only internal resources are authorized to view the comment.
§ Public – means the internal and external users are authorized to view the comments.
§ Restricted – means only the defined authorized roles can view the comment.
· When the Delete Allowed is Selected the comment can be deleted by another Authorized Users
Command Line functions:
Proceed – means the system will take the user to the next logical step required for the transaction
Refresh – means the system will return the screen to the original content when the user entered the screen for the first time
Quit – means the user is finished working on this transaction for the time being and the transaction is available for completion by any authorized user at a late time using the “work in progress” feature.
Cancel – means the user has decided to discard all activity on this transaction as if they had never started it. The transaction log will show the transaction activity.
Help – means the help screen will be provided for the current screen and the user may scan the help file for assistance.
Select PROCEED to execute the edits and auto issuance criteria. If the auto issuance criteria fail, the application will be submitted to the workflow for review. Once the application has been approved by the authorized user and on “Done” click from the application approval details screen, the system will come back to the billing screen.
Select PROCEED on the Command Line; the billing information will be saved to the database and continue to the validation screen. From the billing validation screen, the authorized user can generate the invoice.
Note: Once the application has been invoiced the only way for an Authorized User to move through screens using the tabs is by selecting Cancel Bill.
The Amendment transaction
flow will be same as a new transaction:
Account Search >> General >> Load and Dimensions >> Route >> Conditions >> Billing >> Payment >> Credentials
When an amendment is required to an approved permit. The valid permit number is required.
To amend a permit, the Authorized User must enter or select at least one of the following:
· Account No.
· Legal Name
· Permit/VCE No.
· Permit Year
· Permit/VCE Type from the drop-down list.
· Expiry From Date.
· Expiry To Date.
Select PROCEED to display the general screen
· A CVOR status check will be performed if an O/O account number was created with a CVOR.
·
If the Account Level status is
suspended or inactive, then a message will display as please contact the
oversize/overweight permit section.
General Screen
To get the details of the General screen please refer to Sectionrefer to Section 1.4.2.3.1 or for online-authorized users click here.
For amendment only the following can be changed:
· The Authorized User can select the Address and contact from the dropdown screen
· Number of Permits Required can identify how many identical permits should be renewed
· Select if a bilingual permit is required.
The verification screen displays showing the user a consolidated view of the general information. If the user determines some of the information is incorrect, they can select BACK on the Command Line and the system will display the general screen again. The user can make the required changes and select PROCEED.
Select PROCEED on the Command Line and general information will be saved to the database. The Load and Dimensions Screen will be displayed
Load & Dimensions
To get the details of the Load And Dimension screen please refer to Sectionrefer to Section 1.4.2.3.2 or for online-authorized users click here.
To amend the Loads and Dimensions details the Authorized User must click on hyperlink in the Authorizing the Movement of table.
The Load Details Information will be populated for the Authorized User to amend.
When updates are complete the Authorzied User must select Update to record changes to the dimensions.
Routing
To get the details of the Routing screen please refer to Sectionrefer to Section 1.4.2.3.3 or for online-authorized users click here.
The Authorized User can update the routing details as required.
Select PROCEED to move to the Conditions screen.
Permit Conditions
To get the details of the Permit Condition screen please refer to Sectionrefer to Section 1.4.2.3.4 or for online-authorized users click here.
Current Standard and Non-Standard conditions will be populated on the permit to capture any revisions to wording that was introduced over the last year. The “Additional” conditions would be brought forward from the previous year.
The Amendment Listing displays Conditions for amendment in this field.
Billing
To get the details of the Permit Billing screen please refer to Sectionrefer to Section 1.4.2.3.5 or for online-authorized users click here.
The following fields are populated from the Common Client or Account Level, or System generated, and the Authorized User cannot change them.
O/O Account Details
Account No.
Legal Name
Application No.
CVOR
NSC Number
Exemption Code
Billing Details
· Transaction Type
· Permit Number (No.) is blank, it is system generated when credentials are issued.
· Billing Date
· Transaction Type
· Transaction Status has been updated to OPEN
o
Fees Section
By default, the following are populated from the enterprise screen and cannot be changed by the user.
· Prepaid Balance
· Stored Credit Balance
· Manual Adjustment Amount – Only an Authorized User can complete adjustment based on business rules
· Fee Table displays the following application details
o Fee Type
o Number (No.) of Permits Required
o Fee Amount
o Waive – Only an Authorized User can select based on eligibility criteria
Documentation Requirements
Certain documents are required for the creation of a New Permit. If the system can check for the document automatically via a system interface, it will mark the document as being System Collected.
· If documents are required based on the permit type, the document name will be displayed in the Documentation Requirements Section drop down list
· The Authorized User must select the document name; then click the Add link and the document name will be displayed in a list just below the drop down.
· Authorized User can select the appropriate status for that document from the Status drop down list.
o Collected – means the document has been submitted and approved by issuer.
o Not Required – means the document is not required for this transaction.
o Outstanding – means the document has not been submitted and approved yet.
o System Collected - means the system has some interface that provides verification that the documentation requirement has been met.
Attachment Upload
Documents that Authorized User will upload to attach to the permit
o Browse - Select a PDF file from the Browse link.
o Upload - Uploads a PDF file if required.
· Authorized User can select the PDF files from the Browse link
· To attach the selected file the Authorized User must click Upload to attach the file, if applicable
Delivery Details
The Authorized User must indicate the delivery method for the permit.
· Select the Delivery Method from the drop-down list
o Courier
§ If selected the Authorized User must enter the details of the Courier the Name, Account Number (No.) and Courier Phone Number (No.)
o Mailed
o Pick Up
§ If selected the Authorized User must select the pickup location
o Authorized Users must print annual permits, so the only Electronic Delivery Channel is print
o Authorized User can enter the appropriate comment that will be viewed on the Account Enquiry Screen by internal users only.
o The Authorized User must select the appropriate access level for the comment from the drop-down list:
§ Internal – means only internal resources are authorized to view the comment.
§ Public – means the internal and external users are authorized to view the comments.
§ Restricted – means only the defined authorized roles can view the comment.
· When the Delete Allowed is Selected the comment can be deleted by another Authorized Users
Command Line functions:
Proceed – means the system will take the user to the next logical step required for the transaction
Refresh – means the system will return the screen to the original content when the user entered the screen for the first time
Quit – means the user is finished working on this transaction for the time being and the transaction is available for completion by any authorized user at a late time using the “work in progress” feature.
Cancel – means the user has decided to discard all activity on this transaction as if they had never started it. The transaction log will show the transaction activity.
Help – means the help screen will be provided for the current screen and the user may scan the help file for assistance.
Select PROCEED to execute the edits and auto issuance criteria. If the auto issuance criteria fail, the application will be submitted to the workflow for review. Once the application has been approved by the authorized user and on “Done” click from the application approval details screen, the system will come back to the billing screen.
Select PROCEED on the Command Line; the billing information will be saved to the database and continue to the validation screen. From the billing validation screen, the authorized user can generate the invoice.
Note: Once the application has been invoiced the only way for an Authorized User to move through screens using the tabs is by selecting Cancel Bill.
The Amendment transaction
flow will be same as a new transaction:
Account Search >> General >> SVC >> Conditions >> Billing >> Payment >> Credentials
When an amendment is required to an approved permit. The valid permit number is required. Some changes may cause permit to go into workflow for approval
To amend an SVC, the Authorized User must enter or select at least one of the following:
· Account No.
· Legal Name
· Permit/VCE No.
· Permit Year
· Permit/VCE Type from the drop-down list.
· Expiry From Date.
· Expiry To Date.
· Select PROCEED to display the general screen.
A CVOR status check will be performed if an O/O account number was created with a CVOR.
If the Account Level status
is suspended or inactive, then a message will display as please contact the
oversize/overweight permit section. The permit must be renewed before it
expires. If renewing, and the permit was amended, the user has to do a new
permit with copy from. The authorized user can issue the identical permits. The permit renewal will be assigned a new permit number. A Renewal
fee will be charged as per the configuration. Renewal auto issuance will be as
per the configuration.
Based on the “Permit Type”, PRIO will determine the renewal process flow.
General Screen
To get the
details of the General screen please refer to Section 1.4.2.4.4.1 or for
online-authorized users click here.
To get the details of the General screen please refer to Section1.4.2.1.1 or for online-authorized users click here. For amendment only the following can be changed:
· The Authorized User can select the Address and contact from the dropdown screen
· Number of Permits Required can identify how many identical permits should be renewed
· Select if a bilingual permit is required.
The verification screen displays showing the user a consolidated view of the general information. If the user determines some of the information is incorrect, they can select BACK on the Command Line and the system will display the general screen again. The user can make the required changes and select PROCEED.
Select PROCEED on the Command Line and general information will be saved to the database. The SVC Screen will be displayed.
SVC
To get the details of the SVC screen please refer to Section 1.4.2.4.4.2 or for online-authorized users click here.
The following fields are populated from the Common Client or Account Level, or System generated, and the Authorized User cannot change them.
O/O Account Details
Account No.
Legal Name
Application No.
CVOR
NSC Number
Exemption Code
Permit Details
The following fields are populated from the Common Client or Account Level, or System generated, and the Authorized User cannot change them.
· Transaction Type
· Permit Number (No.) is blank, it is system generated when credentials are issued.
SVC
The Authorized User can amend the dimensions and destination information being requested for the permit(s) and there are a few mandatory fields indicated by a red asterisk (*)
Comment – Enter the appropriate comment. These comments are displayed on the SVC enquiry screen to internal users only.
Access Level – Select the appropriate access level for the comment from the dropdown list:
§ Internal – means only internal resources are authorized to view the comment.
§ Public – means the internal and external users are authorized to view the comments.
§ Restricted – means only the defined authorized roles can view the comment.
Delete Allowed – Click this box if the authorized user wants to be able to delete this comment.
Select PROCEED to execute the edits and display the verification screen.
The verification screen displays showing the user a consolidated view of the SVC information. If the user determines some of the information is incorrect, they can select BACK on the Command
Line and the system will display the SVC screen again. The user can make the required changes and select PROCEED.
Select PROCEED on the Command Line and the SVC information is saved to the database. The conditions screen will display.
Command Line functions:
Proceed – means the system will take the user to the next logical step required for the transaction
Refresh – means the system will return the screen to the original content when the user entered the screen for the first time
Quit – means the user is finished working on this transaction for the time being and the transaction is available for completion by any authorized user at a late time using the “work in progress” feature.
Cancel – means the user has decided to discard all activity on this transaction as if they had never started it. The transaction log will show the transaction activity.
Help – means the help screen will be provided for the current screen and the user may scan the help file for assistance.
To return to an alternate screen while processing a transaction the user can select the appropriate tab along the top of the current screen and the system will asynchronously display the corresponding screen for processing by the user. After fijnishing rfeviewing and/or making changes to the screen the user can select the “Proceed” button to return to the screen they came from General.
Select PROCEED to execute the edits and display the verification screen.
The verification screen displays showing the user a consolidated view of the SVC information. If the user determines some of the information is incorrect, they can select BACK on the Command Line and the system will display the SVC screen again. The user can make the required changes and select PROCEED.
Select PROCEED on the Command Line and the SVC information saved to the database. Display conditions screen.
Permit Conditions
To get the details of the Permit Condition screen please refer to Section 1.4.2.4.4.3 or for online-authorized users click here.
Current Standard and Non-Standard conditions will be populated on the permit to capture any revisions to wording that was introduced over the last year. The “Additional” conditions would be brought forward from the previous year.
The Amendment Listing displays Conditions for amendment in this field.
Billing
· Amendment only prints the difference on the permit
To get the details of the Permit Billing screen please refer to Section 1.4.2.4.4.4 or for online-authorized users click here.
The following fields are populated from the Common Client or Account Level, or System generated, and the Authorized User cannot change them.
O/O Account Details
Account No.
Legal Name
Application No.
CVOR
NSC Number
Exemption Code
Billing Details
· Transaction Type
· Permit Number (No.) is blank, it is system generated when credentials are issued.
· Billing Date
· Transaction Type
· Transaction Status has been updated to OPEN
o
Fees Section
By default, the following are populated from the enterprise screen and cannot be changed by the user.
· Prepaid Balance
· Stored Credit Balance
· Manual Adjustment Amount – Only an Authorized User can complete adjustment based on business rules
· Fee Table displays the following application details
o Fee Type
o Number (No.) of Permits Required
o Fee Amount
o Waive – Only an Authorized User can select based on eligibility criteria
Documentation Requirements
Certain documents are required for the creation of a New Permit. If the system can check for the document automatically via a system interface, it will mark the document as being System Collected.
· If documents are required based on the permit type, the document name will be displayed in the Documentation Requirements Section drop down list
· The Authorized User must select the document name; then click the Add link and the document name will be displayed in a list just below the drop down.
· Authorized User can select the appropriate status for that document from the Status drop down list.
o Collected – means the document has been submitted and approved by issuer.
o Not Required – means the document is not required for this transaction.
o Outstanding – means the document has not been submitted and approved yet.
o System Collected – means the system has some interface that provides verification that the documentation requirement has been met.
Attachment Upload
Documents that Authorized User will upload to attach to the permit
o Browse - Select a PDF file from the Browse link.
o Upload - Uploads a PDF file if required.
· Authorized User can select the PDF files from the Browse link
· To attach the selected file the Authorized User must click Upload to attach the file, if applicable
Delivery Details
The Authorized User must indicate the delivery method for the permit.
· Select the Delivery Method from the drop-down list
o Courier
§ If selected the Authorized User must enter the details of the Courier the Name, Account Number (No.) and Courier Phone Number (No.)
o Mailed
o Pick Up
§ If selected the Authorized User must select the pickup location
o Authorized Users must print annual permits, so the only Electronic Delivery Channel is print
o Authorized User can enter the appropriate comment that will be viewed on the Account Enquiry Screen by internal users only.
o The Authorized User must select the appropriate access level for the comment from the drop-down list:
§ Internal – means only internal resources are authorized to view the comment.
§ Public – means the internal and external users are authorized to view the comments.
§ Restricted – means only the defined authorized roles can view the comment.
· When the Delete Allowed is Selected the comment can be deleted by another Authorized Users
Command Line functions:
Proceed – means the system will take the user to the next logical step required for the transaction
Refresh – means the system will return the screen to the original content when the user entered the screen for the first time
Quit – means the user is finished working on this transaction for the time being and the transaction is available for completion by any authorized user at a late time using the “work in progress” feature.
Cancel – means the user has decided to discard all activity on this transaction as if they had never started it. The transaction log will show the transaction activity.
Help – means the help screen will be provided for the current screen and the user may scan the help file for assistance.
Select PROCEED to execute the edits and auto issuance criteria. If the auto issuance criteria fail, the application will be submitted to the workflow for review. Once the application has been approved by the authorized user and on “Done” click from the application approval details screen, the system will come back to the billing screen.
Select PROCEED on the Command Line; the billing information will be saved to the database and continue to the validation screen. From the billing validation screen, the authorized user can generate the invoice.
Note: Once the application has been invoiced the only way for an Authorized User to move through screens using the tabs is by selecting Cancel Bill.
Select: Enterprise – Applications – O/O - Transaction – Replacement
Replacement transaction flow will be same as new.
Account Search >> General >> Load and Dimensions >> Route >> Conditions >> Billing >> Payment >> Credentials
The replacement permit will be assigned a new permit number.
If replacement is requested the previous permit must be deactivated and the date stipulated on the replacement permit will be based on the new issue (request date) date up to the initial expiry date stipulated on the previous permit.
A replacement fee will be charged as per the configuration.
The Authorized User can process a renewal transaction by performing the following steps:
The Authorized User must enter the Account No. or Legal Name in the corresponding field.
When PROCEED is selected on the Command Line at the bottom of the screen.
To process a replacement transaction, the Authorized User must enter or select at least one of the following:
· Account No.
· Legal Name
· Permit/VCE No.
· Permit Year
· Permit/VCE Type from the drop-down list.
· Expiry From Date.
· Expiry To Date.
· Select PROCEED to display the general screen.
A CVOR status check will be performed if the O/O account number was created with a CVOR
If the Account Level status is suspended or inactive, then a message will display as please contact the oversize/overweight permit section.
Authorized User must Select Proceed to move through all the screens as no updates or changes can be made to the permit.
Billing Screen/ Application Approval/ Cart Payment – Payment Details
Note: If there is a stored credit – payment is set to stored credit by default (can be changed) – eceipt indicates stored credit if used as payment
Enterprise – Applications – O/O – Transaction – Upload Used Towing Certificates
External Authorized Users can enter the following:
· Account Number
· Annual Permit Number
· Certificate No.
· Internal Authorized Users
To upload used tow truck certificate, perform the following steps:
· The Authorized User must enter at least one of the following:
· Account No.
· Certificate No.
· Application No.
· Select PROCEED to display upload used tow truck certificate details screen.

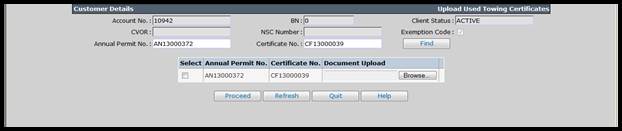
From the upload used towing certificates details screen, the user can find certificates by providing Annual Permit No. or Certificate No.
Select Browse to search for file to Upload to PRIO
The authorized user can upload the certificate and select PROCEED. The system will mark the certificate status as Request to Deactivate.
To upload used single trip batch certificate, perform the following steps:
The Authorized User must enter at least one of the following:
· Account No.
· Certificate No.
· Application No.
· Select PROCEED to display upload used Single Trip Batch Certificate details screen.

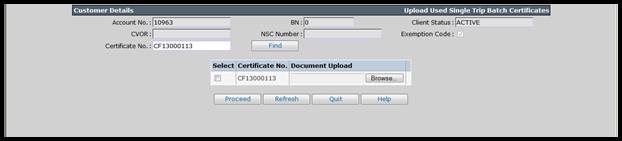
From the Upload Used Single Trip Batch Certificates details screen, the user can find certificates by providing the Certificate No.
Select Browse to search for file for upload to PRIO.
The Authorized User can upload the certificate and select PROCEED. The system will mark the certificate status as Request to Deactivate.
Select: Enterprise – Applications – O/O – Transaction – Hold
A valid permit can be placed on Hold with a valid reason by only Authorized Users. To re-activate the permit an Amendment must be completed.
The Authorized User must perform the following steps to place a permit on Hold.
On the account search screen enter at least one of the following parameters or select from the dropdown list:
· Account No.
· Legal Name
· Permit/VCE No.
· Permit Year
· Select the Permit/VCE Type from the drop-down list.
· Expiry From Date.
· Expiry To Date.
· Select PROCEED to display billing screen.
A CVOR status check will be performed if the O/O account number was created with a CVOR.
If the Account Level status is suspended or inactive, then a message will display to please contact the oversize/overweight permit section.
The Authorized User must ADD a Comment to process application.
A Hold fee may be charged as per the configuration for the permit type.
Select: Enterprise – Applications – O/O – Transactions – Cancellation
The Authorized User can cancel a permit upon request from a Carrier.
To process a cancellation transaction, the Authorized User must follow these steps:
· Account No.
· Legal Name
· Permit/VCE No.
· Permit Year
· Select the Permit/VCE Type from the drop-down list.
· Expiry From Date.
· Expiry To Date.
· Select PROCEED to display the billing screen.

CVOR status check will be performed if the O/O account number was created with a CVOR
If the Account Level status is suspended or inactive, then a message will display as please contact the oversize/overweight permit section.
Select the Permit to proceed
Fees Section – Authorized User can complete Manual Adjustment Amount, if applicable
Documentation Requirements – Required documents listed must be collected and the status updated to complete transaction.
· Comment – Enter the appropriate comment. These comments are displayed on the Account Enquiry Screen to internal users only.
§ Access Level – Select the appropriate access level for the comment from the dropdown list:
§ Internal – means only internal resources are authorized to view the comment.
§ Public – means the internal and external users are authorized to view the comments.
§ Restricted – means only the defined authorized roles can view the comment.
§ Delete Allowed – Click this box if the authorized user wants to be able to delete this comment.
§ Select PROCEED to complete cancellation process.
Select: Services – O/O – Transaction – Bulk Amendment
The system provides the user the ability
to perform bulk amendment on identical permits, providing flexibility to select
the identical permit for performing amendment on selected permits. Perform the
following steps for bulk amendment.
· Click TRANSACTION tab and select BULK AMENDMENT to display the bulk amendment search screen.

· To process bulk amendment, the Authorized User must enter the following search parameters:
o Account No.
o Legal Name
o Permit/VCE No.
o Permit Year
o Permit/VCE Type
o Expiry From Date
o Expiry To Date
o Application No.
· Click PROCEED to view the search result in the grid below.

· Click Select link in the first column for the preferred record in the grid to open the permit screen.

· Select one or more checkboxes against the Permit in the Permit Selection section and click PROCEED to continue with bulk amendment procedure.
· The system will display the respected screen for amendment. Perform the edits on all selected permits and complete the procedure for Bulk Amendment.
Select: Services – O/O – Transaction – Bulk Hold
The system provides the user the ability
to perform bulk hold transactions on identical permits, providing flexibility
to select the identical permit for performing bulk hold on selected permits.
Perform the following steps for bulk hold transaction:
· Click TRANSACTION tab and select BULK HOLD to display the bulk hold search screen.

· To process for bulk hold, the Authorized User must enter the following search parameters:
o Account No.
o Legal Name
o Permit/VCE No.
o Permit Year
o Permit/VCE Type
o Expiry From Date
o Expiry To Date
o Application No.
· Click PROCEED to view the search result in the grid below.

· Click Select link in the first column for the preferred record in the grid to open the permit screen.

· Select one or more checkboxes against the Permit in the Permit Selection section and click PROCEED to continue with the hold procedure.
Select: Enterprise – Applications – O/O – Transaction Enquiry
The system will provide the user with the capability to perform enquiries on all of the O/O related information using the tree structure. All of the enquiries are available on the Enquiry Tab on the O/O Main Menu. Transaction enquiry is also available in Transaction.
· Click on the TRANSACTION tab and then select TRANSACTION ENQUIRY. It will display the transaction enquiry search screen pop up window.
· Each level with a “+” can be expanded or collapsed if a “- “is displayed in tree structure.
A permit/VCE enquiry can be initiated by an Authorized User using one or more of the following search parameters.
· Account Number (No.)
· CVOR
· NSC Number
· Legal Name
· Permit/VCE Type
· Application Number (No.)
· Application Status
· Issued Location
· Permit/VCS Number (No.)
· Permit/VCS Status
· Permit Year
· From Permit Travel Date
· To Permit Travel Date
· Issued from Date
· Issued to Date

· The Authorized User can view a summary of the billing screen by selecting View.
· To view a detailed history of the account the Authorized User must Select link on the left.
Note: A tree structure is populated that allows Authorized Users to expand information by selecting “+” or collapse information by selecting “- “.
· Authorized User must Select BACK to return to the permit/VCE enquiry search page or select CLOSE to exit the permit/VCE enquiry function.

The system will provide the user with the capability to perform enquiries on all the O/O related information using the tree structure. All the enquiries are available on the Enquiry Tab on the O/O Main Menu.
· Click on the Enquiry tab and then select any enquiries. A pop-up window screen will be displayed based on an enquiry.
· Each level with a “+” can be expanded or collapsed if a “- “is displayed in the tree structure.
Perform the following steps to generate an enquiry related to a specific account, vehicle configuration evaluation or Permit.
· From the O/O menu, select one of the following from the ENQUIRY tab.
o Account
o Application
o Permit / VCE
o Transaction
o Restriction
Select: Enterprise – Applications – O/O – Enquiry – Account
A permit/VCE enquiry can be initiated by an Authorized User using one or more of the following search parameters.
· Account Number (No.)
· CVOR
· NSC Number
· Legal Name
· O/O Account Status
o Active
o Inactive
o Suspended

· The Authorized User can view a general summary by selecting View.
· To view a detailed history of the account the Authorized User must Select link on the left.
Note: A tree structure is populated that allows Authorized Users to expand information by selecting “+” or collapse information by selecting “- “.
· Authorized User must Select BACK to return to the permit/VCE enquiry search page or select CLOSE to exit the permit/VCE enquiry function.

Select: Enterprise – Application – O/O – Enquiry – Application Enquiry
A permit/VCE enquiry can be initiated by an Authorized User using one or more of the following search parameters.
· Account Number (No.)
· CVOR
· NSC Number
· Legal Name
· Permit/VCE Type
· Application Number (No.)
· Application Status
· Issued Location
· Permit/VCS Number (No.)
· Permit/VCS Status
· Permit Year
· From Permit Travel Date
· To Permit Travel Date
· Issued from Date
· Issued to Date

· The Authorized User can view a general summary by selecting View.
· To view a detailed history of the account the Authorized User must Select link on the left.
Note: A tree structure is populated that allows Authorized Users to expand information by selecting “+” or collapse information by selecting “- “.
· Authorized User must Select BACK to return to the permit/VCE enquiry search page or select CLOSE to exit the permit/VCE enquiry function.

Select: Enterprise – Applications – O/O – Enquiry – Permit/VCE Enquiry
A permit/VCE enquiry can be initiated by an Authorized User using one or more of the following search parameters.
· Account Number (No.)
· CVOR
· NSC Number
· Legal Name
· Permit/VCE Type
· Application No.
· Application Status
· Issued Location
· Permit/VCS No.
· Permit/VCS Status
· Permit Year
· From Permit Travel Date
· To Permit Travel Date
· Issued from Date
· Issued to Date

· The Authorized User can view a general summary by selecting View.
· To view a detailed history of the account the Authorized User must Select link on the left.
Note: A tree structure is populated that allows Authorized Users to expand information by selecting “+” or collapse information by selecting “- “.
· Authorized User must Select BACK to return to the permit/VCE enquiry search page or select CLOSE to exit the permit/VCE enquiry function.

Select: Enterprise – Applications – O/O – WIP – Resume Application
The Authorized User can continue to process a transaction if they quit in the middle of a transaction without losing the information processed to that point.
· Authorized User must enter one or more of the following search parameters and then select Proceed to populate a list of transactions.
o Account No.
o Permit/VCE Type
o Permit Year
o Permit No.
o Application No.
o Legal Name

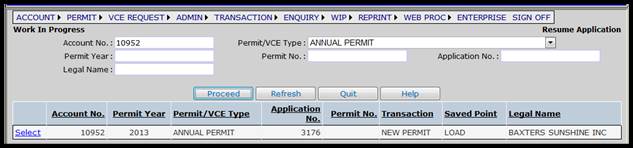
· To continue working on the application the Authorized User must Select link on the left of the account to continue processing the transaction.
· The system will return to the place in the application where you last saved the application.
Navigation:
Select: Services – O/O – WIP – Permit Queue
Based on the business rules, certain applications must be reviewed by internal users. The applications that require review will be submitted to a designated queue that will be accessed by internal users for evaluation. Internal Users will be able to assess the application to take the appropriate action including the acquisition of approvals from various working groups.
Perform the following for Work In progress – Permit Queue:
· From the O/O screen, click PERMIT QUEUE under WIP menu.

· On the Permit Queue screen, enter one (at least) or more of the following search parameters to display a list of application in a grid:
o Account Number (No.)
o CVOR
o NSC Number
o Legal Name
o Operating As
o Application Number
o Application Submission From and To Date – Select the date using the date picker or enter manually.
o Permit/VCE Number
o Permit Travel From and To Date – Select the date using the date picker or enter manually.
o Submitted By
o User Type – Select the user type from the drop-down values:
§ External
§ Internal
§ Both
o Service Location – Select the location available from the drop-down value.
o Application Status – This is a multi-select box allowing multiple selection. Select the status of the application from the list available by scrolling.
o Permit/VCE Type – This is a multi-select box allowing multiple selection. Select the type of Permit/VCE from the list available by scrolling.
o Assigned To Group – This is a multi-select box allowing multiple selection. Select the group available in the list by scrolling down whom you wish to assign to.
o Assigned To User - This is a multi-select box allowing multiple selection.
o Queue Priority – This is a multi-select box allowing multiple selection. Select the queue priority status from the list available by scrolling.
o Queue Type – This is a multi-select box allowing multiple selection. Select the queue type from the list available by scrolling.
o Flag – This is a multi-select box allowing multiple selection. Select the flag type from the list available by scrolling.
o Show Awaiting Approvals checkbox – Select the checkbox to view the list of application(s) waiting for approval.
· Click PROCEED to view the search result in the grid below.

· Auto refresh is available where you can select the time interval for screen refresh, to reflect latest updates.
· Paging is available on the screen. If more than one page of results is found, the buttons at the top of the list allow you to navigate by clicking First Page, Previous Page, Next Page, or Last Page links.
· You can perform the following in the grid listed below:
o Reassign
o To re-assign an applicant, select the check box in the first column from the grid and click RE-ASSIGN above to open a dialog box.

§ Perform the following to Re-Assign Permit Application:
· Assigned To Group – Select the workgroup listed in the drop-down.
· Assigned To User – Select the assigned user listed in the drop-down.
· Click SAVE to save the changes or click CANCEL to return to the Permit queue screen.
·
Click
EXPORT from the command line to download and view the entered search criteria
in Excel format.

·
Click the ‘+’ icon beside the
Notes / Issues column to open a dialog box to Add/Update a note for an
applicant in the grid.

· Click the WORK link to the right of the grid to display Application Approval screen.
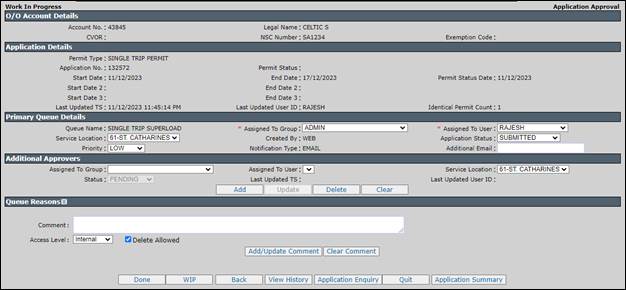
· On the Application Approval screen, perform the following:
o O/O Account Details
§ The details are pre-populated and cannot be changed.
o Application Details
§ The details are pre-populated and cannot be changed.
o Primary Queue Details – Enter the following:
§ Assigned To Group – Select the appropriate group to assign from the drop-down list.
§ Assigned To User – Select appropriate user to assign from the drop-down list.
§ Service Location
§ Application Status – Select the status for the application available from the drop-down list.
§ Priority – Select the priority as Low, Medium, and High available from the drop-down list.
§ Additional Email
o Additional Approvers
§ Assigned To Group – Select additional group whom you want to assign to from the drop-down list.
§ Assigned to User – The user list will populate on selecting Assigned to Group.
§ Service Location
o Queue Reasons
§ Comments – Enter free-form of comments in the text area.
§ Access Level – Select the appropriate access level for the comment from the drop-down list:
· Internal – All internal users can view the comment.
· Public – Anyone using the system can view the comment.
· Restricted – Only the user who entered the comment is authorized to view it.
§ Delete Allowed – Select this checkbox if you want to allow deleting the comment in the future.
§ Click ADD/UPDATE COMMENT to save the entered comments or click CLEAR COMMENT to remove them.
o Click DONE from the command line to save the changes and return to Permit Queue screen.
o Click WIP from the command line to resume to the screen at the point where the last logical piece of work was left. It retains all the information entered at the time of processing for the first time.
o Click VIEW HISTORY form the command line to view Permit Queue Approval History details.
o Click APPLICATION ENQUIRY from the command line to open Application Enquiry screen on a separate window.
o Click QUIT form the command line to quit the current process and go back to home page.
o Click APPLICATION SUMMARY from the command screen to view the summary of the selected account in a separate window.
o Click BACK from the command line to go back to the previous screen.
o Note:
§ Primary assigned group can re-assign the application to other groups at the same or different location. Primary assigned group can also assign the application to additional approver(s) as required.
§ Primary assigned group, who will approve the application once they get approval(s) from the other groups (as required). Whenever there is any status change by any of the approvers, the system will send an email notification to the primary assigned group.
§ Authorized users will be able to edit the application after submission.
§ Final approval is done from the primary queue details section on the application approval screen.

· Click WIP link to the right of the grid to resume to the screen at the point where the last logical piece of work was left off.
· The WIP screen retains all the information entered at the time of processing for the first time.
Reprint functionality will be used to get an additional copy after printing the original copy. The user needs to make sure the conditions are precisely the same as the original permit. Copies of the permit/VCE will be preserved within the system for subsequent retrieval. If an internal user would like to re-generate a permit/VCE previously issued, reprint is used.
The system provides the ability to reprint the following.
o Renewal Notice
o Shipping Document
o Permit/VCE

Select: Enterprise – Applications – O/O – Reprint – Renewal Notice
Authorized Users can reprint the renewal notices for Annual permits, Project permits and some Special Vehicle Configuration (SVC) permits. Renewal notices will be reprinted in either English or French, not bilingual. It is based on the carriers’ account language preference selection.
The Authorized User must complete the following steps to reprint the renewal notice.
· Authorized User must select Reprint and then select Renewal Notice. The reprint search screen will be displayed.
· Entering one or more of the following search parameters initiates the process.
o
Account
Number (No.)
o
Legal
Name
o
Permit/VCE
Number (No.)
o
Permit
Year
o
Selec
the Permit/VCE Type from a drop down list
§ Annual Permit
§ Disabled Vehicle Supplemental Towing
Certificate
§ Single Trip Batch Permit
§ Project Permit
§ Single Trip PErmit
§ Generic SVC
§ Hamilton Steel SVC
§ Nolta SVC
§ Bus Mounted Bike Racks SVC
§ Long Combination Vehicle SVC
§ Car Carriers SVC
§ Public Vehicle SVC
§ Tire Pressure Control System SVC
§ GO Double Decker Bus SVC
§ Extended Permitting Dump Semi-Trailers SVC
§ Conventional VCE Application
§ Mobile Crane VCE Application
§ Road Building Machine VCE Application
Note:
An error message will be posted if the Authorized User selects a permit that is
not eligible for renewal.
· Authorized User must select the Electronic Delivery Channel from the drop down list only if the permit is not being printed on secure paper.
·
PDF - PDF
will display in PDF file.
·
EMAIL –Email will display the email address on the account and allow the
authorized user to change the email address.
·
Fax -
Fax will display the fax number of the account and allow the authorized user to change the fax
number.
·
Select
one of the options from the command line to proceed.
o
Search
– means search the system with the given
criteria
o
Generate
– Generate the report
o
Refresh
– means he system will return the screen to the original content when the user
entered the screen for the first time
o
Quit –
means the user is finished working on this transaction for the time being and
the transaction is available for completion by any authorized user at a late
time using the “work in progress” feature.
o
Help –
means the help screen will be provided for the current screen and the user may
scan the help file for assistance.

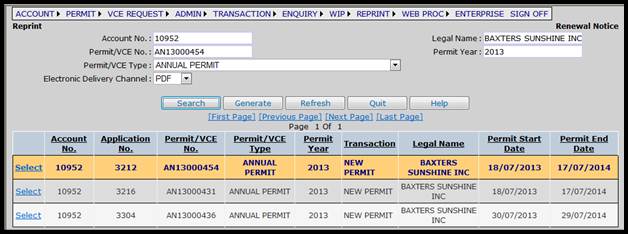
· A list of eligible permits will be displayed.
· Select the appropriate record on the left in the table displayed.
· To print the Renewal, Notice the Authorized User must select Generate from the command line.
.
Select: Enterprise – Applications – O/O – Reprint – Shipping Document
Authorized Users can reprint shipping documents.
· Authorized User must select Reprint and then select Shipping Document. The reprint search screen will be displayed.
· Entering one or more of the following search parameters initiates the process.
o
Account
Number (No.)
o
Legal
Name
o
Permit/VCE
Number (No.)
o
Permit
Year
o
Select
Permit/VCE Type from a drop down list
§ Annual Permit
§ Disabled Vehicle Supplemental Towing
Certificate
§ Single Trip Batch Permit
§ Project Permit
§ Single Trip PErmit
§ Generic SVC
§ Hamilton Steel SVC
§ Nolta SVC
§ Bus Mounted Bike Racks SVC
§ Long Combination Vehicle SVC
§ Car Carriers SVC
§ Public Vehicle SVC
§ Tire Pressure Control System SVC
§ GO Double Decker Bus SVC
§ Extended Permitting Dump Semi-Trailers SVC
§ Conventional VCE Application
§ Mobile Crane VCE Application
§ Road Building Machine VCE Application
· Authorized User must select the Electronic Delivery Channel from the drop down list only if the permit is not being printed on secure paper.
·
PDF - PDF
will display in PDF file.
·
EMAIL –Email will display the email address on the account and allow the
authorized user to change the email address.
·
Fax -
Fax will display the fax number of the account and allow the authorized user to change the fax
number.
·
Select
one of the options from the command line to proceed.
o
Search
– means search the system with the given
criteria
o
Generate
– Generate the report
o
Refresh
– means he system will return the screen to the original content when the user
entered the screen for the first time
o
Quit –
means the user is finished working on this transaction for the time being and
the transaction is available for completion by any authorized user at a late
time using the “work in progress” feature.
o
Help –
means the help screen will be provided for the current screen and the user may
scan the help file for assistance.

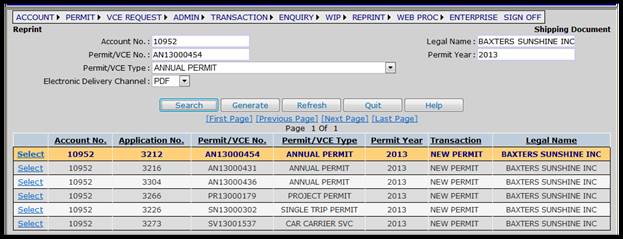
· A list of permit/VCE will be displayed.
· Select the appropriate record on the left in the table displayed.
· To print the Shipping Document the Authorized User must select Generate from the command line.
Select: Enterprise – Applications – O/O – Reprint – Permit/VCE
The Authorized User can reprint a permit or VCE by following the steps below.
· Authorized User must select Reprint and then select Permit/VCE. The reprint search screen will be displayed.
· Entering one or more of the following search parameters initiates the process.
o
Account
Number (No.)
o
Legal
Name
o
Permit/VCE
Number (No.)
o
Permit
Year
o
Select
Permit/VCE Type from a drop down list
§ Annual Permit
§ Disabled Vehicle Supplemental Towing Certificate
§ Single Trip Batch Permit
§ Project Permit
§ Single Trip PErmit
§ Generic SVC
§ Hamilton Steel SVC
§ Nolta SVC
§ Bus Mounted Bike Racks SVC
§ Long Combination Vehicle SVC
§ Car Carriers SVC
§ Public Vehicle SVC
§ Tire Pressure Control System SVC
§ GO Double Decker Bus SVC
§ Extended Permitting Dump Semi-Trailers SVC
§ Conventional VCE Application
§ Mobile Crane VCE Application
§ Road Building Machine VCE Application
· Authorized User must select the Electronic Delivery Channel from the drop down list only if the permit is not being printed on secure paper.
§ PDF - PDF will display in PDF file.
§ EMAIL –Email will
display the email address on the account and allow the authorized user to
change the email address.
§ Fax - Fax will display the fax number of
the account and allow the authorized user to change the fax number.
o
The
Authorized User must check the box if an original permit is required
Note: If Original is not select the permit
will be printed on plain paper with “COPY” text in the footer.
·
Select
one of the options from the command line to proceed.
o
Search – means search the
system with the given criteria.
o
Generate – Generate the report.
o Refresh – means the system will return the screen to the original content when the user entered the screen for the first time.
o Quit – means the user is finished working on this transaction for the time being and the transaction is available for completion by any authorized user at a late time using the “work in progress” feature.
o Help – means the help screen will be provided for the current screen and the user may scan the help file for assistance.

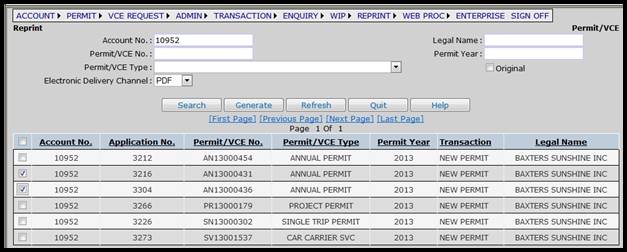
· A list of issued permit/VCE will be displayed.
· Select Account Number (No.) by checking the box to the left of the Account Number (No.)
· To print the permit the Authorized User must select Generate from the command line.
Select: Enterprise – Applications – O/O – WEB PROC
The system will provide the ability to interact with carriers and service providers through the Web. Authorized carriers will be able to access the system and perform transactions through the web. After the application process is completed and the web user has reached the billing screen, the application will be submitted to the web processing queue. The external user will be restricted to only having access to their account. The account number will be protected on all the screens and the user has no access to this field.
Note: External screens may appear different because the external user does not have access to all the fields. The external has the same flow on any permit type.
For Service Providers, the Carrier must authorize a Service Provider to work on their behalf. Upon the Carrier’s authorization the Authorized User will assign the Service Provider to the Carrier’s account.
When the Service Provider is processing a permit application on behalf of the Carrier, they will log-in to their account and select the Carrier’s account number from a drop-down list. The drop-down list consists of all the Carriers they are authorized to represent.
Note: The Account Number (No.) field is protected throughout the transaction and cannot be changed by an Authorized User.
The external user will be able to submit the transaction to an internal user at any point in time during the transaction. The external user will be able to quit from the transaction and select the Submit menu option to send the transaction to the internal user’s queue by providing following information:
·
Account
Number (No.)
·
Application
Number (No.)
·
Permit
Year
·
Permit/VCE Type from the drop-down
list.
External User can enter the following information, if available:
·
Transaction No.
·
Select
the Service Location from the drop down list.
·
Select
the Priority from the drop down list.
·
By
default,the Web Processing Status will be Pending.
·
The
user will be able to upload using Upload File Browse option.
·
Comment will be optional.
·
Select
Proceed to submit the transaction.

On the Web Processing screen, the user must:
· Click Browse to select the required file and click on Upload button
· Add the comment to the Comment box and click on Add/Update Comment button to save the comment.
· Once the document is uploaded and comment is entered, click Submit from the command line to process the application request for an internal review.
The Authorized User will be able to use the View List option to see all the pending submitted transactions on the screen.

Using the Pending Menu option, the internal user will be able to select the transaction submitted by the external web users. This screen will give only the transactions which were done by web users.
The Authorized User can sort transactions submitted by web users using the following parameters:
·
Account
Number (No.)
·
Permit
Type or Vehicle Configuration Evaluation (VCE) Number
·
Web
Processing Status
o
Approved
o
Closed
o
Denied
o
In
Process
o
Pending
·
From
Date
·
To
Date
·
Service
Location
·
Priority
·
Application
No.
·
Service
Provider Name/Client ID

The Authorized User will also be able to sort the transactions for all the options in the grid with underline.
To open a Work in Progress (WIP) submission the Authorized User has two options:
1. The Authorized User will click on the WIP link from the queue to start Work in Progress for the selected transaction and complete the required processing.
a. Once an Authorized User has updated the Status to Approved a notification will be sent to the external user to complete the remaining transaction.
2. The Authorized User can also click on the Account Number link and go to the Submit Screen to change the Status or Priority of the selected transaction from the queue.